The Girl!

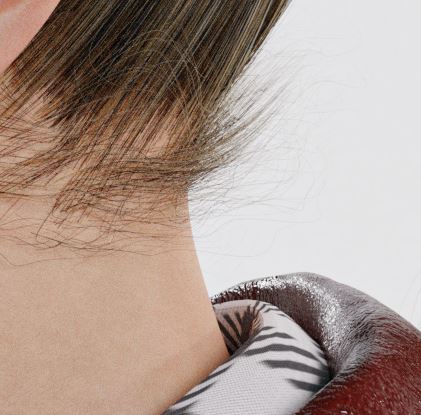
My Latest Personal Project that took me weeks to make.
I created her base mesh in Character Creator and her skin texture was made using a texture from XYZ.
I also used blender hair system without any addons. blender hair system is not as good or convenient as Xgen (Obviously!) but got my job done!


Update 1: How i made her hairs
so in order to make this topic useful for at least some people who want to learn blender hair I decided to explain my hair workflow for this character as blender users would love to know how make hairs!

as you probably know we need a base for hair to grow on. we can always use the original mesh or we can duplicate part of the mesh we want our hair grow on. I choose duplicate because gives you more freedom and you can subdivide the mesh without affecting the original base mesh. (this is true even you use XGen too)
for example this is my scalp mesh I duplicated from original mesh (always select a bigger geometry than you think because you can define hair growth areas with weight painting after this), after that you can create a particle system and choose hair instead of emitter.


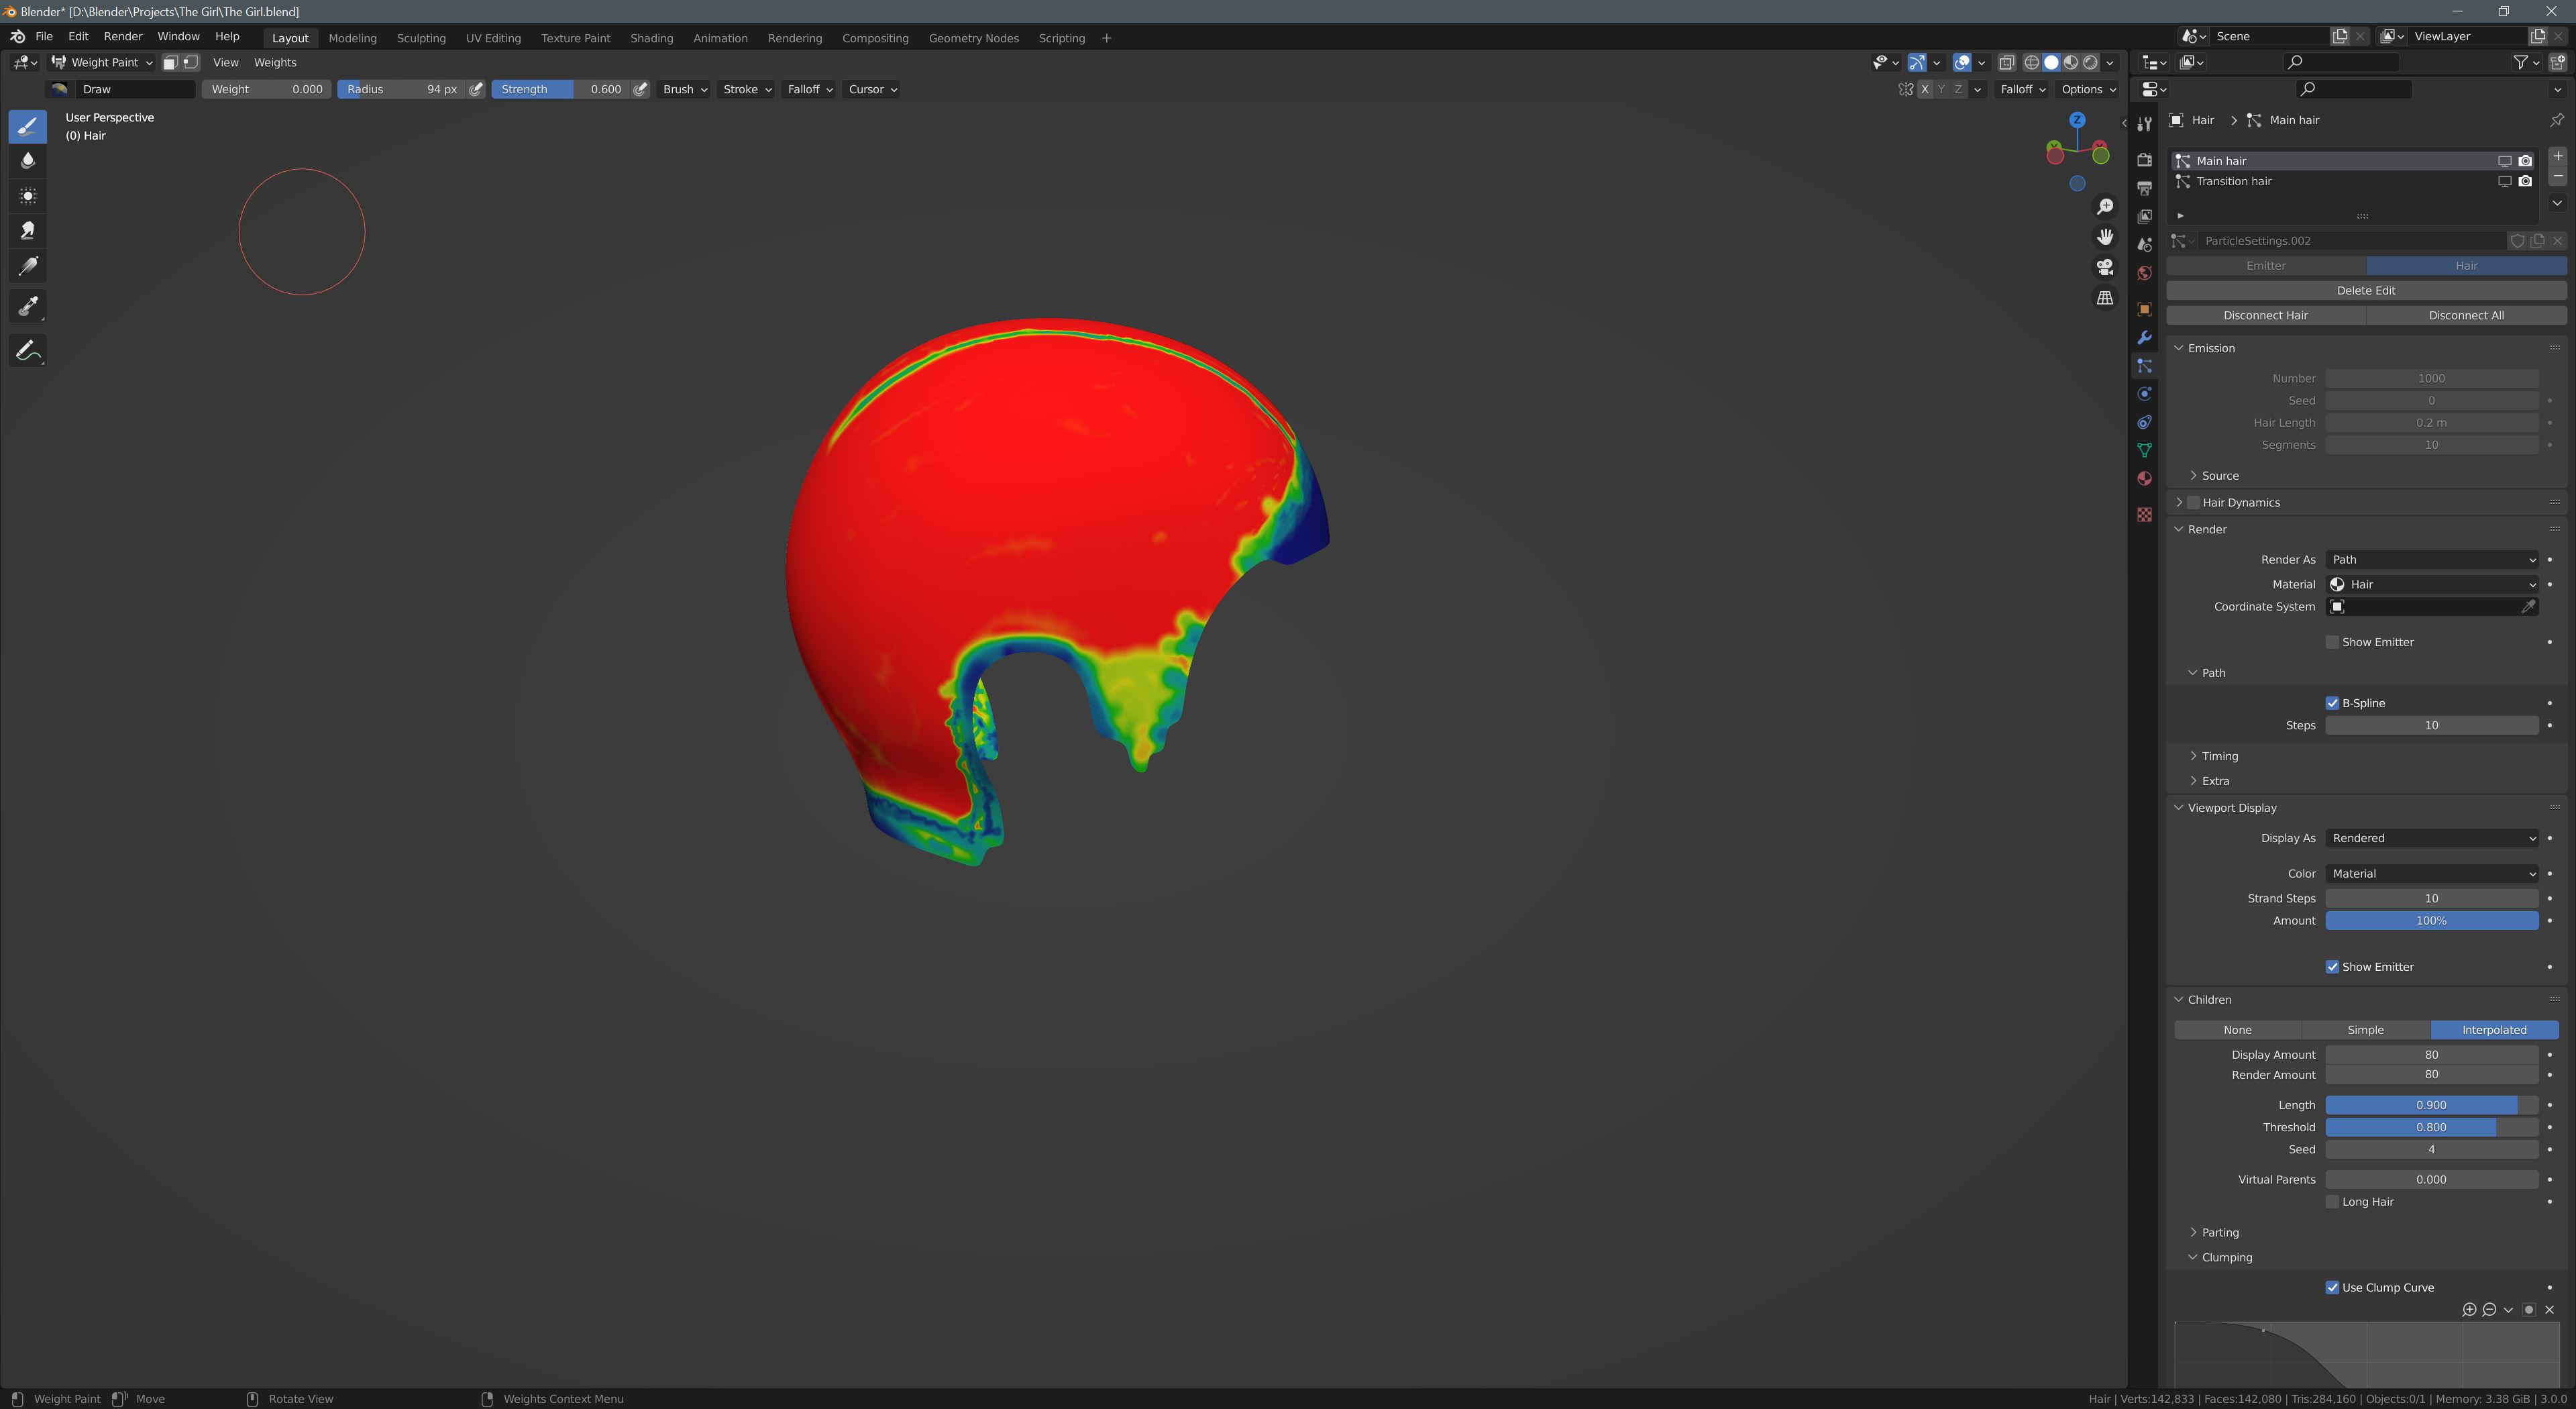
then you can start weight painting on your mesh in order to more precisely define where you want hairs to grow, as you can see red mean 1 (full hair) and blue 0 (no hair) and colors between mean something between 0 to 1.
then you can assign the weight paint you made (Blender call them Vertex Group) to your hair particle system: (also you can repaint your vertex group whenever you want and your hair system will update according to the changes you made)

zzz

for example define density and length of your hair by those weight paints you made
when you create hair first settings you would see in the particle settings tab is this:
aa

you donā€™t have to define your total hair number in here, these hair strands actually work as a guide for your hairs strands to define their shape, so you can choose 100 500 1000 and then we add children particle and with that we make our entire hair.
Hair Length is obvious but also you can change this later in particle edit too (no need to precise here).
segments very important as it define how many bending point each hair strand would have and you can make smoother curves with that (5, 6, 7 usually great)
before going to particle edition mode let me explain render and viewport display:

as you can see in the above picture in render you can define the material for your hair. if you are aiming for photorealistic i recommend choosing Principled Hair BSDF (you should choose Cycles for that as it wont work with EEVEE) for that make sure that you selected your mesh (that hair will grow on) and create hair material. there is a show emitter option for viewport and render each, that is very important if you duplicated your mesh as you donā€™t want the emitter to be shown in final render or maybe viewport rendering too (so make sure to uncheck that).
Also there is a strand steps option under viewport (default is 2, make sure that choose something like 5 to get a smoother hair shape in the viewport, but be aware that this could slow your viewport performance)

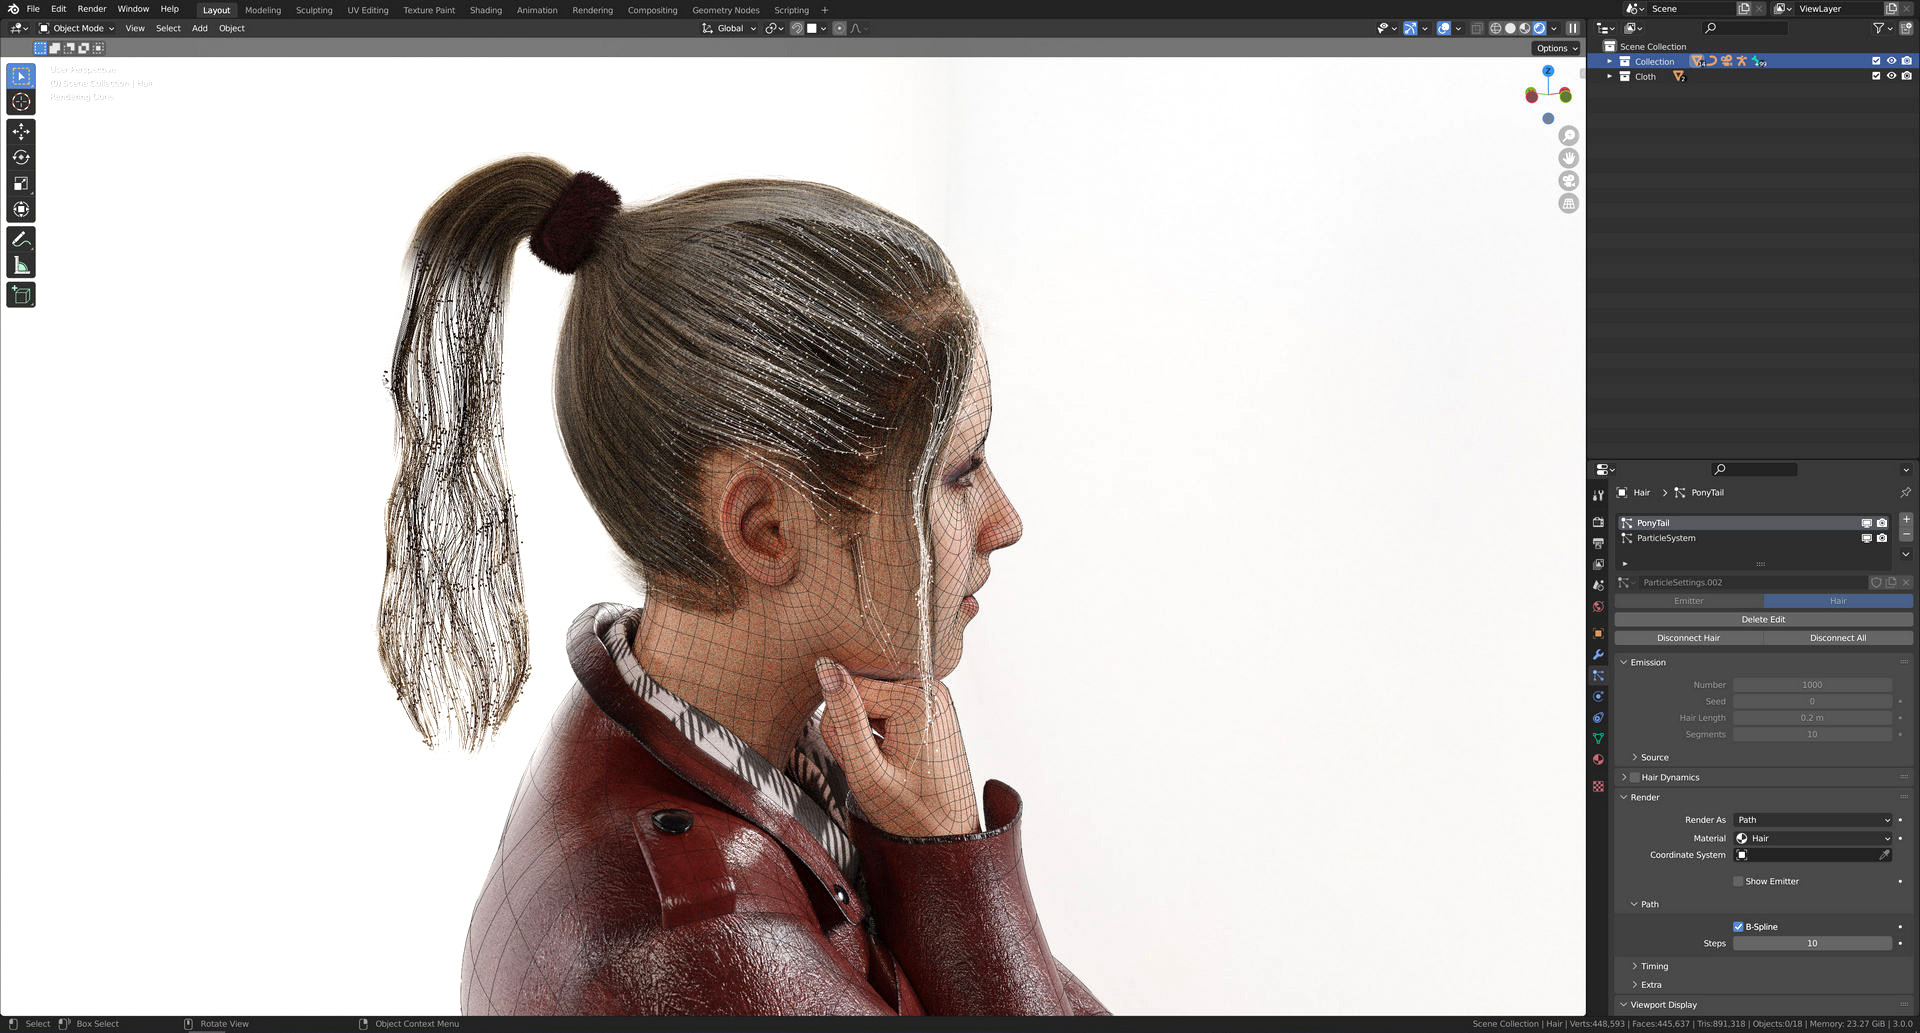
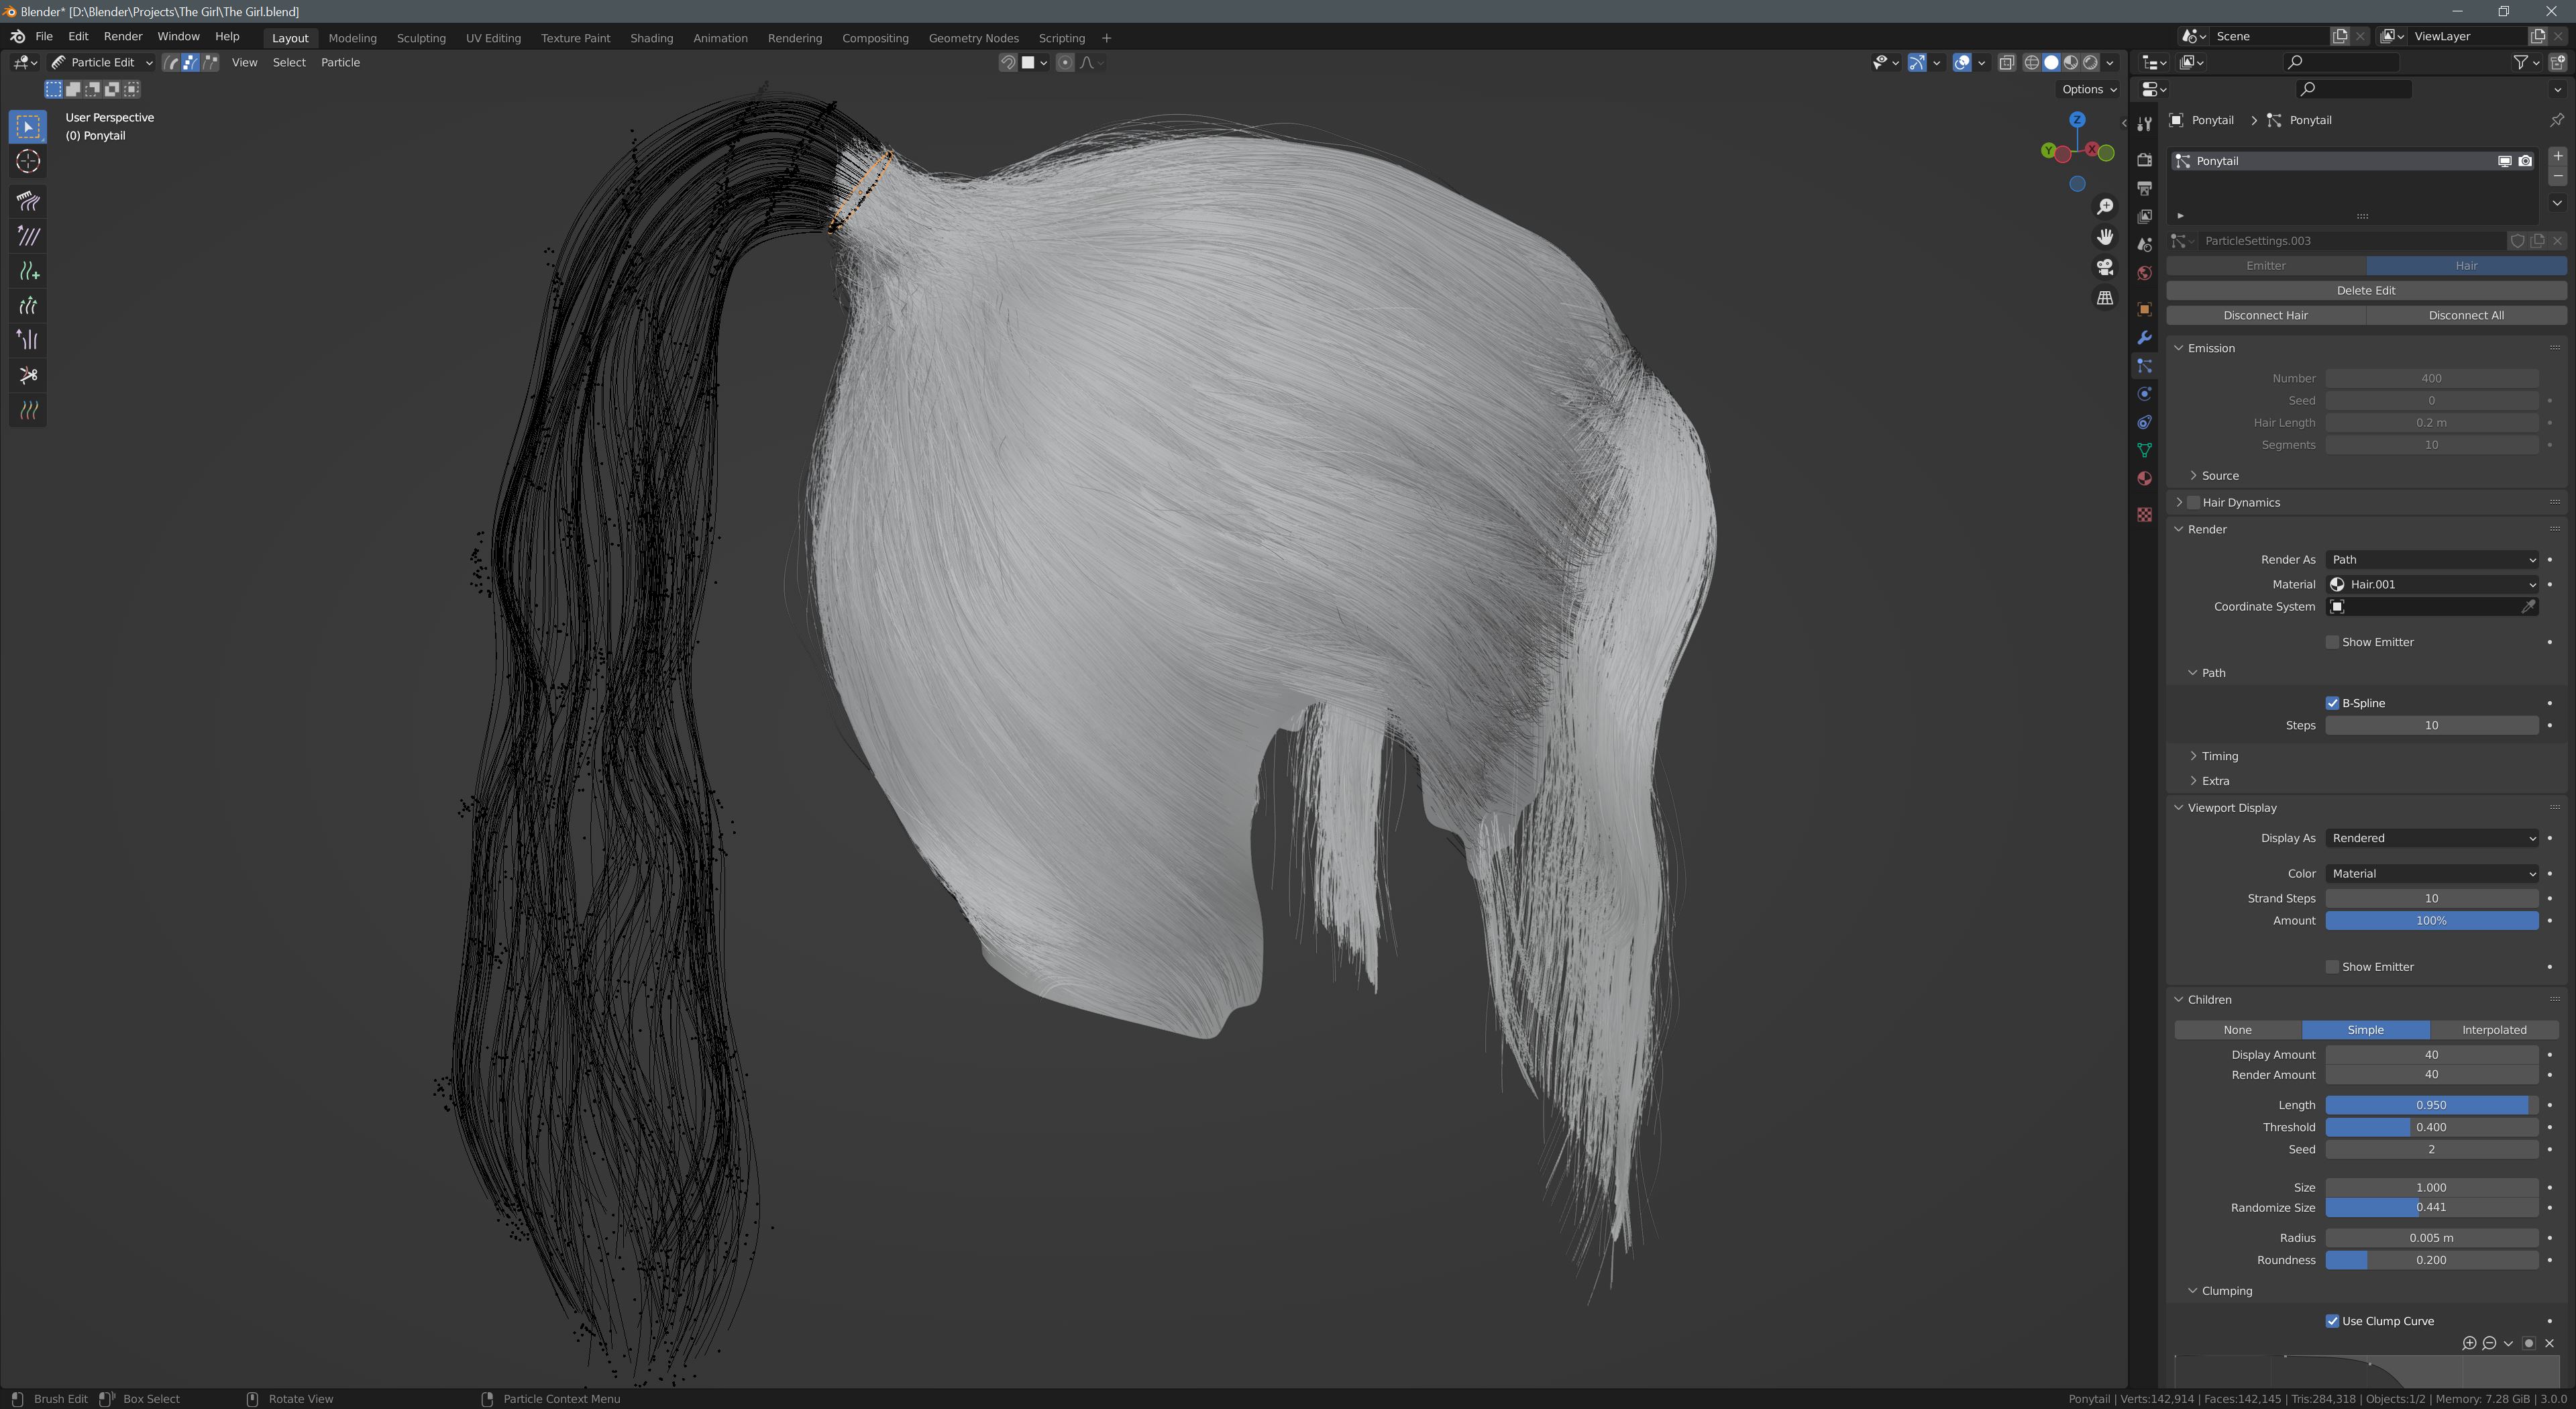
As you see we can use multiple particle systems to create more complex hair styles, for this ponytail style i made one for the main scalp hair and one for ponytail which has a different mesh that grew from (i hid it beneath the hair clip!). you could make the entire hair with one particle system but controlling that and styling it would be much difficult.
also i made transitional hair using another particle system and weight paint map on the scalp mesh:


2

it looks easy but believe me most of time children hairs donā€™t behave as you arrange them!
after these you can switch to particle edit mode (choose the mesh that your hair belongs to) and comb your hair strands and style them as you want (yeah this is the most difficult part and you should render it from time to time and see how it looks! and it takes a lots of time, RAM, CPU power and you could call it tedious!) also in this stage you can activate children from particle settings (definitely choose interpolated as it will distribute children hairs density/length according to the weight paint you made before) how many children particle? as much as you need.
Also hair shape (thickness of hair is important), creating clumps (i recommend using Clump curves not just values) and a little random roughness (in order to create flyaway hair strands) are very important for most hair styles. i used much more roughness for transitional hairs.
IMO the biggest weakness of default hair particle system of blender is itā€™s bad interpolation (generated children hair are not very good and usually do not behave as you would expect) and also clumps have very simple options that you canā€™t do much with them (contrary to XGen)
but of course this is blender and there is an addon for everything.

for the material as i said use Principled Hair BSDF (Arnod renderer has something very similar in Maya that people use in professional workflows)


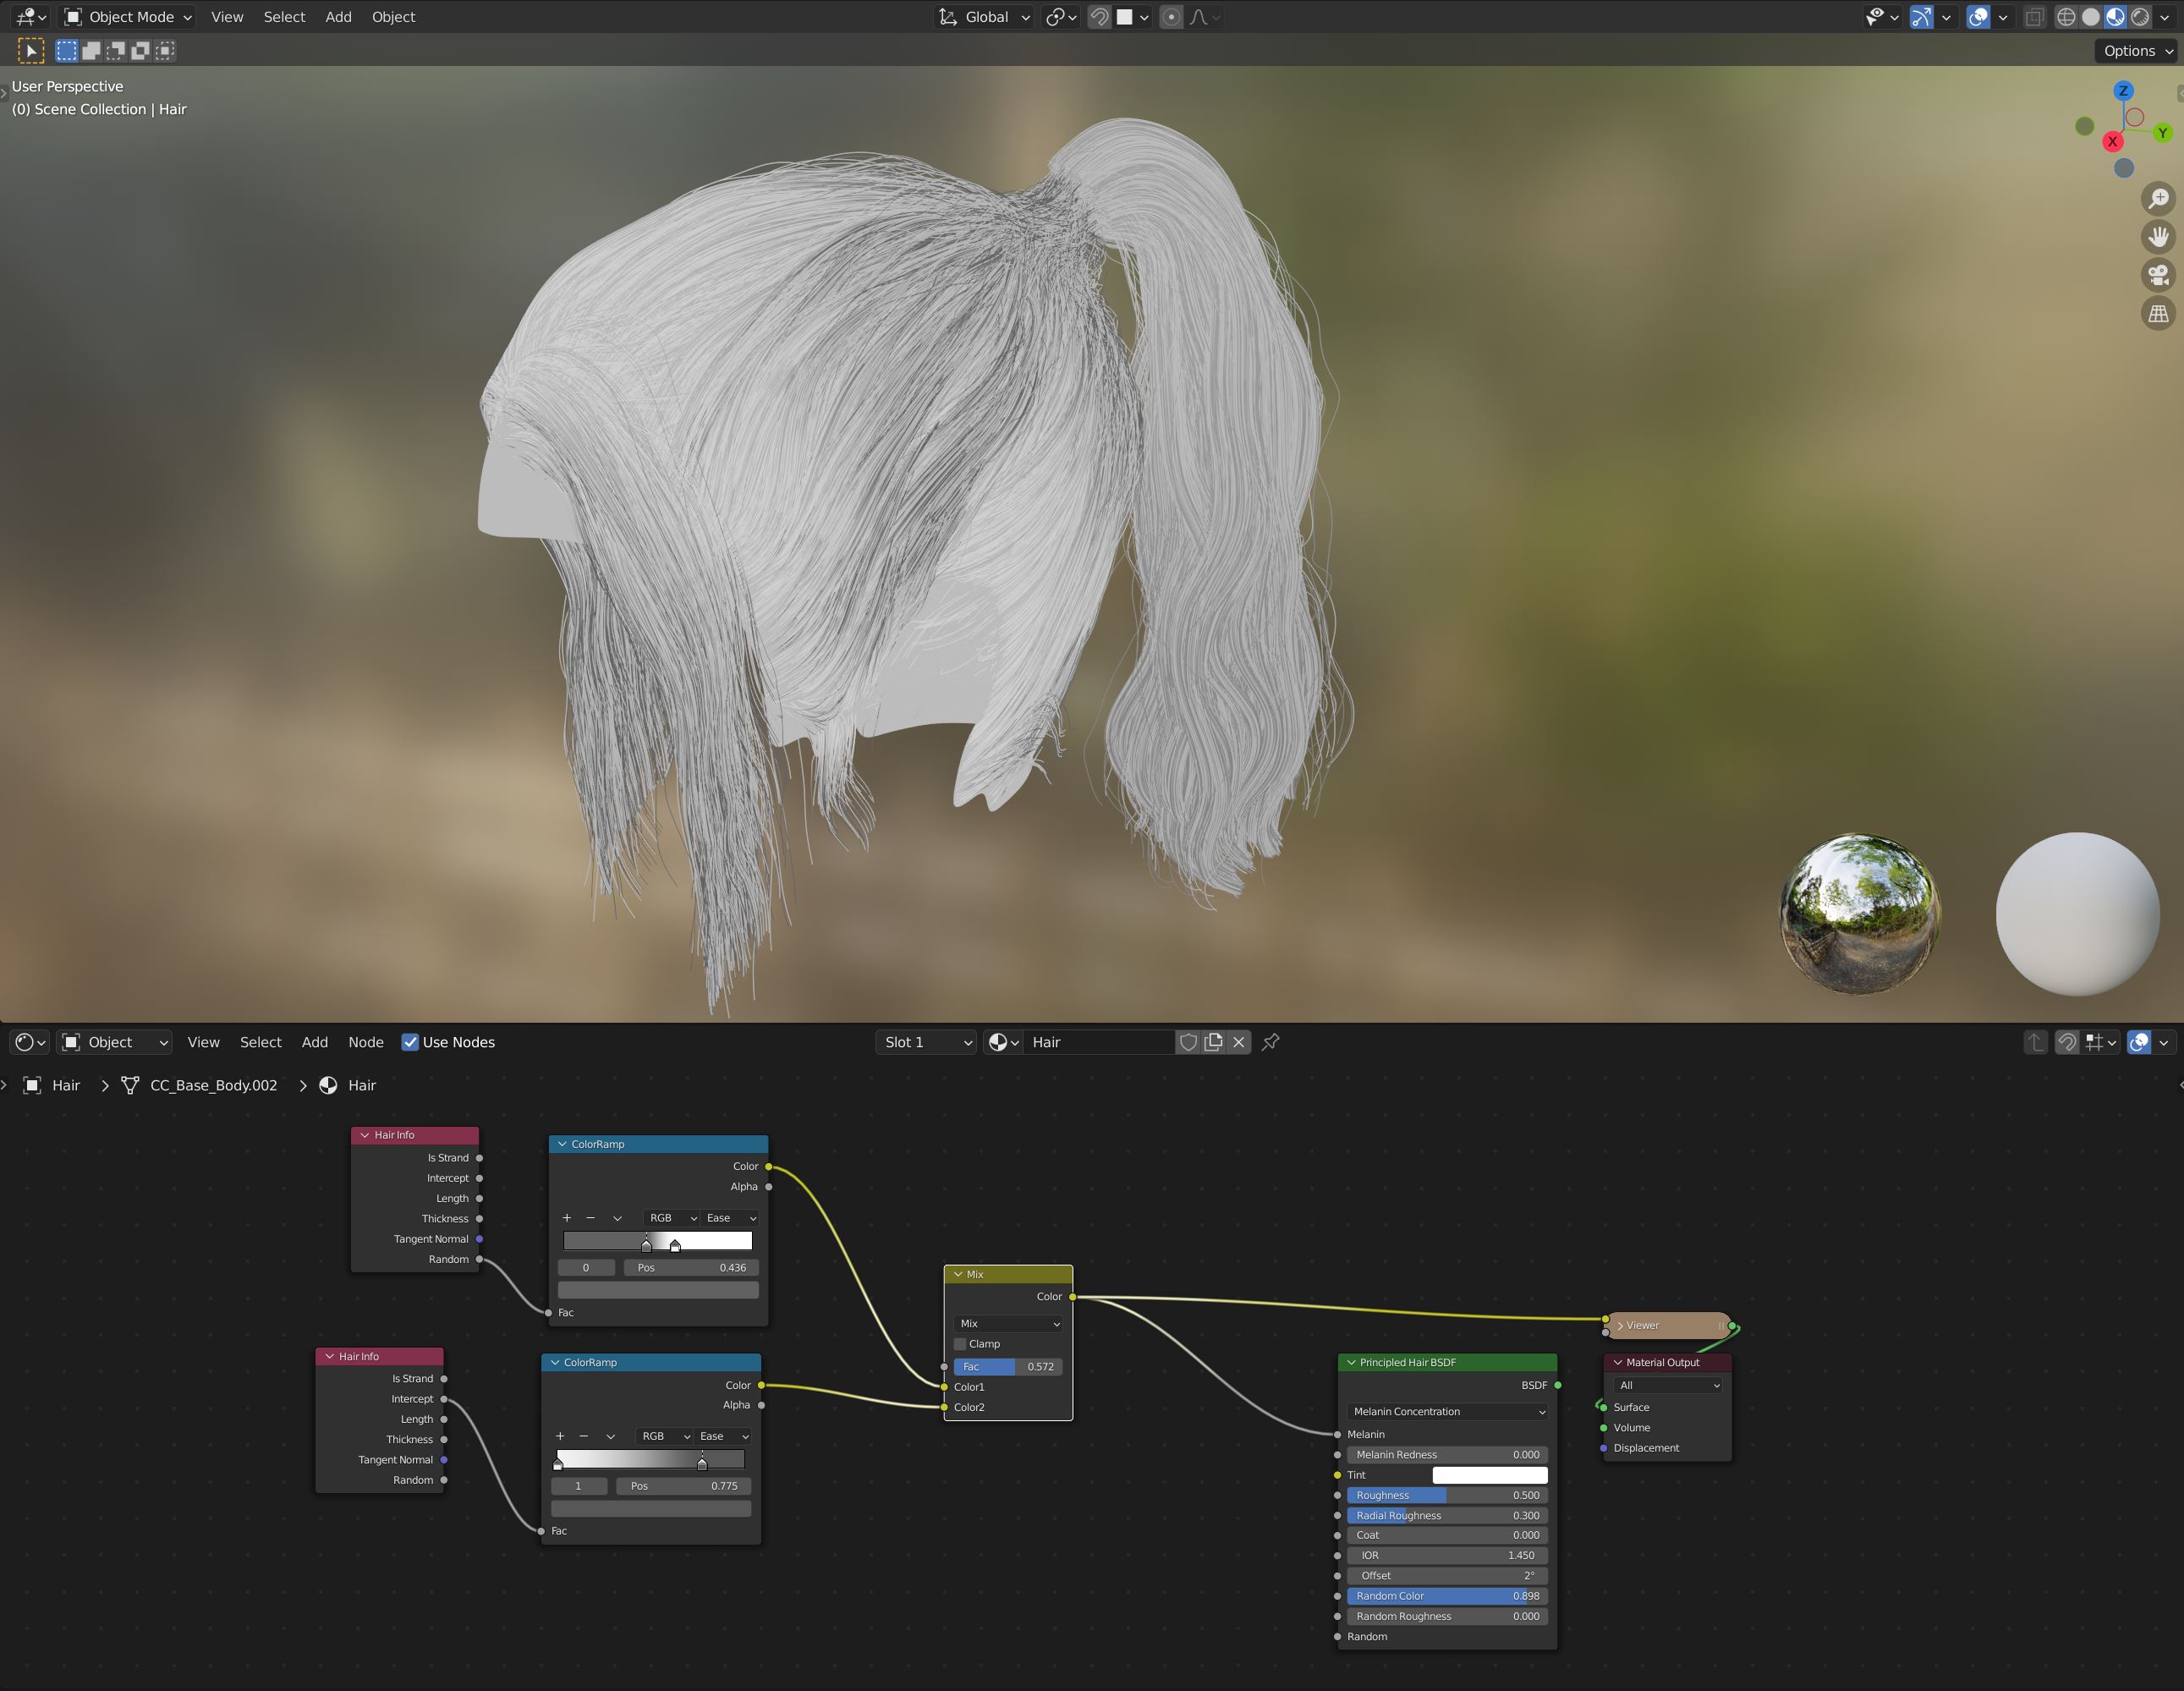
this hair shader has two main mode, Direct Coloring and melanin Concentration, i prefer melanin (gives more realistic material in my opinion). just know that melanin slider has a value between 0 to 1. values close to zero have less melanin so more blond hair color and values toward 1 have more melanin so get darker!
Always add random Color (using its slider) as each hair strands usually have slight different color. you also can add color variations to your hair (as in mine hairs root are more dark compare to tips that are brownish) using Hair info Node (intercept is your option if you want root and tip have different color) and Color ramp.
you want your hair dyed? choose tint not melanin

in case of eyebrows there is no difference in the steps except weight painting is much important as it will define your eyebrow shape which is very important. and in the case of eyelashes no need to create weight paint maps and choosing original face geometry would do the job. just remember that eyelash needs lot of clumps and no roughness!

Update 2: How I made her skin texture

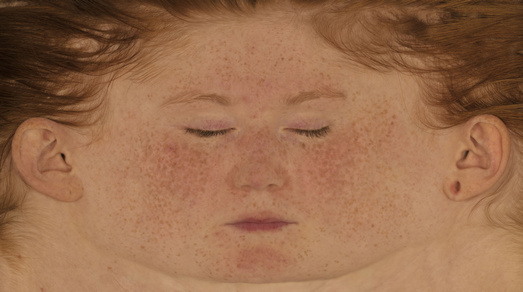
ok in order to make skin textures there are countless ways. for this i used a face texture from a website called Texturing.xyz which has an awesome texture database for creating realistic skin.
I had only one texture from this website in my archive which wasnā€™t very good by default, so i had to heavily tweak and modify it in order to be suitable for this character. (you can do a lot with one texture)
this is the original face texture:

q

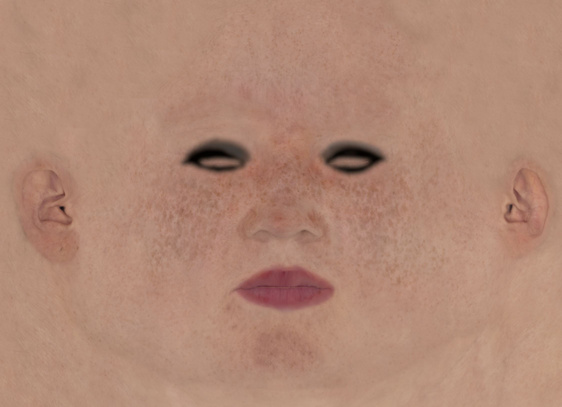
Using photoshop (Puppet Warp) and wireframe of my mesh i managed to align this with my UVs. i also removed her eyebrow and hairs, tweaked itā€™s skin tone, made her lip much bigger and reduce the amount of freckles. for eye makeup and lip boundary i used substance painter because in 3d you have better control about where are you painting on. also this can be done using blender texturing mode and with stencils but it is a little more difficult
This is my final face texture:
qq

I didnā€™t use any of XYZ displacement maps because already my model was very heavy and my system barely made through this!

I hope you learn something from this

Artstation Profile

39 Likes

Did you use Character Creator for this? Itā€™s a rather sudden jump in quality from your last character, and well, topology matchesā€¦

Thereā€™s nothing wrong with using Character Creator, but you seem to be implying you made this character from scratch, entirely in Blender except for texture painting in Substance (although, I thought the textures looked familiar, and the freckles match the Reallusion SkinGen promo really closely), so that does not appear to have been the case.

EDIT: This comment is in reference to the artistā€™s previous claim they had made the character entirely in Blender except for texture painting in Substance Painter. Theyā€™ve since retextured the mesh and credited CC.

5 Likes

Topology matches because I used the same base mesh, never said i sculpted her from a sphere!
and two things was wrong with my previous job, one was her skin texturing that was flat and not detailed and i spent like 2 weeks (8 9 hours a day) on that (this is the video Tutorial helped me a lot)
and the other thing was her hair that i spent around one week (8 9 hours a day) on that too
and BTW do you go to every topic in here and investigate how people created their work, started from what and so on?!!

These bases are used by so many artists you have to expect some people will recognize the obvious tell-tale signs in the topology and texturing that a mesh is a CC export. Nothing wrong with using CC - I used DAZ for years before learning 3D modeling, but thereā€™s no reason to lie about it either.

And you said ā€œAlmost all of the work done in blender except texture painting that [you] used Substance Painter for it.ā€ That certainly implies the character was actually made in Blender and textured in Substance Painter, not that itā€™s a lightly modified CC export that appears to be textured primarily with CCā€™s SkinGen plugin.

5 Likes

You may do disservice yourself when you beore said:

This may donā€™t matter so much here on BA but the Pros on Artstation will see this in an instant ā€¦

On the other hand your project was suggested for the feature row and this is not only some kind of promotion for (blender) artists but also some kind of advertisment for BlenderArtists (org) itselfā€¦ would be bad if in some other (social) media someone would state something like: blender fanboys are all fakeā€¦

I for myself will always favore the ones how give a glimpse into there abilities than those who just post a final image with no comments at all on any (un)social networkā€¦ (i looked at your AS but not Insta) because i cannot learn anything from them. Yours even showed me again that some ā€œsimpleā€ geometry may serve as shirt/jacket if the rest isnā€™t seen. So no need od something like Marvelous Designer or even the ClothSim from Blender (or any addons).

So if you used a generator but also tweaked the result: thatā€™s totally fine and maybe also an info about the possibilities or limitations of this generatorā€¦ so why donā€™t share even you thoughts about why you tweaked it or couldnā€™t tweak it with this tool itself? Somethink like an experience report about using it.

You understand? Nobody wantā€™s to have a bad aftertaste about something like this.
(To be honest i do like it anyway and i donā€™t remember if i liked (heart icon) it but now iā€™m thinking twice if ā€¦ ah liked it nowā€¦ and now please make a mini report about doing this. Maybe everbody can learn something.)

3 Likes

There is no need to get defensive over it. The whole point is to learn and improve right? I think you should stick to a sphere as a starting point until you get to the point where you can reliably produce such realistic characters similar to the ones made with generators. Otherwise, youā€™re not displaying your own skills, so whats the point of sharing them?

I wrote an article on this exact issue in 2018, where i argue against the use of generators, and when theyā€™re appropriate to use.

If your focal point of this project was the hair, and the lighting, then i could stand by it. But as you presented it, its the whole character thats the focal point, and with such major parts being generated, it feels disingenuous.

You also implied that your previous character project was ā€œsculpted in blenderā€, as ill quote you here:

That character too in fact, was based off of Character creator.
I think you should be far more transparent with your work, and clarify which parts of a project you did yourself, and what you imported. Because to me at least, importing a character and slightly distorting it, does not count as ā€œsculpting itā€.

Anyway, i really hope you dont feel attacked, if anything i hope you take this as a genuine lesson. If your goal with a project is specific, then noone will judge you for using external resources to fill in the rest, but then specifying those goals becomes important.

1 Like

Letā€™s try to calm things down for a moment: if claiming the model was made almost entirely in Blender except for texturing in Substance Painter was not a deliberate attempt to mislead people, and was a simple oversight, itā€™s not a big deal, you can always modify your description here and on Artstation to include crediting the Character Creator software, as you did Substance Painter. Correcting the mistake is always an acceptable and professional response.

If Substance Painter was worth mentioning for texture painting, surely the software that produced the base mesh is too?

I mean, I still notice a lot of similarities between SkinGen and your model, so at the very least, it seems like it was a starting point? If you were dissatisfied with the results you got with your previous character, well, J Hillā€™s technique has always felt a little flat even when he does it, his sculpting is just so phenomenal it makes up for it. You could try Artruismā€™s or Lukasā€™ videos for something with a bit more color variation and depth. And Magdelena Dadela had a major GDC talk on her techniques, followed up with a series of videos hosted by substance.

Thing is, that is literally why people use software like this. It may be more than a few clicks, but it actually IS a magical software that letā€™s everyone create great looking characters easily. That is the point. Again Iā€™ve used this kind of thing extensively myself - so I genuinely donā€™t have a problem with character generation software or third-party assets. But I also know what it takes to create a character almost entirely in Blender, because Iā€™ve done that too. Itā€™s a lot more work than modeling the hair, lashes, and brows. Hair is hard, but it isnā€™t ā€œwhat do eyelids even look likeā€ hard.

But if you want to be able to tell people you made your character almost entirely in Blender, well, you can learn it too: hereā€™s what I started with (Tip: set the speed on some of these to 0.25x). Dikko has a toonier style tutorial, but easier to follow. The mix of sculpting and poly modeling is easier than trying to do everything from a sphere.

As for the why,

  1. Itā€™s fun
  2. You can say you made it entirely yourself.
  3. Whatever you donā€™t like about your character generation software, you can do differently on your own mesh. Complete artistic control. Thatā€™s why the rest of the industry hasnā€™t abandoned making their own characters for CC and itā€™s like.

I think you raise some good points. Iā€™ll also give you credit for ā€˜owning upā€™ to using a character creator - but you should have been clear about that from the start. (Especially considering you were suggested for the featured row for this particular piece) - something to learn from going forward.

You mention archvis, and again, you raise a good point. But I feel like there is a general understanding with archviz regarding the use of assets from 3rd parties. As you say, not everyone is clear or transparent, and I think youā€™ve hit on slight a double standard which is worth noting, though again, I feel like there is always a general assumption with archiviz that some - or all - of the assets are from a 3rd part.

Regarding characters, this can be the case too, and thereā€™s nothing wrong with it. People will use whatever tools they can to speed up certain parts of the process. Be that using external cloth sims, texture mapping or painting - whatever. Itā€™s fine. The problem comes, when you claim to have made it yourself. Now, technically, pulling some sliders and stuff might class as ā€˜making itā€™, but I think the point is that character creation is a very long and time consuming process, and to do it well, takes a genuine level of skill and understanding. For someone not well versed to just come along, press some buttons, and say ā€œLook what I madeā€ - you can see why that might rub some people the wrong way, and I can completely understand it.

Regarding the sphere thing - I disagree with that strongly. Itā€™s a flex, nothing more; just to prove you can. I think doing it once - for that specific reason - is a valuable learning experience. But after that? No way. Just make a universal base mesh and use it for future projects. Thatā€™s what Iā€™ve done in the past. Itā€™s still my mesh, I still made it from scratch, but Iā€™m also saving myself 20 hours of work to get the base mesh for a character each time.

The general message here I think, is transparency to a point where it makes sense. Listing every piece of software you used, every addon, every image, etcā€¦is unnecessary. Just be clear about certain things.

ā€œI used X-Gen for the hairā€
ā€œI sculpted her in Zbrushā€
ā€œI used Marvelous Designer for the jacketā€
ā€œI used [insert character creator] for the base mesh - the clothes were modelled from scratchā€

Things like that. Itā€™s a very quick and easy way to let people know what you did and didnā€™t do, and itā€™s based on assumption.

But I really hope this doesnā€™t dissuade you. It took me 10 years of Blender before I finally cracked character creations, and in the end, it was all about understanding the work flow, not necessarily the ā€˜skillsā€™ needed. There are tons of resources out there to learn from - if you do actually want to make your own characters from scratch.

I wish you luck! :slight_smile:

2 Likes

What is this fighting for ? Isnā€™t there enough war in the world?

X: Here is my work done inā€¦ and withā€¦
Y: Did you used ā€¦ becauseā€¦ but you seem toā€¦
X: I usedā€¦ but never said i did fromā€¦ BTW do youā€¦
Y: nothing wrongā€¦ i did alsoā€¦ but you saidā€¦
O:ā€¦disserviceā€¦
X: ? << cynicism >> ?
Z: ā€¦calm downā€¦
ā€¦

Stop this spiral iā€™m getting dizzy.

Something was usedā€¦ fine. Now even everybody knowsā€¦ fine.

We grow on challenges and experience. Next time we all will do different.

1 Like

Simply put, if it is the main subject, mention the origin, else mention it optionally. If somethingā€™s contributing much to the scene, mention it, otherwise do it optionally. That keeps you off from trouble like this.

I personally donā€™t care if people use tools like Character Creator without citing it. The problem really still is that you said you made it almost entirely in Blender except in Substance Painter when that statement is simply not true. I really donā€™t know how to explain this in a simpler way for you to understand. Why are you so angry at the idea that you shouldnā€™t say itā€™s made almost entirely in Blender when itā€™s not? Thatā€™s what I really donā€™t get.

Like, you know what a lie is, right? Because thatā€™s the problem, you lied about making the character almost entirely in Blender with the exception of texture painting, and then you got angry when I pointed out it was from CC, and now youā€™re acting like everyone else is just too new and inexperienced to understand that this is how real professional artists behave? Because, itā€™s not, usually they say: I made the hair, character by X. Or I cleaned and retopologized the scan, clothing modeled by Y. And they donā€™t have to because unless they said I made this entirely myself (which they wouldnā€™t), weā€™d assume the groom artist just did the hair model. And when they donā€™t, they donā€™t say they made parts of it themselves they didnā€™t.

You donā€™t necessarily need to break down every step of a project, just donā€™t make statements about itā€™s production that are simply and verifiably not true. If your workflow is so professional, surely you can admit the third software you used?

No, but if they upload an image of that asset and say ā€œI made this entirely in Blenderā€ itā€™s not true.

No, but what you did is the equivalent of saying ā€œI didnā€™t use any addonsā€ when most of the assets came with, or are paid additions to, an addon.

Sure, but donā€™t lie about how you reached the goal. Thatā€™s all anyone is saying. I donā€™t understand why this is confusing or upsetting to you.

TLDR; The only problem is you said you made it entirely in Blender, except for texture painting.

But you did not make it entirely in Blender except for texture painting. You then got angry that people think you shouldnā€™t say you made it entirely in Blender if thatā€™s not true. Youā€™re not being held to a different standard then anyone else, you are only being asked not to make statements that are not true.

certainly this is your opinion!, there are people in the industry that put their entire career on just making hairs, so obviously sculpting eyelids are not necessarily harder than making hairs! (trust me i dont know why this is written in bold font!! bold is off)

I updated my original post with explaining how I made those hairs, since this is a blender community maybe people in here are interested in blender hair and how it works
I donā€™t see any reason stretching this conversion anymore so good luck and i hope my original post at least regarding how I made hairs be useful to some of you guys.

peace! :slightly_smiling_face:

Its not a rule, per say. But its strongly considered bad practice.

Here is an example from 24d ago, where i transparently mentioned that a portion of the work was imported. Because the gorilla was a focal point.


You are right, noone works this way in the professional world. But everyone doing professional work, has probably done it 50-100 times already, and know the process. The point is to learn and improve.

3 Likes

of course, but trust me if you know nothing of topology, normal maps, Displacement maps and how all these works under the hood in order to create a character you certainly cannot get good results from generators we are talking about in this topic either. to be honest i never saw someone that is a complete beginner in 3d using CC, DAZ etc and get good results. :slightly_smiling_face:

I was talking about groom artists when I mentioned artists who make hair, I know they exist. I believe I even mentioned specifically how professional groom artists donā€™t say they made the entire character themselves when they only made the hair. But I do see youā€™ve modified your description here to remove the statement about making it entirely yourself in Blender. Donā€™t forget Artstation.

I see that my point about the minutiae of sculpting correct anatomy confused you, but letā€™s ignore that, and instead clarify that I was trying to say modeling a complete character including hair, is more work than just the hair.

May i ask specifically, what is it that you aspire to be, or display yourself as?

Is it a light artist? Or a Character artist? What lable would you say fits you the best.

I get your point, eyelids are brutal :stuck_out_tongue: I was about to rant about comparing equal skill levels when evaluating difficulty, and iā€™d put anatomy very high up on that list.

1 Like

As you probably saw my portfolio (not here, artstation) i started with blender (BlenderGuruā€™s Donut Tutorial) and then i went to try different fields of 3D like sculpting, box modeling, Archviz, texture painting, Environment, lighting, character creation. I just wanted to find my passion as you can not get good in all of those fields, so i tried them and for me Iā€™m pretty sure character creation and texture painting is the one Iā€™m going to pursue and I know it is probably the hardest as people who even know nothing from 3d or CGI would easily see any flaw in your character so it is hard and unforgiving (contrary to something like archviz)
I usually work 10 12 hours a day (i would spend more if i could) because i love creating 3D Art and for me it is just pure enjoyment!

Ah so generalist.

That very much validates the use of base meshes for practising things like hair, texturing, lighting etc. I was slightly concerned that you wanted to lable it ā€œcharacter artistā€, in which case i had a rant planned out in my head :stuck_out_tongue:

1 Like