The front legs look like it’s just one long bone to the feet instead of 2 with a joint in the middle, the wings also look a bit small with no wingbones.
But I know you’re learning Blender, keep at it.
The front legs look like it’s just one long bone to the feet instead of 2 with a joint in the middle, the wings also look a bit small with no wingbones.
But I know you’re learning Blender, keep at it.
Now it’s alot better. Still, front legs and feet are too human. Also, it’s still gray… lol
Many problem with topology, I screwed it up , fortunately from the inside of the leg.
Generally I have a very hard time with the legs. But I try my best.
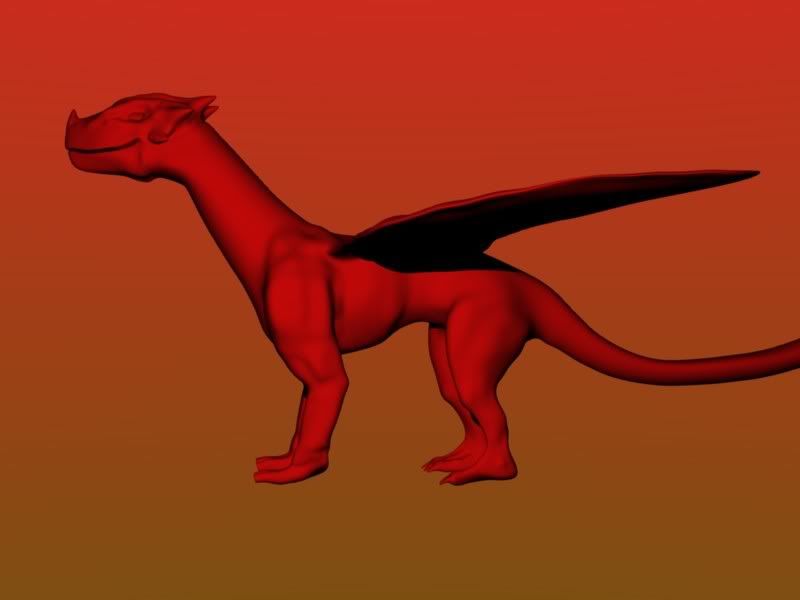
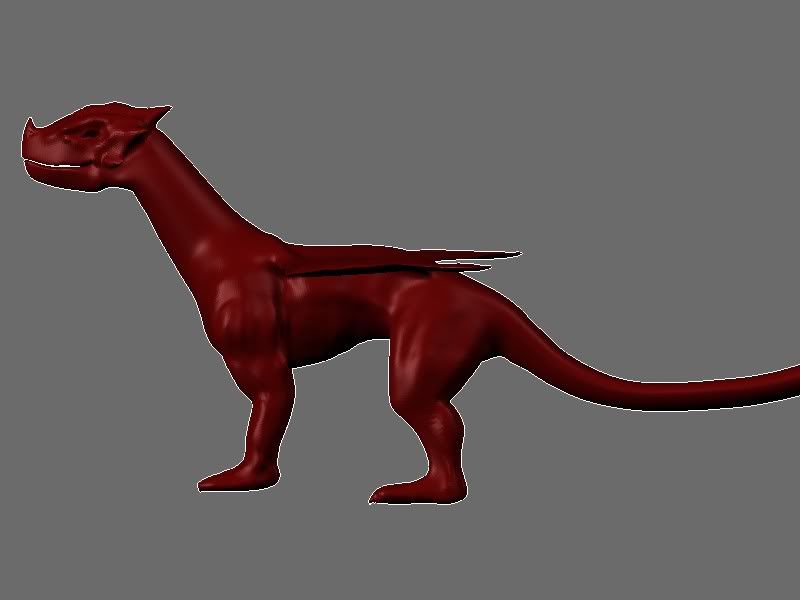
Hey at last it is RED!!! LOL
Thank you for your comments , yeah the legs look a bit too human , not that this a bad thing per se , I would love to bring some human look to the Dragon , but still need alot of modelling. I hope you like the corrections.
This makes me want to cry, ive been doing blender for months now and i cant even touch organic shapes. any tips?
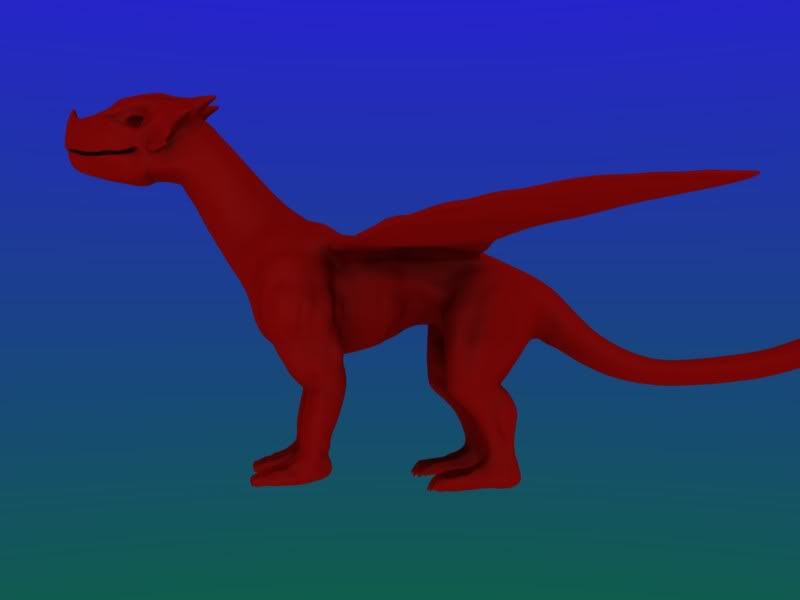
Wow, you should use a different background to better show off your work though.
(I would recommend green, because complementary colors do wonders:spin:)
Yeap… I have several
Start a WIP thread for an organic model. People here make loads of useful suggestions, I will be there to help you as well.
Another suggestion is to use reference all the time.At all time look at reference pictures to make sure you know 100% what you model, and that means you understand how the topology works
Sculpting tools are highly recommended for very detailed models. Unfortunately , multires is not as editable in term of topology as subsurf but it still remains easier to handle for modelling loads of details. 2.5 will made multires editable and will sky rocket blender sculpting tools so it is good idea to start getting used to them.
Loads of patience, expect going back and forward all the time. Correcting mistakes is a slow and lenghty process. But it is one way street if you want to learn and become better.
Well I was rather pessimistic about this Dragon , I am glad people like , but still there so much that need to be done.
I agree the background mixes with the main material , probably need to change it. As always advice is both useful and helpful , I am glad I started a WIP thread.
I would like to thank you all for your help.
Another update, the 4 feet are almost done , created several muscle tones for the torso as well, fined tuned the head abit , have not touched yet wings, neck and tail. Replaced the light , included AA and changed background for easier viewing.
I am open to any suggestions. Enjoy !
Next step
Here is a viewport real time rendering with no aa and light. AA destroys my muscle tone, still too noobish with it.
It looks good!
The muscle on the lower hind leg is good. On the upper leg it goes in the right direction but something is funny. I think it’s too edgy but I can’t put my finger on it, really bad render ( don’t use red for showing a sculpt render, use light gray and use AO as it puts more stress on the sculpted parts ). Front legs are a mess what goes for muscles. I don’t know why but the model degraded over the course of action so far. Earlier versions looked better even with the lack of muscles 
EDIT: Also I think the narrowing down near the hips is too much. Looks like one of those under-nurtured fashion models
The muscle on the lower hind leg is good. On the upper leg it goes in the right direction but something is funny. I think it’s too edgy but I can’t put my finger on it,
The viewport render you can see the muscles more clearly , but it wont matter so much because when I texture it , I really doubt whether the muscles will play any role. I intended to create a bump map for the scales and small details so , the muscle tone will most certainly move to the background.
really bad render ( don’t use red for showing a sculpt render, use light gray and use AO as it puts more stress on the sculpted parts ).
I have less than a month that started blender , have not touched rendering and materials . Obviously need alot of work in this department. I have tried AO but it is too slow for mytaste and creates those noise effect that I do not like. I prefer AA, but I guess needs to tweak the material better , maybe it wont matter after I start texturing the Dragon. Will see.
Front legs are a mess what goes for muscles.
Would help if you could explain why , so I can fix. I agree that the modeling is not great but I do not see any mess.
I don’t know why but the model degraded over the course of action so far. Earlier versions looked better even with the lack of muscles
Again disagree, I prefer this version obviously that is why I moved it toward that direction but if you tell me what you do not like and why , I will improve it and move it to the right direction.
EDIT: Also I think the narrowing down near the hips is too much. Looks like one of those under-nurtured fashion models
Are you talking about the front or the back legs, sorry my English is not my mother tongue. I guess by talking about “hips” you are talking about back legs.
I am not making all this up from my head . I do some freestyle but also I am based on these two references.
As you can see the hips are considerable fatter than the lower leg.
Thanks for taking the time to write such a lengthy post for pointing me to the right direction.
It looks good!
thank you minifig
I think he’s talking about the Subdivide tool in Mesh Tools. What everyone else is talking about is the Subsurf Modifier in the Modifiers panel (F9 for both).
Also, from what I can see so far, the degredation of the model could have to do with poor topology and lack of proper loop cuts in the mesh.
I think he’s talking about the Subdivide tool in Mesh Tools.
That is exactly what I am talking about.
What everyone else is talking about is the Subsurf Modifier in the Modifiers panel (F9 for both).
Yes I am aware of subsurf , since is the feature that the majority of users are using. But I am coming from Zbrush , and have been scultping for many years I see no reason why I should return back to subsurf, unless I am doing something more mechanical.
Also, from what I can see so far, the degredation of the model could have to do with poor topology and lack of proper loop cuts in the mesh.
No , poor topology does not affect Sculpting that is Subsurf limitations. With Subsurf modeling it is more difficult to corect mistakes. For example if you put a loop cut close to another one , most likely you create a colar bumb on the surface.
All these can be solved easily with the smooth brush in sculpting , and generally when you are in sculpting mode , you will work strictly quad polygons and that makes it alot more limited in polgon distribution in a sense that you will work mainly with high polygon model so it wont matter so much if your model has more polygon in one are than the other. Because you work with brushes not draging and droping points.
The screwed up topology I was talking about , you cannot see it is from the inside of the front legs. I accidently left a triangle there when the model was still extreme low poly , do not how, but it messed up my topology in the are when the inside of the leg meets the torso. Hopefully that area will reamin invisible to the viewer during the animation so I am not that worried.
How to describe this best. On the front legs the muscles feel “tacked on”, like some child in a sandbox slaps a piece of sand on a sand castle. So the area where the muscle meets the leg is harsh, nearly edgy. A muscle though is smooth as it is like a bulgy something pushing the skin outwards and while the skin is a sort of tissue it is pushed out in a curvy way not an edgy way. Difficult to describe this.
What goes for the hip I talk about the diameter of the torso in this area compared to the diameter of the torso in the area of the shoulders. The hip torso diameter is nearly 50% of the shoulder torso diameter which is huge. This is what I call the “under-nurtured fashion model” problem. This can be a artistic tool for certain models ( for example some starved out undead for example ) but looks ( in my opinion ) silly on a dragon unless he’s supposed to be on Lenten fastening.
But I see now where you are coming from. I didn’t realize before you base yourself on the DnD drawings. I would though suggest doing your own design leaving those ( broken ) designs aside. You are doing this for a particular project and I think it’s worth more to make something “out of the line” for this one inspired by yourself. You’ve got the creativity for that no doubt so use it. I want to see a original red dragon in a cup not a DnD ripoff 
EDIT: And yes, Topology has influence on sculpting. Blender is not Z-Brush and therefore has it’s own problems and limitations when it gets down to sculpting. It’s a modelling application first hand not a sculpting application as Z-Brush is. In Blender the two worlds do mix and can give you some headaches if you try to use it as a pure sculpting application.
I am not ripping off D&D dragon for my design , D&D dragons are ripping off my design LOL. There is just an agreement between my intended design and D&D design , I never said I was aiming for that , it just so happened that these references look very closely to what I am aiming to achieving, if some people do not find this original well tough then , I am going to live with that. But that is the type of Dragon I like.
Also I have to strongly disagree that Blender is not ZBRUSH. Blender IS Zbrush. It is quite obvious to me that the majority of Zbrush Features have been cloned. It may not support the amount of polygons the Current Zbrush supports or have all the Zbrush advanced features but neither did the Early vesions of Zbrush I used (version 1.5) , this did not stop early zbrush users like me in using zbrush solely as a scultping tool , I fail to see why it should stop Blender users doing the same. Actually that is exactly what I have done with Blender so far. It is my belief that Blender sculpting tools can kick subsurf a$$ any day (except mechanical modeling or hybrid modeling with creased edges like car modeling) . Can’t wait 2.5 fo editable multires, it will be loads of fun.
I agree that muscle tone needs more work. Maybe it looks too human , probably looks too edgy, but it is my problem not Blender’s scutping tools problem.
As I always thanks for taking the time , explaining to me what you do not like. IT is really helpful to hear other point of view , it keeps me open minded.
Kilon, you need to listen to what Odjin and I are saying about the topology. We have both been using Blender far longer than you and know what we are talking about.
All “sculpting”, in Blender, is doing is manipulating vertice points. If you do not set up the edge flow in your mesh properly, you will run into some improper distortion if you try to go against the flow of the edge. I’m really glad you like the sculpting feature in Blender. I like it very much myself. However, the fact remains that Blender is a polygon modeling program first and foremost. If you don’t take this into consideration, you will run into trouble with the sculpting part.
The reality is, you are pushing and pulling vertice points, you’re just using some fancy tools to do it. Almost like a fancy proportional edit.
Also, look at any 3d character used in professional film, all have very good mesh topology, I have no idea if studios use zbrush for details, but regardless the topology is still great.
We all have something to learn, a good way to run people off is to tell them they’re wrong when, in fact, they are not.
I have to admit I never took 3d art very seriously , I mainly messed around as a means of relaxation. But I have being messing with 3d apps since 1997. I learn about good topology rule from the first year. It is an excellent rule for most mesh tools. But scuplting is totaly diffirent world.
In Zbrush there are no means of controling topology , there is a subdivide tool and that is it. No mesh editing , no edge selection , no subsurf nothing. Obviously Zspheres give more control over topology , but Zspheres are a recen addition to Zbrush. And Zspheres are too basic compared to Blender mesh tools. However there is never an issue of topology because you are always work with high poly count model with only quad polygons. The most standard topology. You have no means of screwing up the topology.
Zbrush and all the similar (mudbox , etc) nowdays are considered a standard for high poly organic models. Especially in creature desing it has the monopoly.
No sculpting has nothing to do with pushing around points, and is not the same as proportiante tool. Scuplting look alot like Drawing and is as fast as drawing. To do the the same as one scuplting stroke in mesh editing even with proportiante tool enabled will require several moves and clicks.
I wont mind repsect to other people experience , if they also respect mine experience. If some choose to believe that scultping is nothing more than a fancy pushing and pulling around points , then it is their choice. But certainly this is not my experience with scuplting.
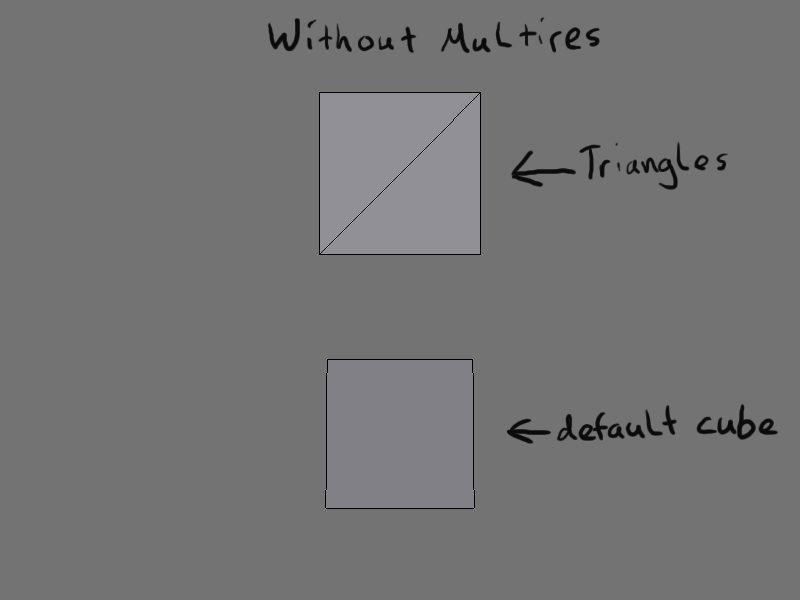
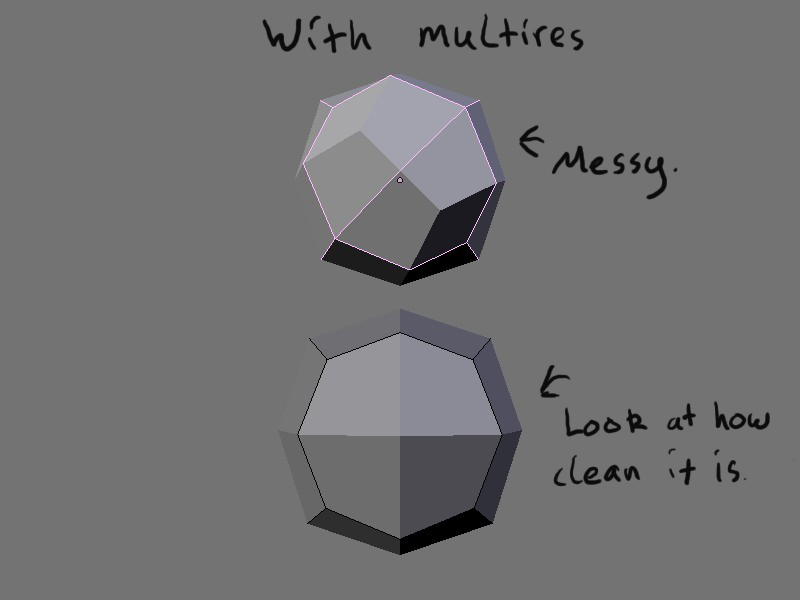
You think sculpting isn’t manipulating vertices?? Try taking a simple 6 sided box. Do not add a multires layer, go into sculpt mode and try sculpting. The part of the box that will change is where the vertices are at.
Maybe Zbrush handles things differently, I don’t know. I do respect the fact that you have experience in other programs. The fact that you think you can simply throw a ton of poly’s at the model to make it look good speaks that you use Zbrush. This isn’t Zbrush, you aren’t listening, I’m through wasting my time.
I’m out.
If topology doesn’t matter then please explain these photos.
It does matter, listen to what these people are saying.
Sculpting in Blender is does just manipulate verticies. Depending on your style of Blendering, sculpting may be much easier for you than moving each vert individually, but it’s the same thing.
-Funddevi