I do not see why you are offended or annoyed by my reply. I have been polite from the start to all people.
Yes sculpting can be used for moving points around, but its intended use is for high polygon models. You wont see many people using zbrush for game models , or other low polygon models unless we are talking about creating normal maps. With lower poly good topology is crusial because you have to make absolute sure that the edges end in the intended area. But with high polys from 500,000 and more it is not important because anyway the topology is there are so many polygons that the end result will always be smooth. With scultping you work with digital clay , and to achieve this clay effect you need a high polygon count, in sculpting wireframe , edges and points are not important , only digital clay matters. Of course it may create problems with animation , but even then it will largely depend from the models topology but if you follow a basic box topology you whould not run to any problems.
I was doing load of subsurf modeling before going to zbrush in 2002 , the biggest reson why I abandoned subsurf was because of the topology problems. It is a pain to make a clean topology for the Catmul subdivision to work properly. Even adding an edge loop to wrong position it was easy to screw up your mesh. Sculpting has not these kind of limitations , but on the other hand it does not allow for the level of control that mesh tools allow , it is alot more abstract like drawing.
The Sculpting tools of Blender not only look same as Zbrush, they behave the same , they are even named the same. The only diffirence is that Zbrush has more more tools in the sculpting department. I had no problem transitioning from zbrush to blender. Many other ex-zbrush user have reported the same.
I have to agree topology is important, if you have a mesh full of triangles and oddly placed poles you’re going to get a lot of subsurf and sculpting artifacts, you can try to sculpt to fix it but you may run into problems later on.
How Blender sculpting works is that you push and pull verticies that are both part of the origional mesh and what’s created by the multires feature, it’s just that it feels like drawing because at a high multires level, the verticies are really close together and it looks like a fluid stroke.
please read my previous posts. I make it clear several times , triangles with sculpting is really a bad idea. It is impossible to create triangles with zbrush. Actually to be exact triangles are a bad idea for any kind of modeling.
EXCACTLY and that makes topology less and less relevant , the more polygons the less relevant topology is. I have never seen any artifact created with sculpting , ever. If you model is high poly and using quads only then you should not have any problem .
Except for the GE, but that is an entirely different matter…
The GE has to convert models to tris for calculation purposes, so modeling low-poly with tris is good for the GE.
Modeling with tris for a model or animation is a bad idea though.
Heh, you posted while I was posting about the same thing.
Well you can still get less than steller results if you don’t know how to work it well with the brush and the tools, because Blender doesn’t just pull and push along the normal of the origional multires mesh before sculpting like other sculpting apps, it pushes and pulls along the normal of the faces that were manipulated by sculpting as well, that’s why you can make a high bump on a flat surface, then inflate the top in all directions like a balloon.
Incorrect. Triangles are a must in low-poly modeling.
A number of useful tools like loop cuts and a few UVMap options are not as useful if you try to model in triangles, though that is different if you model in quads then convert to triangles, the BGE doesn’t care if all your models are quads, I thought I heard before of cases the BGE isn’t as fast with large all triangle meshes?
Actually , to be precise a necessity for achieving the least amount of polygons. Other than that they are a recipe for disaster. If you can avoid them , avoid them .
There was no multires in the early Zbrush versions. What you describe is standard sculpting functionality. I have not experience any difference between Zbrush sculpting and Blender sculpting. Are you sure about that ? Does blender inflate in all directions ? Have not seen this happen yet with the DRAW brush. Inflating to an extend is normal scuplting behaviour for the DRAW brush of course not to the extend of the INFLATE brush.
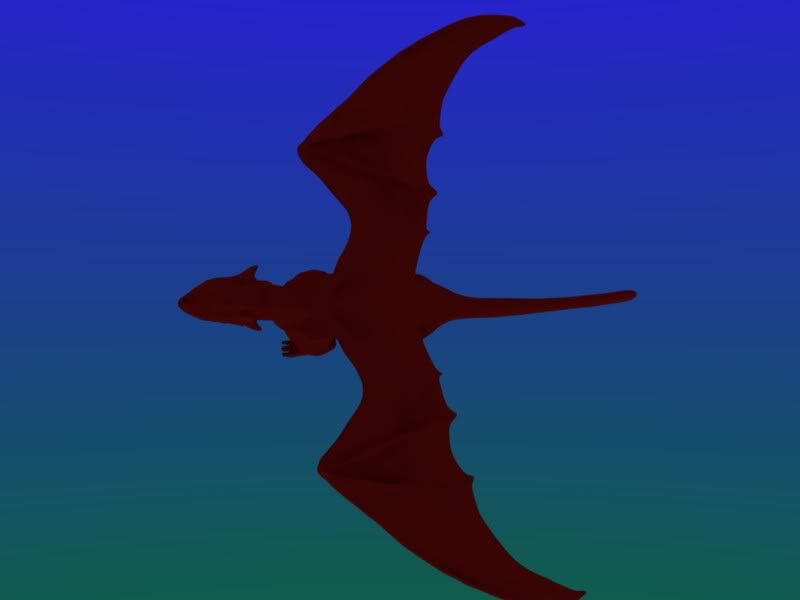
No chance of commenting… it’s all one huge red blob. Please use a proper lighting and a gray color potentially with wires if you look for comments since right now it’s impossible to decipher any shape on the render.
Wel I would not call it a huge red blob but yeah rendering is bad , for two major reason 1) completely noob with AO and AA 2) Jpeg artifats 3) Still learning belnder , I have used it less than one month.
Nahh it makes no sense to show the wire, this is scultping and already the model is more than 250.000 polygons. If I show you the wires the only you are going to see is a black thing.
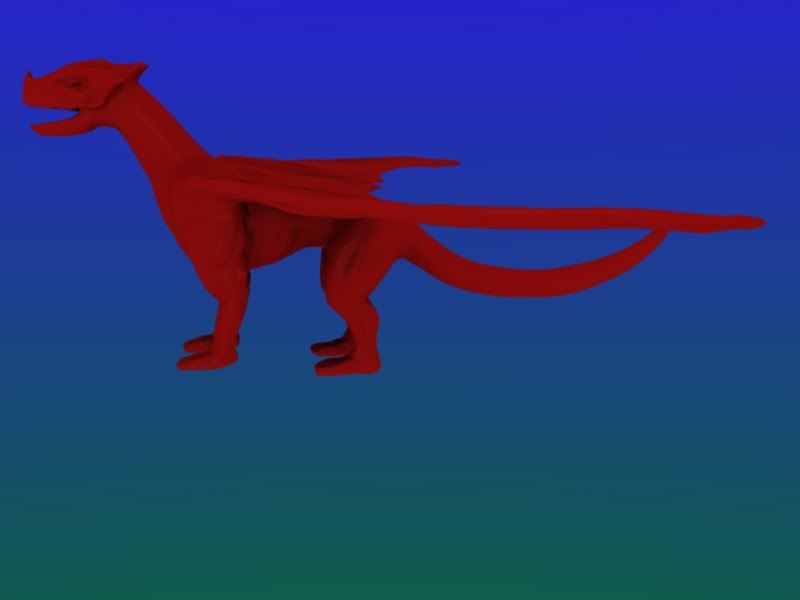
Here are some viewport renders with no AA and fortunately no Jpeg artifacts.
Thanks you , I am glad you like it , as you can see I am going after the muscle type of Dragon. Generally not the type you are expecting to see to a dragon or any reptile but I prefer it this way. Obviously the muscle tone will fade out when apply bump map and textures for scales and small details. Still very much a work in progress.
Wires in sculpting are very well useful. In the multi-res panel the “level” value indicates which multi-res level you are editing while the “edges” value indicates which multi-res level the wire overlay uses. Hence put it to 2 or 3 and you see the topology.
First of all, props for the nice modelling! My jaw dropped when I saw the head first in a defined shaped version, so you definitely have talent! Later on it seems to lose definition a bit. Just like my first sculpt when I coloured it red. Very nice though! Also the ribs and muscles look good. Definitely inspiring
OK, as far as I have figured until now (I’m using Blender since January), my 2ct:
I also got started on modelling playing around with the Sculpt Mode. It’s fun, it’s pretty and with a Wacom tablet and a fast processor what comes out maybe looks good.
Cons from my limited experience:
it creates a tremendous amount of polys and makes things very slow
it cannot take strokes faster than a snail crawling once the poly amout gets high, it creates spotty creases
it is hard to control it PROPERLY, especially with a mouse
I haven’t yet heard of one professional Blender-modeller using it (which doesn’t say too much though)
it messes up topology. Especially for animated models I think it’s usability is very limited, as you were talking about animation earlier. You would probably have to retopo your Dragon (I never did that, I just read it).
I am delving into modelling quite deeply now and whichever “tutorial” you see on the sculpt mode, whichever video/turntable model there is, at least as far as I have found any: they all look really bad, almost retarded Except if a lowpoly model has been used as the basis that has been modelled as closely as possible towards the final target result. With traditional tools (subsurf and proper edgeloops). So I’m leaving my fingers off sculpt mode until it’s reworked and until I can model properly WITHOUT it! Believe me, I have been forcefully searching for reasons to use it. Yet I don’t. Details and wrinkles would be great to do in sculpt mode, because certain things, I believe, cannot be done properly with textures/bump maps only.
Seriously - how many GOOD Blender models (especially heads) have you seen out there that have been done using sculpt mode? I only found one that was created poly-modelling in Blender and then reworking the mesh in ZBrush for creases etc.
I was thinking about buying ZBrush for that purpose though - why don’t you if you come from ZBrush anyway? It’s quite affordable!
Consensus: judging from what I have been told (and I’ve been getting on many people’s nerves) I would advise you to first poly-model as precisely as possible and look to having a nice edgeflow. How to best work on with the sculpt mode I do not know, I only read about that stuff - baking normal maps etc. to reduce poly count, but there’s no advice I could give on that, especially given my 2.5 month experience I’m just doing as I’m told and it seems to work fine. I would really like somebody to give me a good reason FOR using sculpt mode though - if only it weren’t so slow…


 Except if a lowpoly model has been used as the basis that has been modelled as closely as possible towards the final target result. With traditional tools (subsurf and proper edgeloops). So I’m leaving my fingers off sculpt mode until it’s reworked and until I can model properly WITHOUT it! Believe me, I have been forcefully searching for reasons to use it. Yet I don’t. Details and wrinkles would be great to do in sculpt mode, because certain things, I believe, cannot be done properly with textures/bump maps only.