Timber - A Realistic Procedural PBR Wood Material (Download links included)

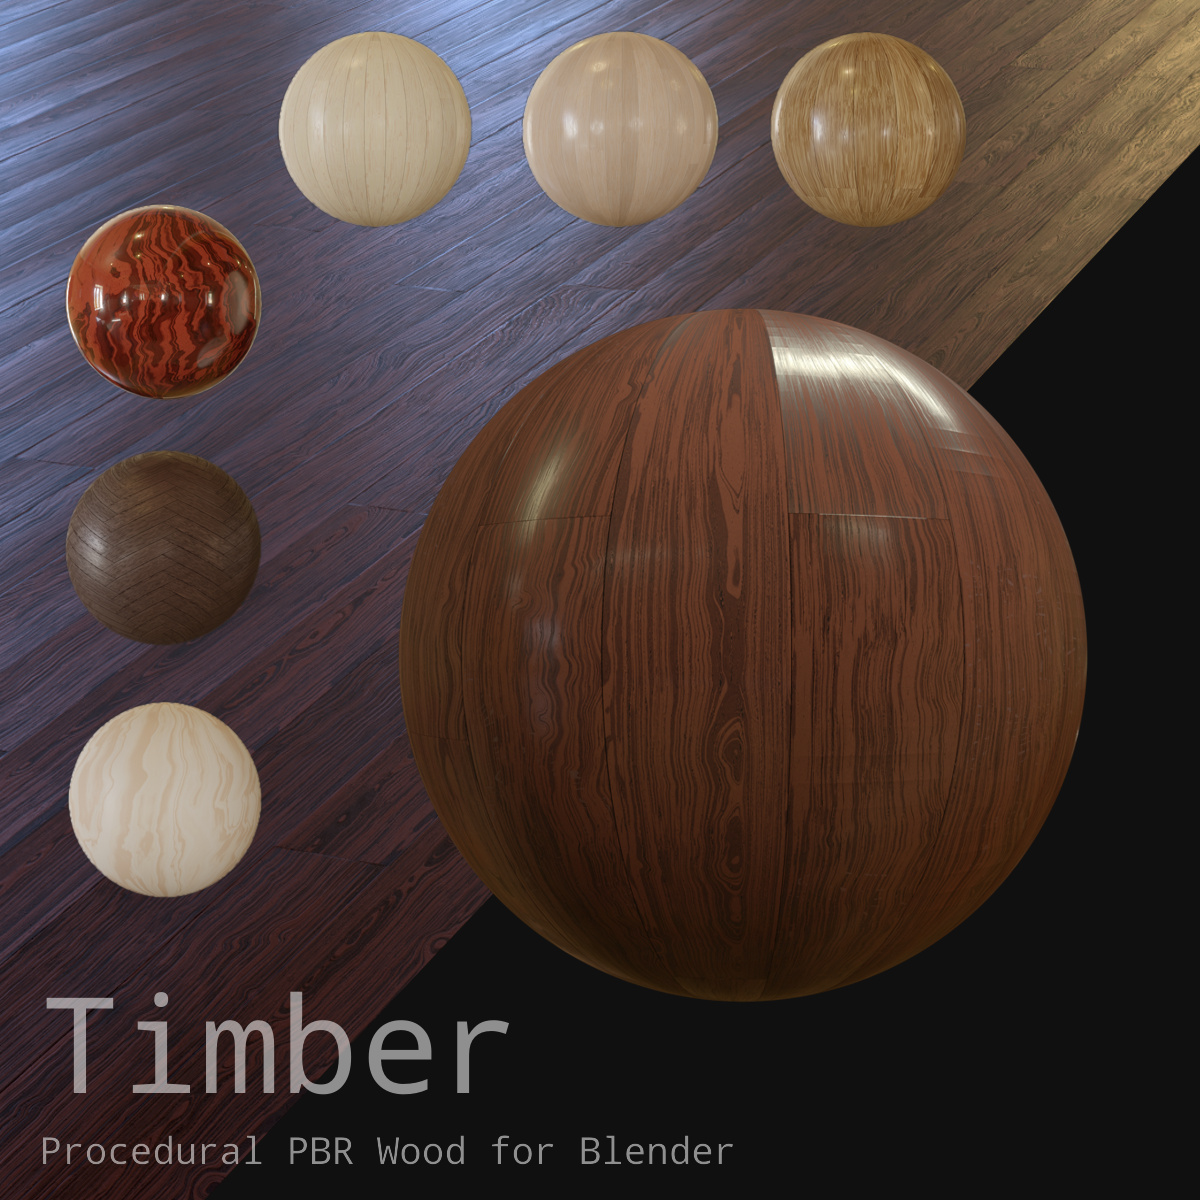
Timber is a fully procedural, realistic, PBR material made with Blender’s shader nodes

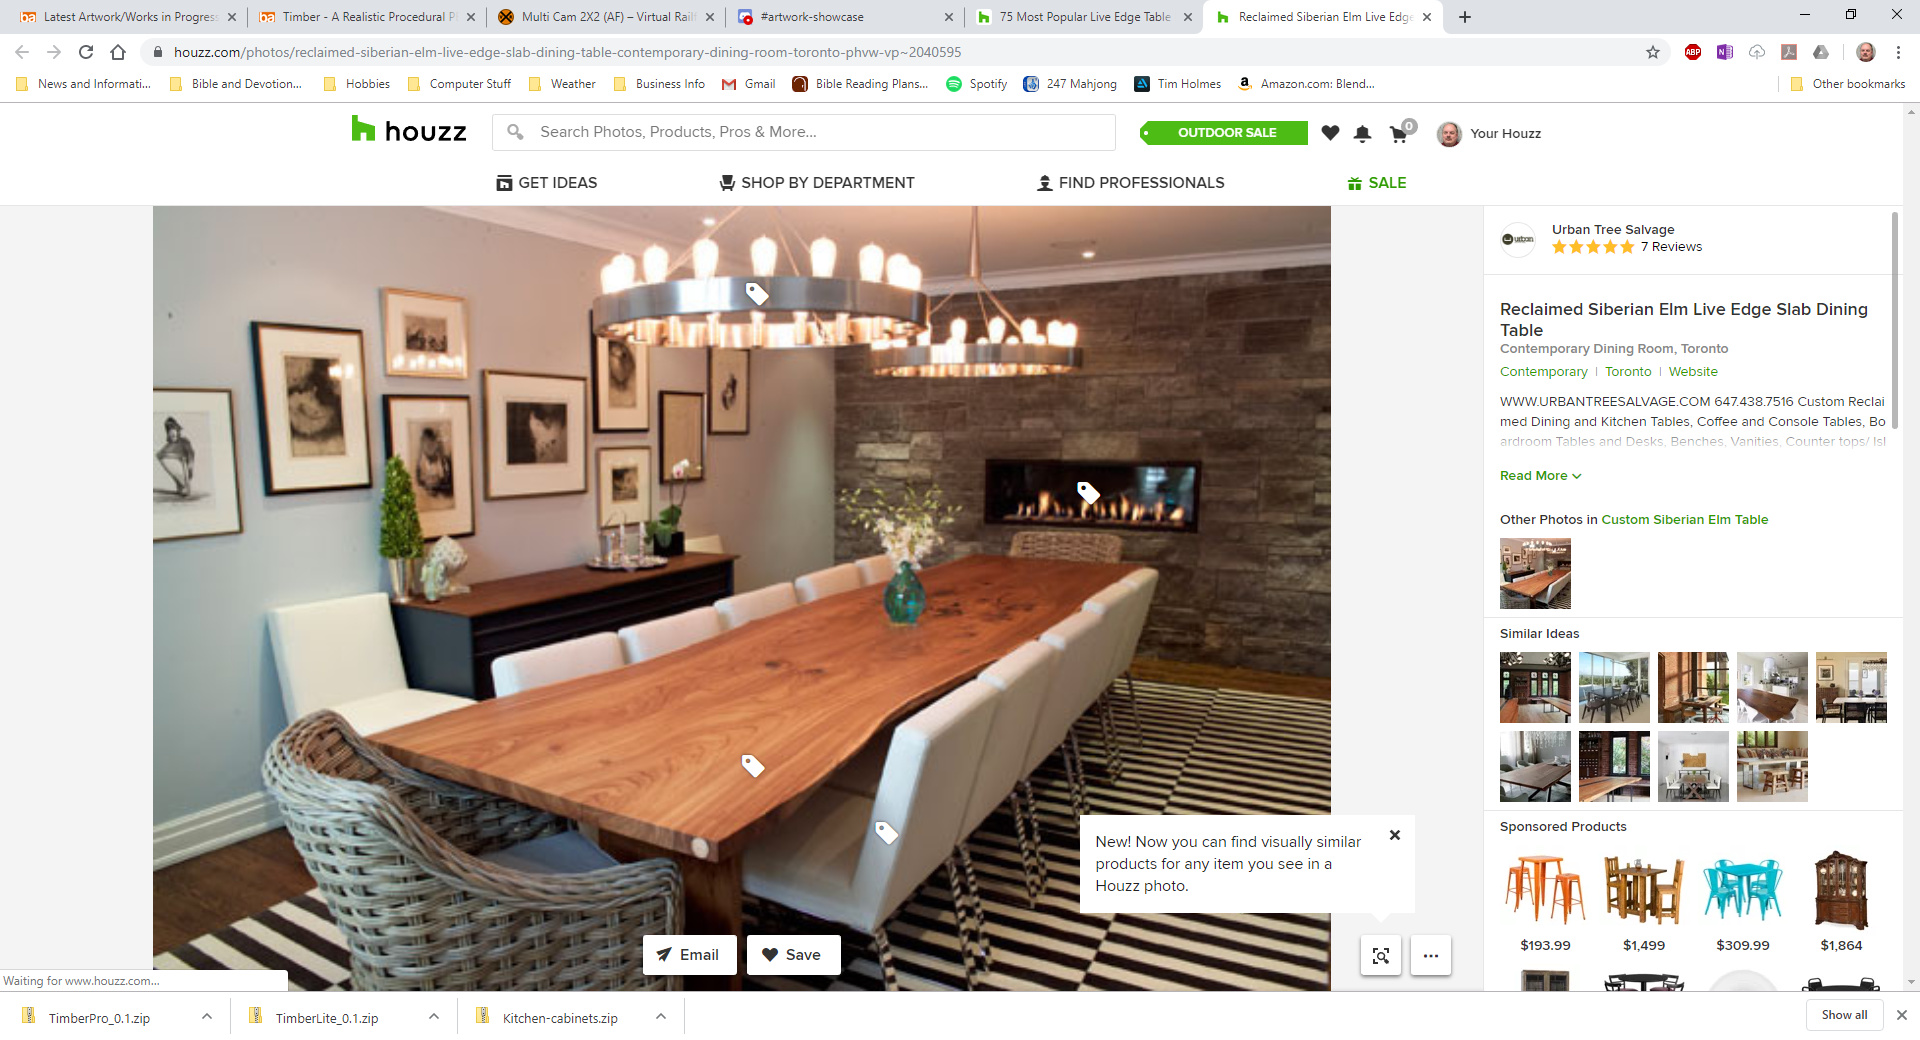
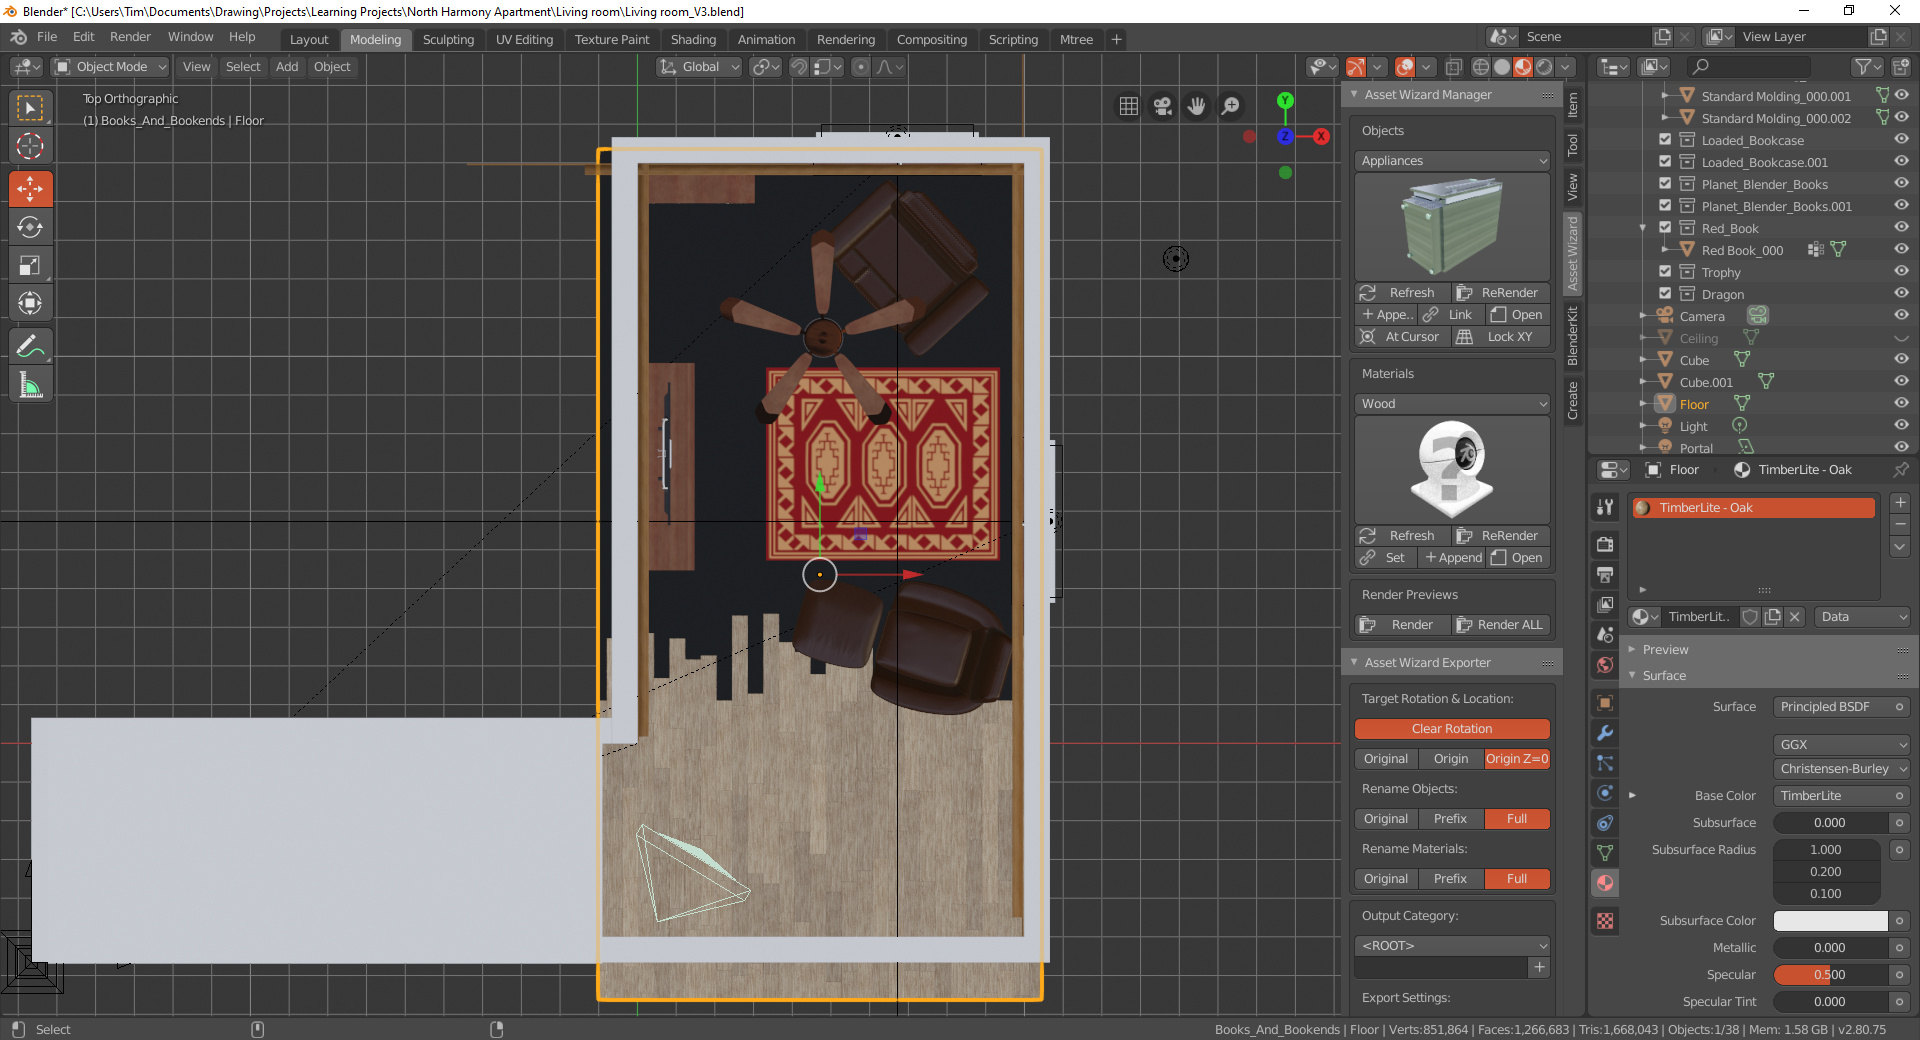
A lot of people seemed to enjoy Wickr (Thank you so much!) so I thought it was time to make something that would actually be useful. I’m an Interior Design student and I’m interested in becoming an architectural illustrator / renderer so I thought I should have a go at making some wood. I’m always coming up against issues with not having exactly the right wood image textures for a scene or they don’t tile properly or they need recolouring etc. I used to be a cabinet maker so I’m never happy looking at an obviously faked wood texture and there are just a lot of features that I wanted to be able to use. Hence, Timber.

You can download it here for free from Gumroad:

Or for $5 from Blender Market (which includes a donation to the Blender Fund):

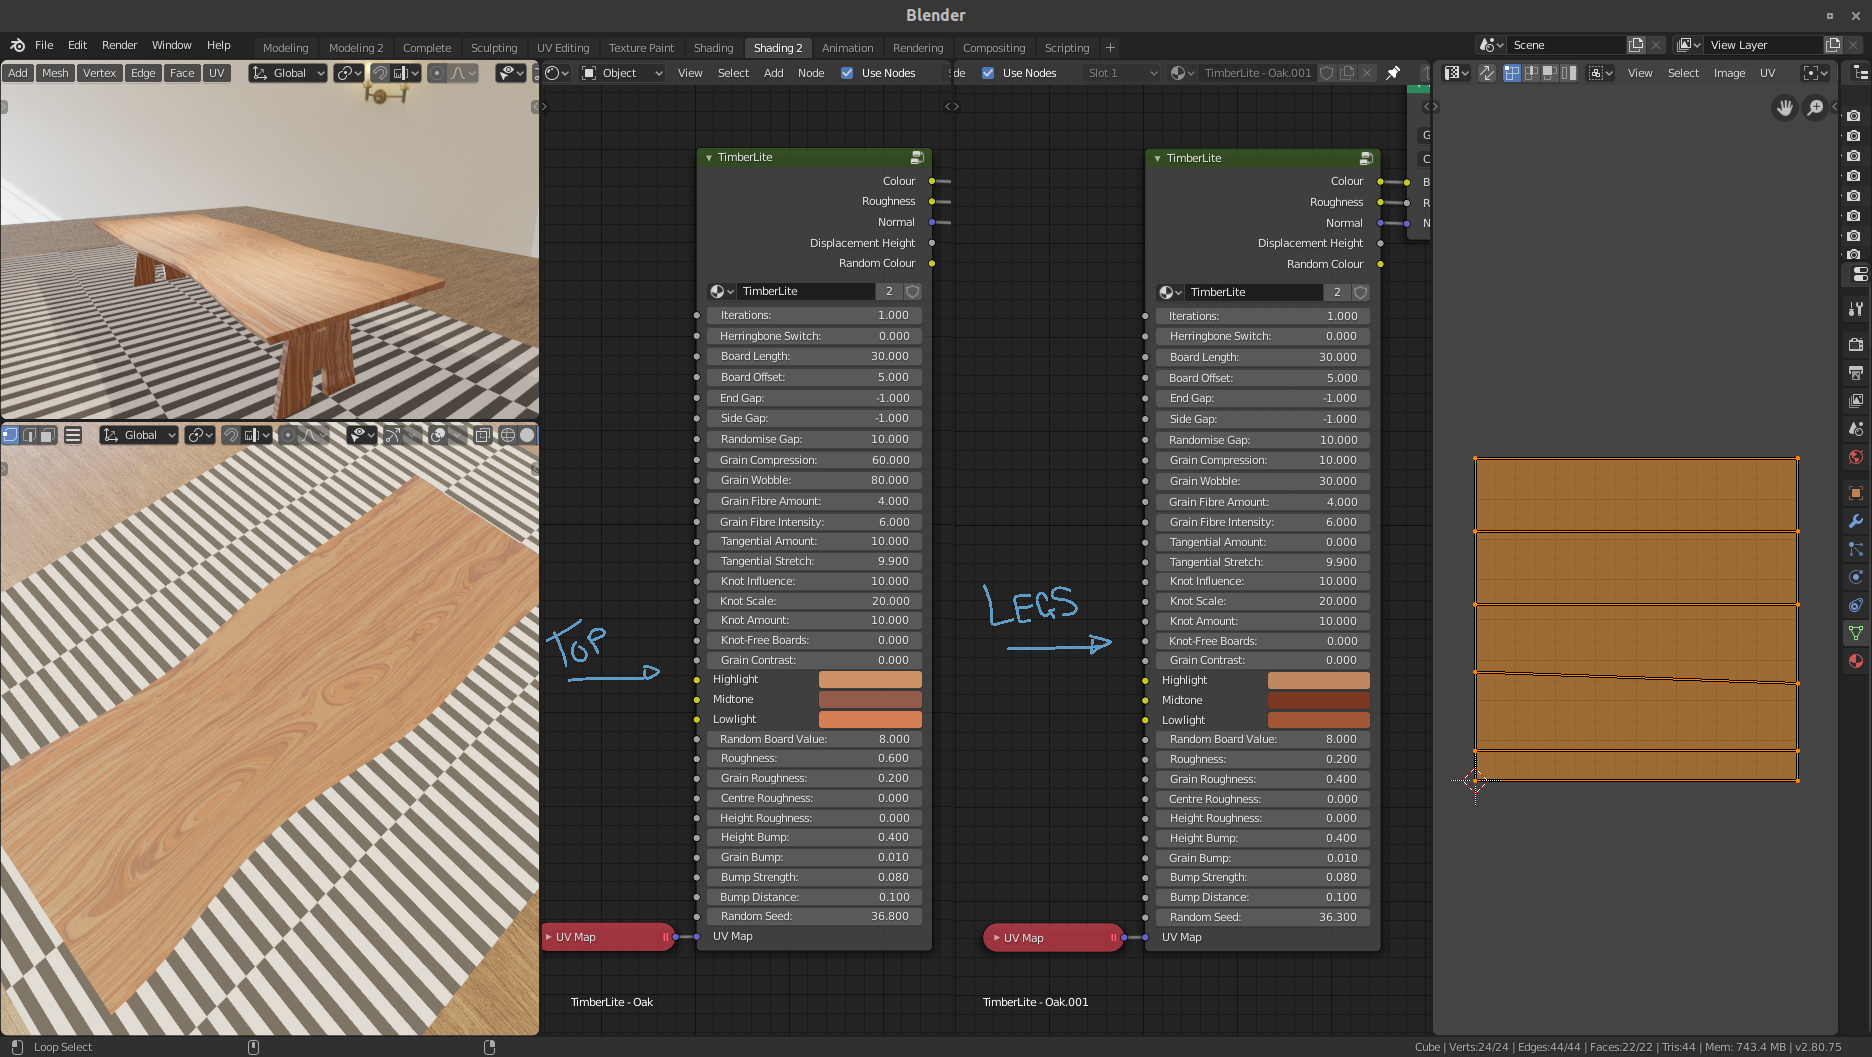
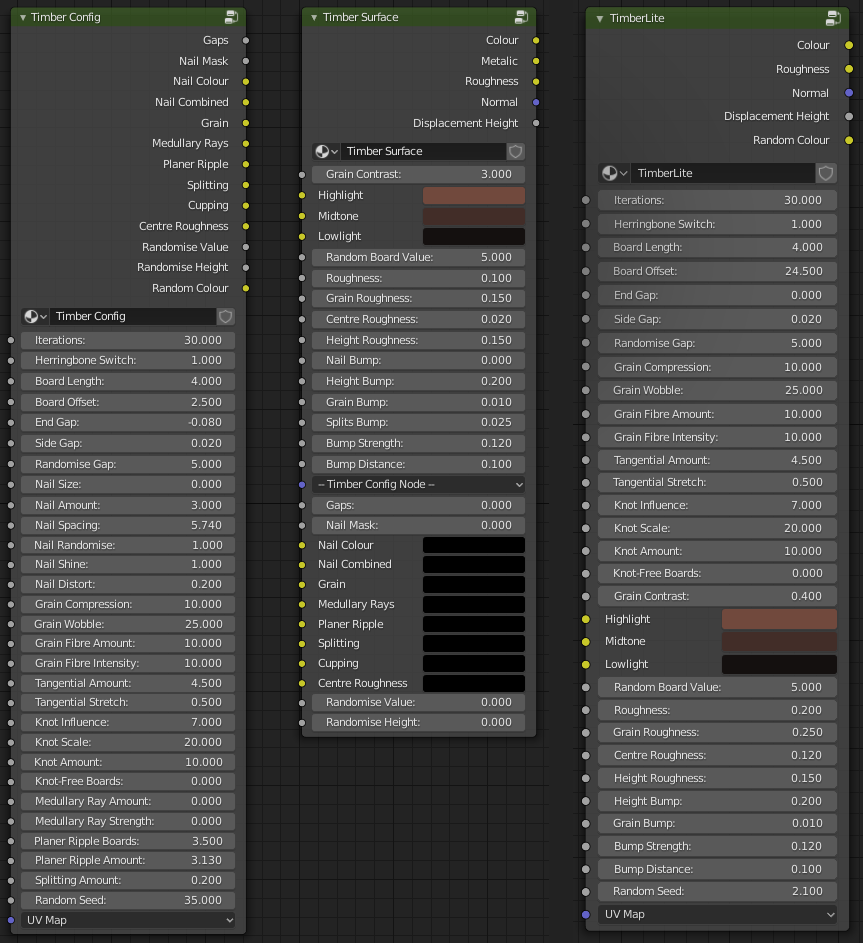
It’s quite a complex node setup so I’ve released two versions - a Pro version which contains all the functionality that I wanted to have access to, and a Lite version which drops a few features but it still a powerful and functional solution. One of the big motivations behind this is that the Pro version is only compatible with Cycles due to the sheer number of nodes being over Eevee’s limit. The Lite version, however, provides a solution that is compatible with both Cycles and Eevee but at the cost of several features.

The two nodes on the left make up the Pro version while the one on the right is the Lite version. The Pro nodes are split into two so that a viewer node in Look Dev can be used to get feedback on the configuration before the strands get joined in colouring / roughness / bump and become too heavy for Eevee.

Both come with 6 presets of commonly used timbers for interiors / architecture

Both versions of Timber contain the following functionality:

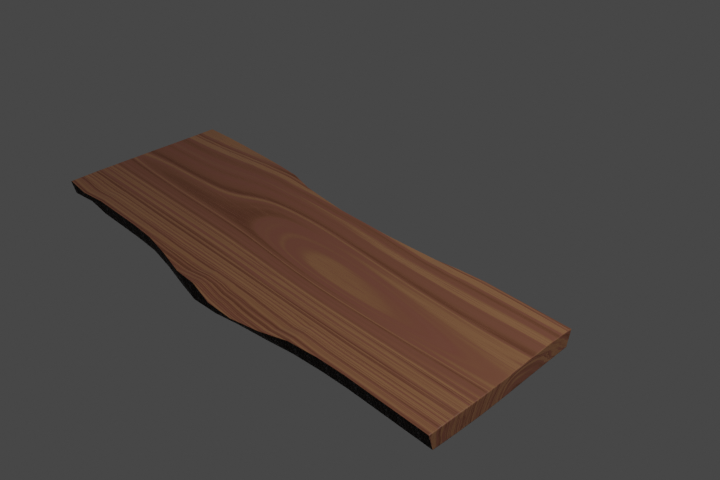
Scalability, straight lay vs herringbone, variable board length, variable gaps around boards, lateral grain compression, straight vs wobbly grain pattern, control of the minor grain visibility, control over tangential vs quarter-sawn boards, knots, grain colour split into 3 value bands, overall roughness with finetuning of 3 specific factors, overall bump mapping with fine control of 3 factors, and a random seed that changes distribution of a lot of the features across the texture.
The Pro version also includes nails, medullary rays, splitting and planer ripple.

Here is a quick overview video showing off the functionality of Timber Lite

The nail engine allows for a lot of configuration options with the size, number and appearance of the nail heads and has a certain amount of automation, such as hiding nails when they get too close to the ends of boards.

https://i.imgur.com/7hfwvYj.gifv

Planer Ripple in the Pro version creates lateral undulations similar to those that can be caused by a planer-thicknesser. This is useful to add some surface variations that affect bump / displacement height and height roughness.

https://i.imgur.com/JJtsVXB.gifv

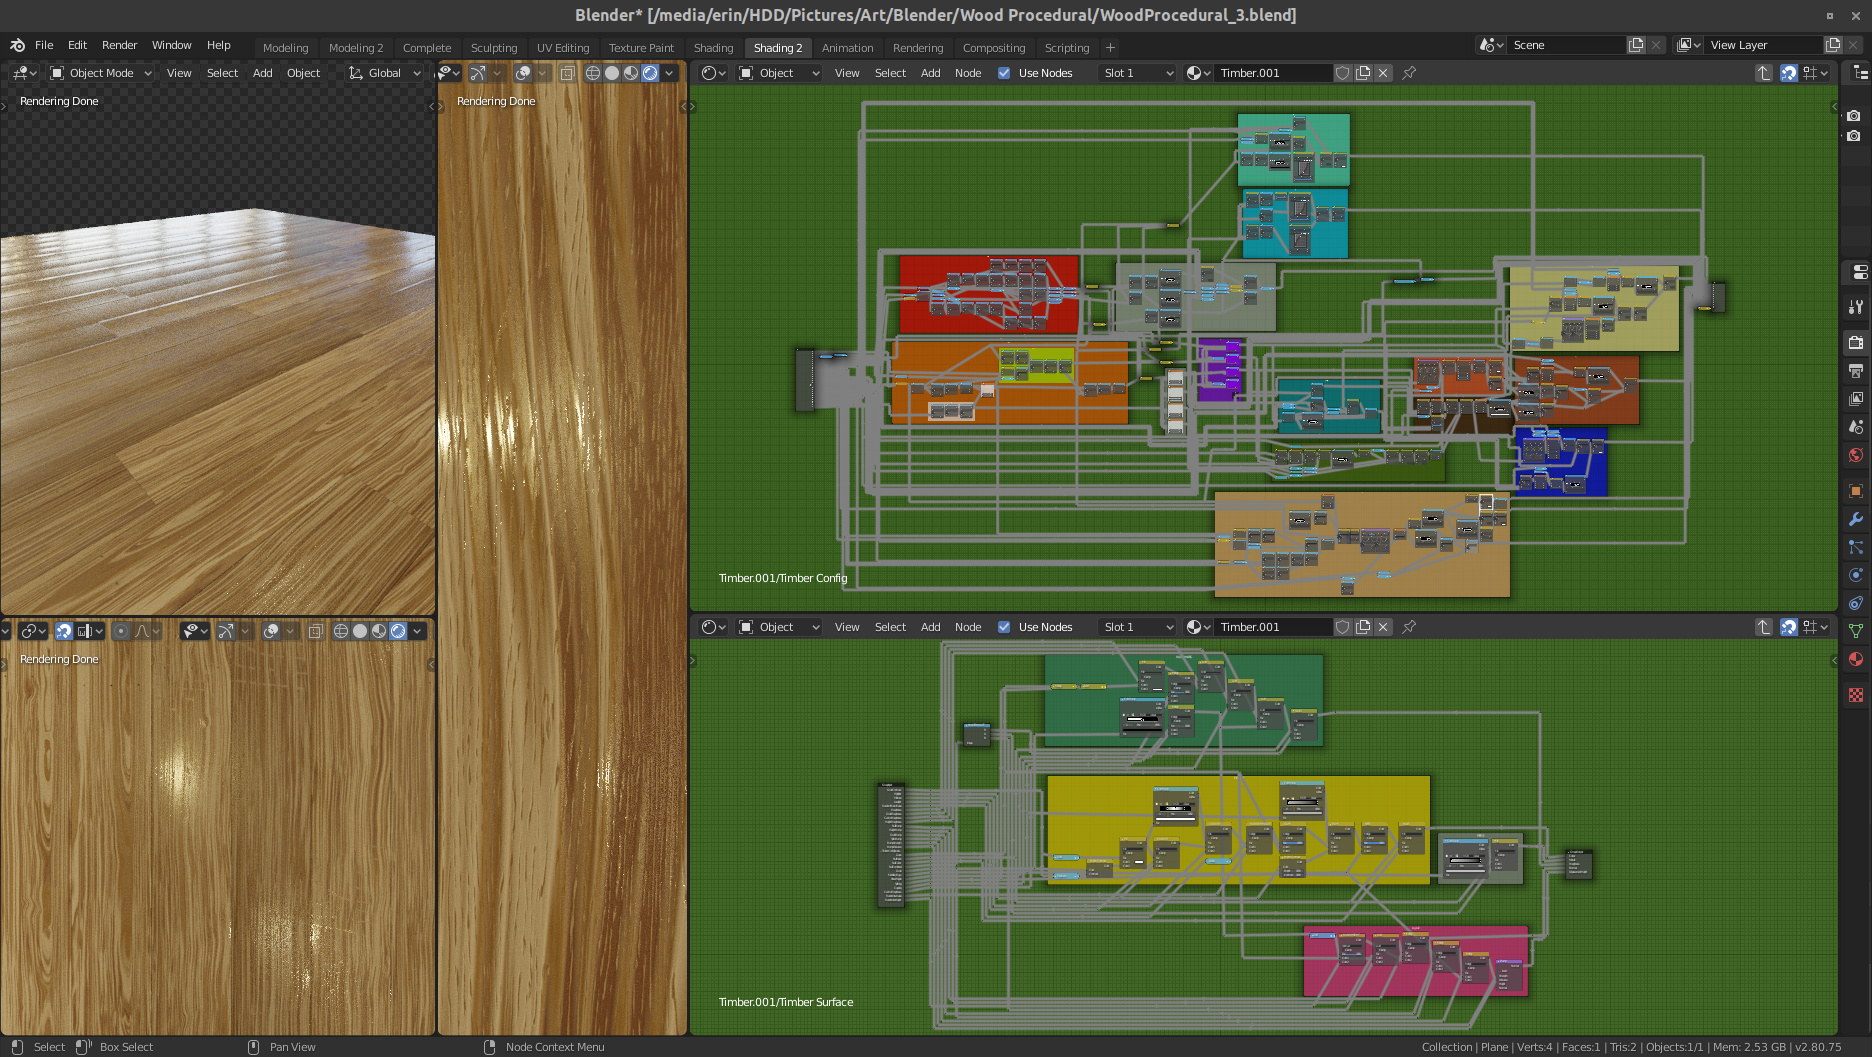
I think that’s about it! Here’s a fun overview of the Timber Pro node groups with three levels of zoom on some Oak!

Both versions come with documentation covering what each of the settings does, as well as a baking guide. I hope you enjoy this material! It’s been a fun challenge to put it all together!

16 Likes

Looks great! Can’t wait to dig in and test it, I’m an Archviz artist and this will come so useful for the reasons you already stated.

One thing, the pro version includes the eevee compatible nodes of the lite version? If not there’s the usual gumroad problem of not being able to buy both versions, as when buying the second one says it’s already bought…

1 Like

Thank you! Ah no they’re separate! But someone else had this problem earlier and they said that they were able to download the other after a couple of minutes! I will combine them after work tonight if I’m able. If it does only let you download the one, pop me a message and I’ll send you the other

1 Like

I have added an option for people to download both in one hit now, thanks for pointing it out!

1 Like

WOW – looks wonderful – I do Arch Viz with a particular love for log homes in the Pacific Northwest style, so I use LOTS of wood.

One quick question, how would you set it up to do the surface of a whole log table similar to this

Thanks
TIM

1 Like

Hi Tim,
Sounds like you’re doing my dream work!!
Here’s a quick setup that approximates that table, even just cycling through the random seed with that set up produces a lot of varied results. You’re essentially telling it that you need 1 board that’s tangentially sawn, making it long with high compression translates to a larger feeling of scale. My UV unwrap I projected from top view and I made the edges straight in the UV editor so that when I deformed the table edges, it pulls the grain along with it.

I would maybe consider adding a few extra nodes (noise + colour ramp) to mix (multiply) with Timber’s diffuse output just to add those really dark spots of the knots. You could even add a layer of texture painting to position them exactly.

Hope this helps a little! Let me know if you run into any issues!

WOW – COOL – I’ll be looking at this today – thank you so much

1 Like

Im gonna ask one other question too – how did you go about deforming the edges, was that just grabbing a bunch of verts from the sub division, or did you use a deform modifier or what?

1 Like

Just wow! And we’re honoured to be able to use it for free. I don’t know how you can wrap you head around such node systems.

1 Like

Yeah I just took a cube, squashed it vertically, stretch it lengthways, added some loop cuts around it and sinched these in. Essentially just modelling the tabletop as you normally would! The whole timber material generated from the UV coordinates so you can keep modelling as you normally do! On the right of my image you can see my UV space with the table top in it. I’ve just constrained to the UV space (UV > Constrain to image bounds) and then scaled it to the edges.

Aw thank you for saying so! As long as Blender is free, I’ll always try to release as much content for it for free too!

Sweet – im working on it right now – thanks for a fantastic tool –

1 Like

Thank you –

1 Like

Hi @Gemn – Been working on that table top, its working great, but I am noticing that it burns up a lot of processor power in the doings – not complaining, just noticing

Keep up the great work
TIM

1 Like

Yeah that’s Eevee for you. The shaders are a lot lot quicker to react to changes with cycles and especially with GPU Compute selected but then you have to deal with the graininess of ray-tracing passes. The Lite version of Timber is right up to the limit of the number of nodes Eevee will compute per material so it’s a limitation of the system really. Perhaps it would be faster if it was done as a script rather than nodes? But I wouldn’t know how to approach that at all! If it’s part of a larger scene and you’re experiencing performance issues, I would suggest doing some high quality texture baking once you have the material where you want it. During renders, Eevee will calculate the shaders for every frame so if rendering animations with Eevee, it’s definitely preferable to bake them as the time really adds up across 500+ frames

Hi @gemn actually, I dont use EEVEE at all everything is cycles I really dont like eevee. The bulk of it I am noticing is when I am in look dev while I’m setting things up , but its progressing nicely, heres a low res test render

to give you a feel of how its going – lighting is not set up at all – Ive never really messed with baking stuff, I’ll have to give that a look

Thanks again
TIM

1 Like

You got the end grain looking great on there! Did you unwrap it to get that? LookDev mode is Eevee powered so that would be why you’re experiencing the performance hit! Definitely let me know how it comes out in the end! I’m really happy you’re using it!

HI:

I am attempting to put the timber shader into a project, and trying to make a wood floor.
Here is my setup and result.

I would like to have the floor planks about the size and length that they are, but covering the entire floor.

I am also trying to achieve a mostly glossy finish on the floor – I’ll be adding overlays to it – in a color similar to #223 Colonial Maple on this site https://www.minwax.com/wood-products/stains-color-guide/#

Thanks for any help you can provide

TIM

1 Like

Hi Tim,
It looks to me that your floor isn’t UV unwrapped properly and maybe drops down below the UV space. If you go into edit mode and select all the floor vertices and in the UV editor viewport, make sure that all the vertices are within the UV space.
As for the timber matching, I would download an image of the wood finish that you like, open it into the image editor in blender and use the eye-dropper to pick the colours from the image for the high/mid/low tones. Looking at the sample on that website, you probably want to play with your grain fibre amount values too.
If you’re going glossy, be careful with the bump values, eevee doesn’t seem to be the most subtle when it comes to the grain bump!
Good luck! Let me know if that doesn’t fix your mapping issue too!

Cool – thanks – I got the floor properly covered. I’ll have to work on the gloss etc later today, the good news is that I dont use EEVEE, so I dont need to mess with that

1 Like