this is final render only ![]()
Thanks a lot for your great help Michael!
Everything works perfectly now! With and without haze.
And I’m fully aware, that my project is extremely complicated and demanding.
The results are simply mind-blowing. It’s still a miracle to me how you manage to achieve these kind of results with so few samples in such fast render times.
It completely changed the way I work & render now. As I can only render on CPU I had to plan renders carefully and do them during lunch time or breaks. Now…I simply press ‘RENDER’ whenever I like.
So, I’ll go and finish the shrine now… ![]()
1 Like
How do you do that? Is there a universal setup for this?
1 Like
I’ll do a demo in the release video. Basically you add a vector blur node in the compositor like this:
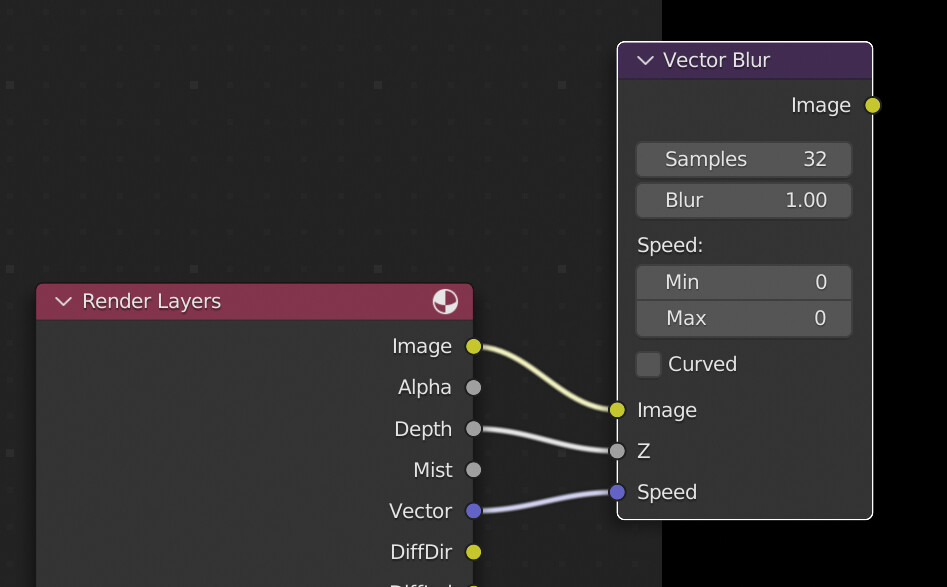
The blur strength controls the amount, and the samples the quality.
Here are two examples. The red monkey is compositor motion blur, and the green monkey is render motion blur. Pause the videos to see the effect more clearly. Comp motion blur also means your renders will be faster.
2 Likes
comp motion blur with AOV allows for per pixel motion blur*
I think we need a pixel ID buffer?
1 Like
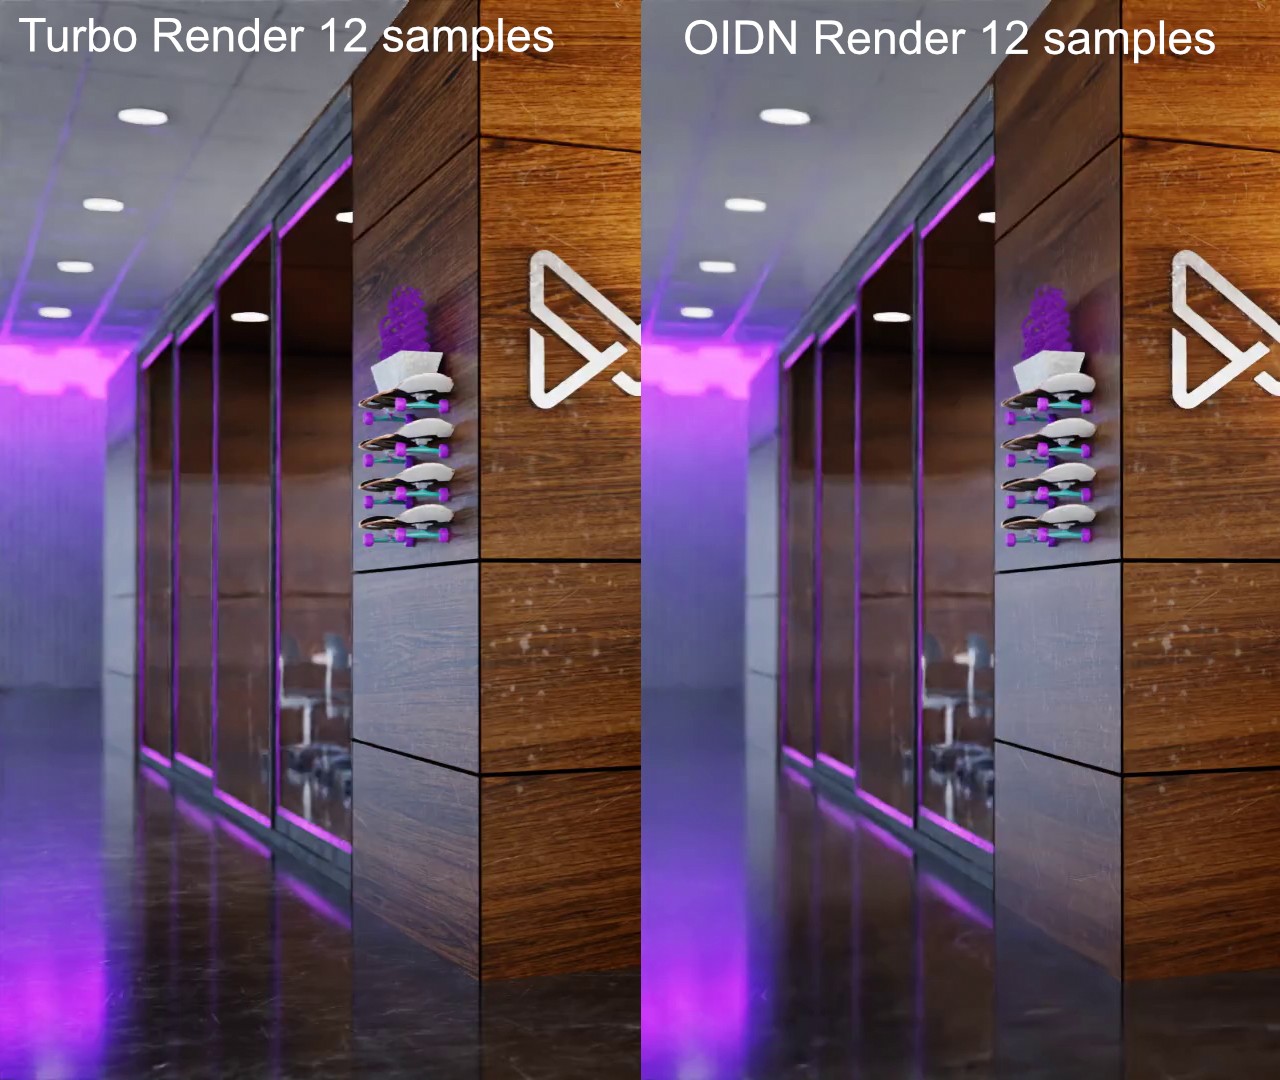
Turbo Tools 2.15 Release with the new temporal denoising is now imminent, intro tutorial underway. Here’s a scene that was impossible to denoise with less than 1000 samples previously. This is with Turbo Render with only 12 samples. Left is with denoising, right is denoising + temporal.
What do people think for the reveal video. Should I give it a few more samples so that it’s completely stable after temporalising, or is it better to do what I’ve done here and use an incredibly low number of samples so the improvement is more obvious?
Right click the video and choose loop to get a better look.
2 Likes
Difficult to tell without seeing how obvious the difference in a higher sample video is.
Why not do both? ![]()
1 Like
Might be a plan, I think I’m probably being a bit too eager to release it that I was avoiding the trial renders to find a sweet spot ![]() The actual rendering is taking around 3 seconds per frame, but there’s something in the scene which is causing scene calculation (the bit before actual rendering begins) to take around 40 seconds! What’s worse is there’s also something in the scene that’s stopping persistent data from working, so I can’t just calculate on the first frame only
The actual rendering is taking around 3 seconds per frame, but there’s something in the scene which is causing scene calculation (the bit before actual rendering begins) to take around 40 seconds! What’s worse is there’s also something in the scene that’s stopping persistent data from working, so I can’t just calculate on the first frame only ![]()
Just release it as a ‘beta’.
I think all of us here will gladly help you to find the sweet spot…
1 Like
I’m not allowed to share the scene unfortunately. Right I’ll get cracking with the intro video again ![]()
I finally have it in writing! ![]()

OK, so here’s my take on it, for what it’s worth and to address the question of more samples in light of the statement above.
To me, I don’t care about the samples, that’s a means to an end (the way in which one gets the render done faster), but its only one part of the render process, as you detail above.
What I’d want to see is a comparison of a final production level quality render/animation and know how long in time for the whole thing to render took.
Basically there should be no visual difference between the two renders (all using the exact same hardware), just that one was faster then the other (due to less samples being needed).
1 Like
Blinking heck, I think you’re right. I’d better show full quality as well as low quality as you and others have suggested. I’ll have to put that bottle of version release celebratory wine back in the cupboard for a while longer! Cheers ![]()
1 Like
Any guess, when you get that bottle out of the cupboard again?
As soon as humanly possible, because after coding for 18 hours almost every day for months to get this feature in, I’m definitely ready for it! I’ll have to step out into the sun for the first time in a while too…although I’m a bit worried about my pale skin frightening the neighbours ![]()
3 Likes
I think your neighbours gonna be more shocked to find out someone actually lives in your place! ![]()
2 Likes
You need access to the Sun to render some darkness back into your skin least you look like a ghost.
The good news is that the Fusion Reactor that is the sun can turbo render that tone into your skin real quickly.
Be sure to check “Dirty render” and “Sss”.
Denoising might not be necessary because of the infinite bounce…ok maybe uncheck “dirty render” as well.
1 Like