This time I am struggling with a rigging problem: the jeans etc are going wonky but only in renders.
Sorry for the bad lighting setup — it’s leftover from some careful angling to look at pores texturing on the face.
The setup
The rig uses a Mesh Deform modifier (in order to get clean deformations in the shoulders and hips, etc), and the body is deformed primarily by that, with the Armature applied only for head and jaw, hands, and bosom.
The jeans, sport bra, and socks used to be rigged similarly, each with its own tediously-modified version of the deform mesh, but then I discovered the sweet, sweet Surface Deform modifier, and now her jeans and sport bra and socks are attached to the body that way. Only the deform mesh and the body are parented to the armature with an Armature Deform… everything else is parented to the armature with an “Object” parent type.
All the modifiers are as you see them — everything you don’t see has default values.
I’ve gone over everything I can think to do, including saving and quitting and reloading the file (to clear out any clingy datablocks) but I am at a loss.
I’d really like to avoid going back to the modified deform cages — those (by nature) have issues with synchrony with the body deform cage.
Why does Surface Deform work fine until I press F12?
A discrepancy between render and viewport generally means there’s a different setting somewhere between render and viewport on either the items or modifiers - but it’s hard to determine what without the blend file.
Check your modifier stack on all your objects including the figure itself, as well as all the objects themselves. Make sure that everything that is enabled in viewport is enabled in render, and everything that is disabled in viewport is disabled in render, and that anywere where render and viewport can have different settings they’re the same.
Do this even where you’ve intentionally set visibility or settings differently. If you can get the render and viewport matching once again, you can adjust them back one by one if needed later until you know which setting caused the issue.
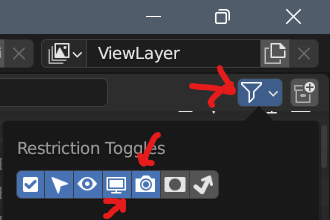
In the modifier stack look at the monitor and camera icons on the modifiers:
For the objects, I’d enable the viewport filter while checking:
Important Edit: For objects and other items in the outliner, there are actually two ways to hide/disable in viewport, the Eye icon (show/hide) and the Monitor icon (enable/disable). If one of these settings is set to hide or disable, then it is hidden in viewport. Make sure those items are also the same while troubleshooting.
Perhaps the modifiers are in the wrong order. It may be the surface deform needs to happen after something else.
How about something obscure like - you did the surface deform, later on realised you needed to apply scale to the clothing, but forgot to redo the surface deform binding.
The odds are that your surface deform is targeting something with a subdivision modifier, which then has different render and preview settings. Either set render subdivisions equal to preview subdivisions, or else bind to the number of render subdivisions that you have. You can have duplicated surface deform modifiers for multiple binds. It’ll give console window spam, but it’ll work.
@Nanoglyph Yep. Those are actually the first things I checked, though I went back again and combed through my outliner graph just to be sure. Nothing significant mismatches. (A couple things did, on purpose as you said, but making them match did not affect the result, even after save and reload.)
@Matakani and @bandages I have ruled out ordering and targeting issues, and all my objects are at scale=1.0 (and, excepting the eyeballs, are all at world origin to boot). Viewport vs Render subsurf level is also not the culprit (it continues to fail either way).
I can confirm now that it appears to be a failure on the part of the Surface Deform modifier:
As you can see, the only difference is in the amount of geometry it has available to be weirdly distorted (no Solidify or Subsurface modifiers).
I also tried applying the Surface Deform modifier once the meshes were in the final pose, and that renders okay, but as I am working on a character to be animated this is a last-resort option.
I still have a couple of ideas to try, but it would appear that Surface Deform is broken when animating against a mesh with a Mesh Deform modifier.
I don’t know… While I’ve never tried that specific combination of modifiers, in my experience if it can look right in viewport, and it’s only broken in render, then there should be some setting somewhere that needs to be adjusted to make it work the same in render too. Probably.
It looks like your testing has been pretty thorough, but if you can upload a .blend onto google drive, dropbox, or whatever file sharing service you prefer, we can see if we have any better luck narrowing down the cause for you.
And for only spending a couple mins posing, it largely works out OK. While I do use Surface Deform on a number of objects, I don’t use Mesh Deform at all.
Instead most of the smoothing out is done by a Corrective Smooth modifier, on top of messing around with a lot of weight painting, etc.
Hello !
I wouldn’t be surprised if a small error as chimed in somewhere.
These kind of bugs are quite common on complex projects / assets and most of the time it’s more an user mistake than the software.
To be sure, you can recreate the setup with simple objects and only the modifiers at fault.
That file can be shared here for people to look if something isn’t working as intended, and eventually send as a bug report if there is really something malfunctioning in blender.
Or if that’s too much trouble share only one object that bugs like the dress, something that shows the problem but protect you work too !
I think the only way to find why it doesn’t work is to look at the file and test different things, especially since you already tested the most obvious case of error.
All right. So I couldn’t figure out the problem with the Surface Deform and, alas, don’t want to spend more time on it right now. It looks like a very promising modifier, and as I understand its function it works to apply deformations not much different in nature to a Mesh Deform modifier — deform a mesh using another. As I already have deform meshes handy, my time is best spent just using those.
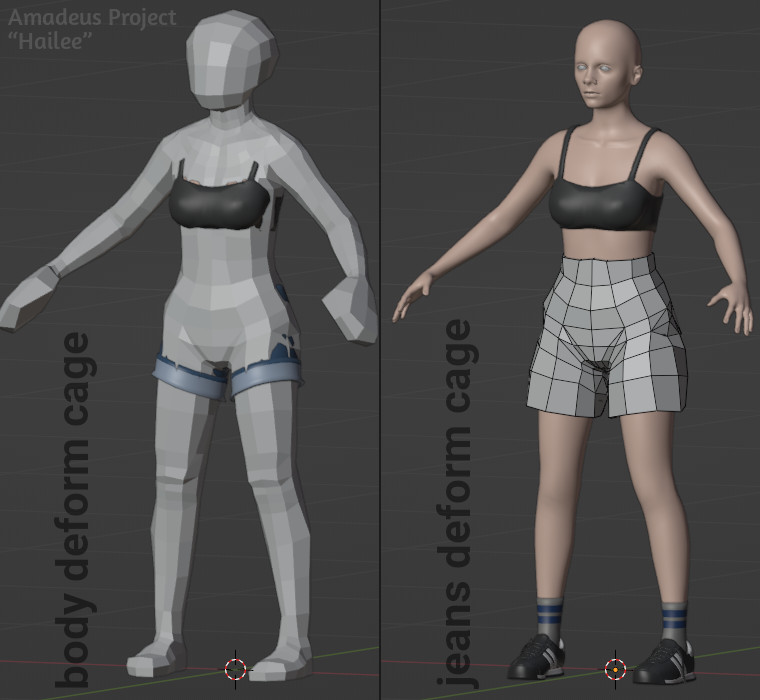
Since there seems to be interest, this is my setup:
The deform cage is a minor modification of the old Zepam cage. It modifies everything you see on the left: body, socks, sport bra. Combine that with a little vertex weight painting for things like hands, head, etc.
The jeans get their own deform cage.
The shoes are bound directly to the armature with vertex weights.
This setup gets me some very nice deformations where people usually have trouble, such as shoulders, hips and knees, without needing a very complicated rig.
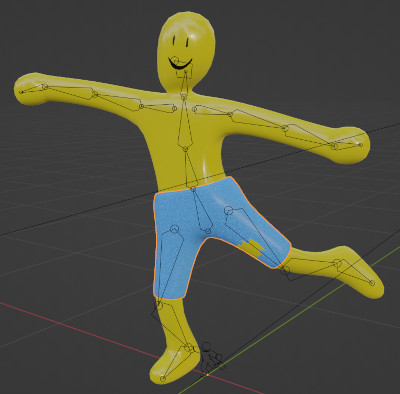
Anyway, if my brain gets overheated continuing with all three of Kailee, the piano, and the cat, maybe I’ll strip out everything unrelated and put up a blend with the offending Surface Deform problem. As it is I cannot reproduce it with a simpler gingerbread man mesh, which I set up the same way as I had Kailee — his jeans are bound to the body using a Surface Deform modifier:
I do like having the root bone display as the proxy mesh, though.
I can’t help but notice, in your picture, that you have quite a few modifiers that are disabled in preview but not in render. You said that you checked all that, but on review, it seems that your exact words were actually,
Is it possible that something is significant that you don’t realize is significant? For purposes of mesh or surface deform, subdivision absolutely is significant. (It is most significant, however, on the target of those modifiers; if it is after a deform on the modified mesh, I could call it insignificant.)
But I should just shut up, I’m trying to keep myself from commenting anywhere where there’s no file, because it’s just a frustrating guessing game in those cases.
That’s the current, working state — without any Surface Deform modifiers used.
Observe also that only the Subsurf modifiers are disabled in preview. I’m working on a very old AMD 130, which just can’t keep up very well in the viewport when even subsurf level 1 is enabled.
I didn’t discount it either. I checked the subsurfs against the possibility (plus permutations) that they were the cause of the problem. (They’re not.)
“Nothing significant” was having subsurf disabled on the shoes in viewport rendering. So unless the shoes being bound to the armature were affecting the jeans (they weren’t, because I completely disabled them and tested) I consider it QED. I checked everything.
So far the only thing I haven’t done is disassemble everything and rebuild the entire setup starting with a blank Blender file. Sometimes that is what is necessary to fix something weird. But I think I’ll consider that a very last step if I absolutely cannot avoid it. And, as I can currently avoid it, I will.
Sorry there isn’t much resolution to what the problem was…
But again, I have only so much time and brainpower. Best to let it go and focus on what works…
Those who were thinking things about subdivision were absolutely correct. The answer came from user julperado in this post, which I will quote in its entirety (with one parenthetical insert):
If you plan on having clothes that fit the body, then you can model the clothes normally and use the Surface Deform modifier to follow the body deformation, without having to bind the cloth model to the rig or run a sim. The process is this:
Make a copy of the body model and rename it to something like “deform_mesh” or similar, just so you know that’s just a reference for the modifier. Make this object not visible in render.
Remove any subdivision or multires modifier from this mesh, but not the armature modifier [or, in my case, the mesh deform modifier]! The idea here is to remove anything that modifies the polygon count. (This step is important because the Surface Deform modifier uses the original polycount of the target mesh, so if you bind it to a model that has subdivisions, it will not render properly because the polycount in render time will be different to the polycount used to bind your objects)
Now select your cloth model and add the Surface Deform modifier, on the Target option select the duplicate of the body mesh, Interpolation Fallof and Strenght can be left unchanged, those defaults work fine most of the time.
Now click on Bind, and your clothes will deform exactly as the body without doing any extra rigging or simulation.
Keep in mind that this modifier will work better in lowish polycounts, so if you’re going to use Solidify, Subdivision Surface, or Multires, add it AFTER the Surface Deform modifier.
Hope this helps
EDIT:
This process can also be used along with a cloth sim; on a dress or skirt for example, you could bind the mesh only on the waist area using a vertex group, and then run the cloth sim for the rest of the mesh, so it will follow the body deformation and the cloth sim will react to that.
I never tried entirely disabling all subsurface on the body mesh in final render, as the final render should have that enabled.
So with the body duplicated, and that duplicate body removed from render along with all vertex-count-modifying deformers removed, then jeans, socks, etc all bound to it works properly! (It is still bound to both the cage deform and the armature, just as the original, so it deforms the same as the original.)
It is nice to understand what the problem was and have a solution!
I was so slow…
No image either, it looks the same as with the deform cages (as it should). Not sure if I am going to update everything as I currently have a working solution with the Mesh Deform cages, but it is a very easy change should it become necessary.
Hey I’m glad my answer helped you solve your issue!
Just wanted to point out that since version 3.3 you can add a Subdivision Surface modifier to the deformer mesh, as long as you do it AFTER you have set up the Surface Deform on any other meshes, and keep it disabled in viewport, so there’s no need now to use a different object as a deformer mesh.