I need to export a model (a woman wearing a dress) from Blender into Unity.
In Unity I’m using the same shader on the model and the dress however I have noticed it appears differently on both. it appears as I would like on the woman, but incorrectly on the dress:
On closer inspection, in my Blender project it appears that the UV maps for the woman and dress are a different scale. The image below shows the UV map of both the dress and the woman by enabling ‘Draw Other Objects’ in the UV/image editor.
I’m not sure if this is the reason behind the issue in Unity but it’s the logical explanation I can think of. I’ve tried scaling the dress up but of course the canvas size in the UV editor is too small. If any one has any ideas or suggestions about how to fix this problem, or even just the scaling issue for these UV maps, it would be much appreciated. Thanks!
If there’s no reason why the object shouldn’t have wrapping or overlapping uvs, you can just scale however you want, you can go out of the image border (0-1 space).
The UV packing is not that good on the dress, also, you probably want to have the head on a separate mesh so that you can give it the right amount of UV space there’s also to take in consideration that most of the body is covered by the dress, you could remove those polygons that are covered anyway and gain a lot of UV space for other parts.
There is a nice tool on Blender, it’s called TexTools.
You can use it to easily show a checkermap on your model, match the texel density of the various meshes and other cool stuff.
Here is a detailed explanation of whats going on, and how to fix it.
Texel density:
Dont worry about what a texel is, if you want details, watch this - https://www.youtube.com/watch?v=wKDlJUlzFoA
Hes using Maya, PS and Unreal engine, but this is irrelevant as the concept is the same, but long story short, its the amount of pixels you give each area of a mesh.
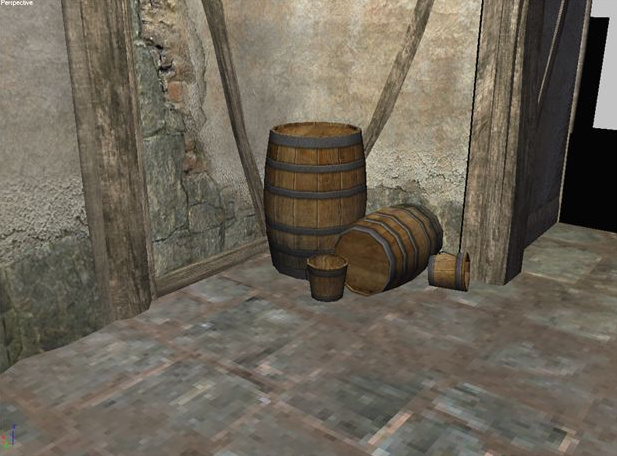
Usually the rule is to keep the texels the same, bad texel density will result in things like this:
Notice how the ground is blurry but the wall is crisp, this is something that stands out, and it does not look nice. The solution would be to make the ground higher res, or the wall lower res.
How does this apply to your model? Well the texels are WAAY too big on the shirt, meaning you wont get the wave effect that you get on the body. Also be very careful with the hands and the head, make sure the texels are the same there as well. I would suggest adding a checker board as a texture to check the texels before applying a material, do this by following this tutorial:
i would also try to eliminate even more seams, by adding necklaces and bracelets to hide the seams.
Thank you so much for your responses. I didn’t know about Texels so it seems I have a lot of learning to do! If I come across any problems on the way I’ll post them here.