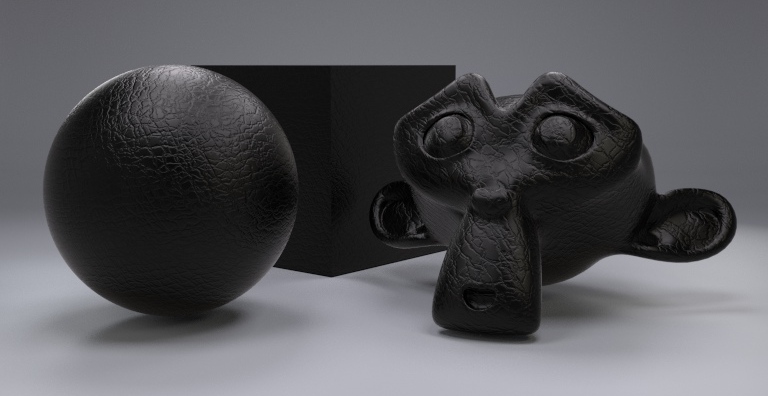
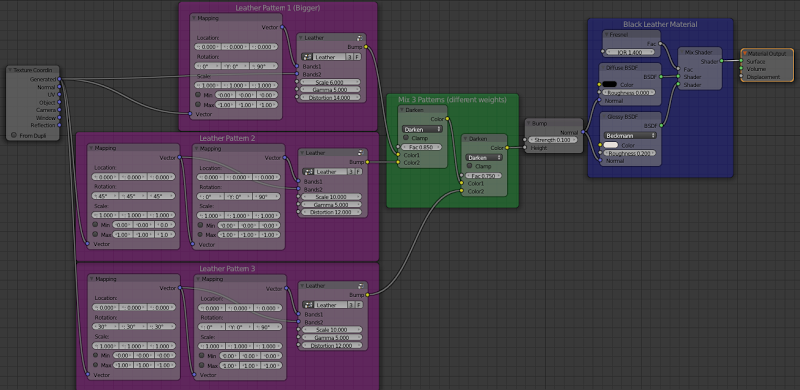
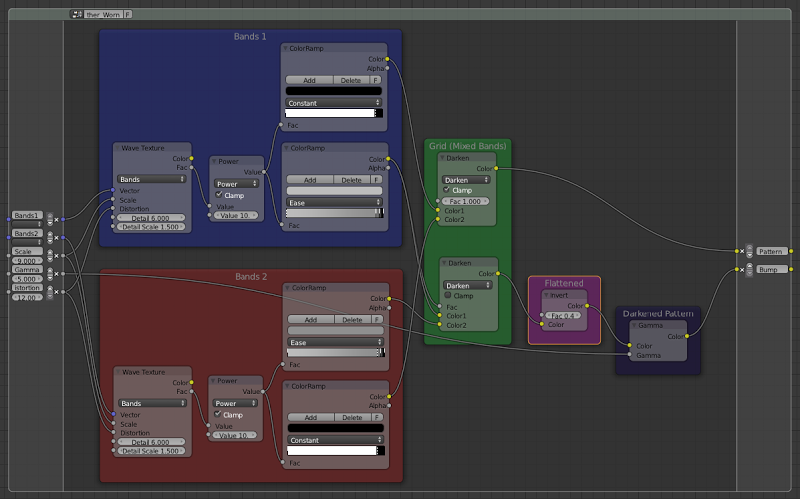
The most important in this material is to get the leather texture. If you see some examples like this, leather texture has a pattern similar to some overlapped distorted grids. Probably this material is not good enough for a close-up image, but I think it could be useful for cars interior, clothes or furniture. This is the node setup I have made:
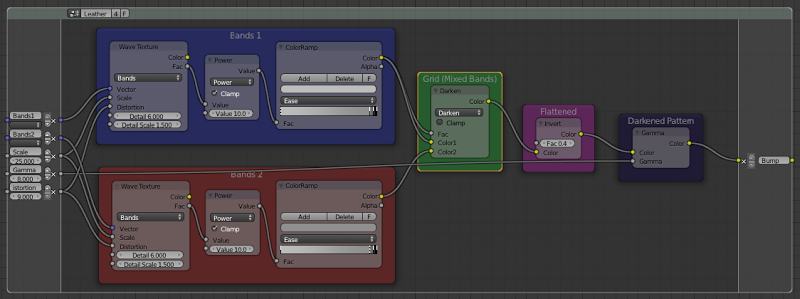
I have mixed both bands textures with the darken feature. See my blog for color mix modes examples. After mixing, I have added a invert node and a gamma node to flatten the texture. So the bubble look disappears. I have tried to make a subtle bump effect here:
Hi @RickyBlender, the color ramp node wasn’t enough. It should be easiest with the new RGB curves node (in the next blender version, 2.66). I needed a way of rapidly increasing from white to black (but not using constant mode), to simulate the pattern of leather wrinkles.
To make this, I needed two things:
1.- including noise in the color material.
2.- making wrinkles appear clearer in the material, like worn leather.
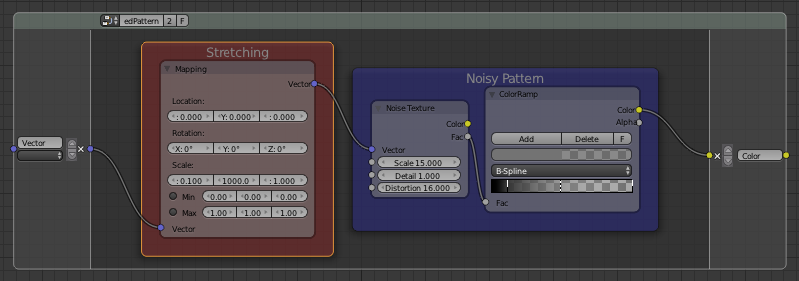
So I have changed the leather group to include another ramp node for getting a clean leather pattern (second point), without any transitions. Using its constant mode you get this.
Then I can change the color only for the wrinkles using this new socket (called pattern). I have added a kind of threshold (0.3 value in the image) which let me make the wrinkles thicker or narrower.
now i reduce sample down to 10 and 20
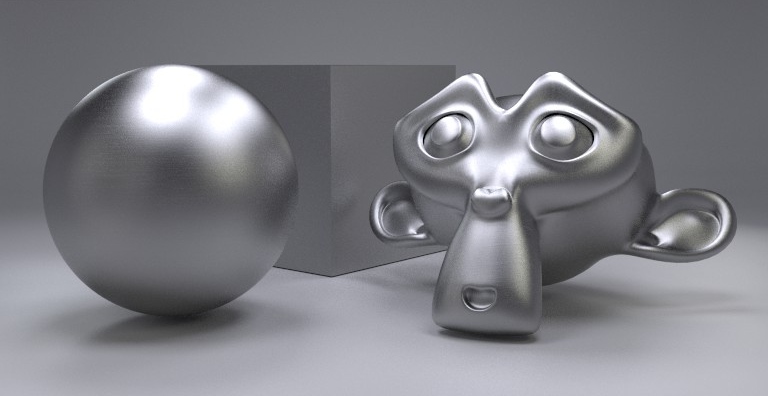
but the displacement for the leather is very small
is three a way to increase displacement to get it workign with low sample value
I’m not sure how displacement works. In my test scene showed here, the bump node uses strength 0.1, but in the blender ball (at blendswap), I had to increase it to 2.0 to show the displacement. I don’t know the reason.
Just wanted to say thanks for these post… I’m just getting started with Cycles and node based textures… these really help out alot…
I have been having some trouble with getting bump mapping to really work for me in cycles by the way… if you have any pointers on that please let me know…
Firstly this is an experimental feature. You must set ‘Experimental’ in Render Panel >> Feature Set. There are three levels of bump mapping: bump, both, true (see wiki for details). This feature is in Object Data >> Displacement Panel (it doesn’t appear if don’t set Experimental feature set).
Bump is the most basic level. True is the most complex, and produce real surface displacement (bump only for shading).
When you use bump mapping, black color is similar to ‘no displacement’. Clearer colors will move the surface along to normals. White color generates extreme displacements.
I think these are some basic tips I hope help you.
I think these are some basic tips I hope help you.
Yah that helps… I have been using 3D softwares for quite a number of years now… Blender only about the past 2 years… but I have never used nodes in any software before so… We all get to be noobs again some time…
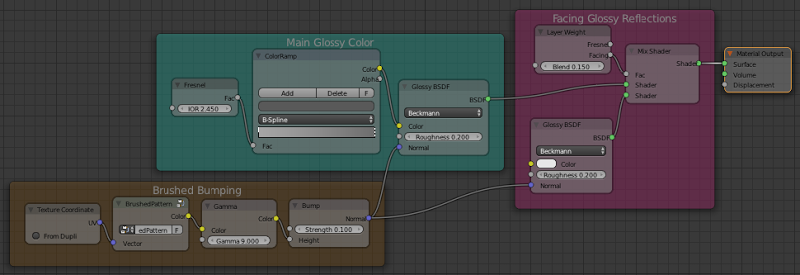
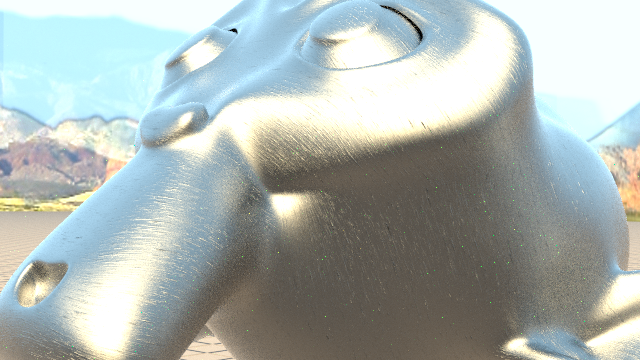
Hi everybody. Today I’m going to make an aluminium material, with a little brushed on its surface. This time I have followed the references of @RickyBlender and @eppo.
I have used a double glossy mix for this material. For base color I have used a facing gradient, through a color ramp node and a facing layer weight node:
Firstly this is an experimental feature. You must set ‘Experimental’ in Render Panel
Yah… I’m not using experimental… I have an ATI graphics card so I’m having to do everything through the CPU… but I’m still getting good results with the bump maps…
Here’s a render of your texture above on my system… with an i7 CPU… (but using an ATI GPU … unsupported) in Linux Mint… 2mins 33 sec… render…
I think it’s lookin pretty good…
As you tell I’m getting some noisebn specaling… not sure how to fix that…
There is an experimental feature that gets turned on when you invoke ‘experimental’ rendering with cycles…
When experimental is turned on you get an extra ‘Displacement’ menu in the Properties Panel > Object Data(triangle Icon)…
it then has a pop up menu under ‘method’ with the choices… Bump… True… and Both… (I’m not sure what they do as I haven’t been using them)
Hi @norvman. The material looks fine. I don’t know why the render is showing green noise. Probably it is the environment lighting. It looks too much saturated. If you want you can try a background setup like this.
No matter if you have an ATI card for bumping or displacement. I’m preparing a mini tutorial about that.
Yah I this preticular scene setup I have as an out door lighting set… so there are a hand full of lights that are on the Saturated side… the green tinge is not a problem for me in this instance…