¡Hello, Blenderfolks!
After a while without any updates on this 3D Character, I’m back with consistent developments… on Modelling, Rigging, Shading, Compositing and Rendering.
To the point I thought I was ready to start making some animations tests with this 3D Character (Dorothy); so I’ve made this specialized thread in “Animations” section:
Now, for the other relevant updates, I won’t be able to track back nor show everything; but I’ll try present some of the improvements in a clear way:
Compositing & Rendering
Eevee has been my main stylistical approach to NPR on this 3D Cartoon; but after I’ve begin with Posterize effects from the Copositor, Eevee’s graphical output turned to be the least interesting of the 3 Render Engines; I believe I can find ways to change that.

This is sluggerish, but results are incredible with or without Posterize effect.

Really intriguing solution; as I’ve learned one basic thing about the Workbench Render Engine: it is possible to mimic the Solid Shading Preview in the Render Properties Tab, since the settings are mostly equivalent; with the help of the Compositor, it Renders in really promising ways.

There is a preset Posterize Node in the Compositor; but since it lacks customization features, it’s hard to get finer results; but sometimes it’s much faster in giving insight of what cool stuff Posterizing 3D imagery can do in Blender.

This is the (Compositor’s Node setup for a hand-made Posterize effect Group Node I’ve learned from a very good Youtube tutorial on the matter; as you might have seen previously, I’ve got 3 copies of this Group Node in the Compositor, so I can just swap the optimal settings according to one of the 3 Render Engine (but the Render Engine must be swapped manually as well; sometimes, like in the last, preset Posterize example, I need to make global changes to some RGB settings to have better results in this case, which is bad if I do not remember the original values (¿maybe playing with Drivers could help there?).

Custom Shapes
The chaotic Widgets. It’s challenging to customize these: so many possibilities, but then, it seems like there are few optimal solutions for Posing. So, I’ve been trying to upgrade them slowly.
Here I’ve Selected the ones that I’ve recently changed or that are original (Root, Foot, Hand, Torso, Hips, Limb, Shoulder, Head, HeadTrack)

And here, at least for the ones that are central to the Model, as Mesh Objects, they can keep their Origin at World Origin (just as the other main Objects), but then be leveled up more or less to the position they’ll appear on Object/Pose Mode. This way, we can directly Model them with reference of the local anatomic shapes of the Model on its Rest Pose. ¡Mirror Modifier works for Custom Shapes! (which is a curious phenomenon I didn’t know about. I’m still not sure how to replicate this method with sided Widgets though (like a Hand Widget, but there should be a way.

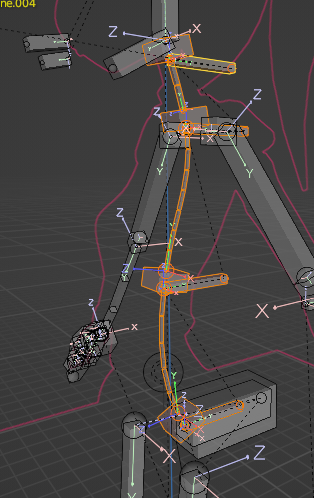
Skeleton
For the Spine Rig, at some point totally swapped the older Spline IK Rig for a Bendy Bone Rig. The most difficult thing was setting the FK Control Bones; but eventually I’ve figured it out —I have this as a tutorial proposition btw. Eventually, I’ve decided that the Neck Rig would become, also, part of that Spine Rig; it’s much more convenient to have that into the flow.
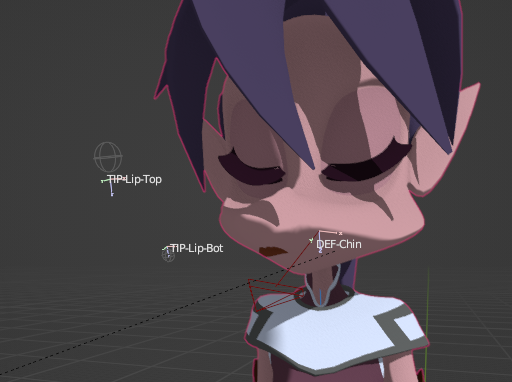
Following the notion of avoiding Rotations for Deform Bones, the Jaw (“Chin”) Bone still Rotates though, but I’ve made the Lip Bones (which were part of the base Jaw/Mouth Rig) only change Locations; an already, lots of cool, even expressive Deformations can be done on the Mouth Region (I intend to come up with Bendy Bone Rig there for Spline Skinning; then I’m not sure what I’ll do with these old Top & Bottom Lip Bones; they’ll probably become obsolete (or be revamped in Main Control Bones for the Bendy Bones Lips Rig).

Hair with Curves, still need some improvements and research on filling the gaps and make them synchronous or non-conflicting; not Rigged yet; I intend to Rig the Curve Objects directly (no Conversion to Mesh), I hope it won’t fail.

Head-Track Rig fully revamp. That was really puzzling. Was able to get rid of all Rotation Modes that weren’t Quaternions. Many iterations on the Spine and Neck Rigs were required; I was looking forward to simplification. For the Head-Tracking, the Head Bone had to develop a new set of Bone Constraints (whereas the Transformation Bone Constraint was the best option for the tilt of the Head as part of the Head-Track control; other Bone Constraints, such as Copy Rotation, seems to turn the process much more complicated, and failing at many points; so, translating the Rotations through a Transformation Bone Constraint ended up being a much more reliable solution.
Also, added some sort of handy ‘Switch’ for the Head-Track Bone I’ve never though about. Will have to make a tutorial about all this too.
Yes, of course, Override Transform is very tricky; especially in a Head-Track case. It can help Aligning the Bone to the Head Rotations; but it’s very easy to get in trouble with this implementation in a Head-Track Rig.
I’m still investigating this 3D Cartoony Deforms possibility with Bendy Bones Panel settings. My original intent was just making Forearm Twist feature; but then I’ve found a rabbit hole. Besides the Limb Twisting, there was a possibility of making very slight and automated cartoony bendings near the Joint Regions, that seems to be nice both as a concept in 2D and 3D. This therefore became a feature, not only about Twisting alone, but also about elastic Bending quality for… Joints in general. More specifically, Ease In & Ease Out settings. what happens (and this is sort of not very intuitive in Blender UI) is that any of these Values on Pose Mode, are relative to similar Values but on Edit Mode, or vice-versa —so, it’s the same principle which relates to the (root) Edit Mode’s Rest Position and the Rigging outcome of Pose Mode’s Rest Pose and beyond. Sometimes, I have those Pose Mode settings randomly reset for no apparent reason and I have to restore them; maybe it’s a bug or it happens when I Reset the Pose in a particular way. Yet, this feature certainly holds interesting stuff for Organic Rigging and I’ll keep investigating.
That’s it for now. ¡Happy Blending!