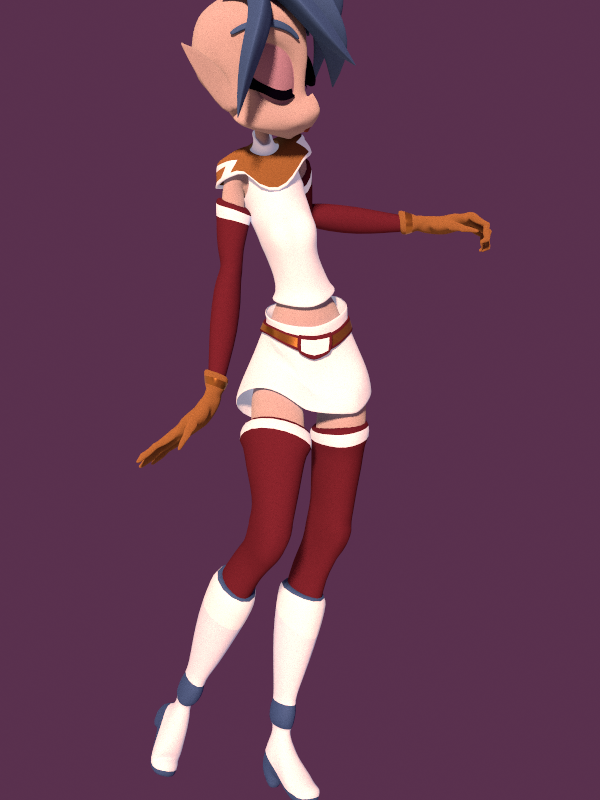
So, this is part of a project for 3D Animation show I’ve been envisioning for a long time. But only recently have I been able to get restarted on the Blender learning process and on improvements on the 3D artwork.
Maybe one the hardest challenges for me is to make a proper style adaptation from 2D to 3D. This single topic made me take many, many steps forward, backward, then forward; again and again. This, within the terrible doubt if a satisfactory adaptation is even possible from my point of view. But recently I’ve started to become more optimistic about it (thanks to recent 3D achievements), and decided that maybe I should be more inventive than conservative, regarding this 3D adaptation, as there are elements from the 2D style that don’t seem to fit well in 3D space after all…
I’m glad to share this with the community, and might be posting updates here from this particular model, which might be in the middle of the process by now.
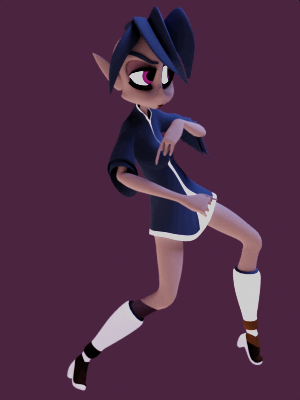
Render is 2 colored Lights (Area, Disk), and most Shaders are based on ColorRamp toon shading stuff, but then turned back into BSDF Diffuse shader, in order to be dramatically affected by Light objects.
It’s the first time I ever update this WIP, and now I believe I’ll be sticking to it more regularly.
After completing the eyelids rig with Shape Keys…
(where I’ve got stucked since the beggining of 2022. In case you are curious, you can check my “Non-Linear” Shape Keys topic to check a special solution regarding eyeblinks for making the eyelids motion to be curved [thus, Non-Linear] over large, non-spherical and asymmetric cartoon eyes)
…I’m gradually addressing the other elements of the Facial Rig. I’ve checked many tutorials and I wanted something simpler, so here goes my first attempt on the eyelashes. It requires more or less retakes, but at least it seems to be feasible on this approach —I’ve just connected the eyelashes’ mesh to the already working eyelids’ mesh Shape Keys, and adapted it; so that this eyelids reshaping on Key 1 and Basis might have took a couple of hours.
I’ve also found out that creating an active Solidify Modifier for the lips’ mesh (as a Vertex Group) might actually be helpful in working that complex region for Modelling and Rigging purposes. The modifier effects must be very gentle, and I think its “Only Rim” property should be unchecked or checked (whatever it works) so that it doesn’t cause disparity between the affected mesh and the non-affected mesh that is connected but is around the lips on the mouth region.
By the way, I’ve also employing similar strategy (Solidify Modifier) for different Vertex Groups concerning the eyelids (it has even 2 Vertex Groups for different forms of the Solidify Modifier) and eyelashes.
Feel free to comment; feedbacks are most welcomed; this might be far from my first 3D character trial, but it’s my first resolute one.
I think this is an excellent way to learn 3D character creation by using a 2D concept as source and turn it into 3D.
This is something I’ve wanted to do as well, I love doing stylized drawings (anime, cartoon, etc), but making 3D versions of it is a whole other thing and very hard when you have no expirence in this area (I’m only doing Archviz, enviroments and props when it comes to 3D), there are so many things you need to learn like creating correct geometry (the wireframes), texture paiting, skin shading, hair, cloth, rigging etc etc etc.
Learning this kind of things in 3D takes a montrous amount of work, so I wish you good luck!
It has been a long journey for me of pure drafts and intermittent learning stuff in Blender; only more recently things have changed and I’ve decided to undertake this more seriously.
Yes, I agree; the challenge of making fine 3D Characters for projects involving animation is big; even with all the valuable tutorials out there, artistic background in 2D field and some CG experience, it might be pretty difficult without orientation —because there are so many fascinating possibilities but also so many little & large tricky things involved that we might have to engage because of certain specifics of our character project we might not even be aware in the begging or for a while.
Fortunately, I believe that, at least concerning 3D Character Modelling & Rigging, I’ve already crossed that “ice age period”; now things seem much clearer, and at reach.
Nonetheless, probably the biggest concern I had, that recently turned out to be just a fairly manageable issue, was an asthetic one: the 2D→3D style adaption. I’m no longer as perfeccionist and conservative as I was in earlier times; I now am more and more able to breath inspiration from 3D shapes that previously I wouldn’t like to see on my adapted characters. This, which —in my particular case— took a long span of time to happen so that I could “figure it” out, occurred naturally —within the process of trial and error, bringing a better grasp to reality regarding what 3D today can help us to achieve and what it cannot. I don’t see that character adaptation shift as a failure necessarily since the biggest failure instead was me not being able to progress properly because I could hardly get anything done look “good enough” on 3D from that previous perspective. Of course, a completely faithful adaption seems to be naturally impossible —at least in the current state of Art & Technology— so one artist might has to dig through all the mess until, with some “luck”, might eventually end up finding a treasure —and then things start Flowing better, while insecurity, fears, angst… all of these, lessen out.
Must be very careful on the mesh while using the Shape Keys; lots of mistakes can happen. It did take some hours to add and I had to retake the top eyelashes along the way so that they don’t make a bad interaction. Althought it should ideally require some final retakes (which can be postpone to some final stage of pre-production; because there are lots of other Rigging priorities), I’m glad it is working and kinda looking good; it’s also a funny shape.
Next, I think I’ll be able to address facial expressions Shape Keys.
I’ve selected some main, simpler, minor mouth expressions to start with Shape Keys on that region. And results are on the video —at the end I combine a few of them, but it gets a bit too laggy.
Next, I’ll be working on the lip synch mouth shapes, with lots of vowel open mouth shapes; so I expect those will be better to combine with the previous ones.
I already have teeth, arcs, tongue and mouth interior, which are working with the jaw bone controller (except top teeth+arc; which I’ll have to implement a sub-system so they have movement too), but I figured out I’ll have to make deformations for the teeth+arcs so that they “follow” deformations especially from open mouths… that will be a tricky solution, but without this kind of extra, non-realistic transformation, many cartoon expressions would be unfeasible in CG.
The issue I have is to get a “feeling” when I (try) 3D model stylesied characters. When I do 2D I don’t think much, I just “let it flow” and draw the stylesied character from the heart, as to speak. This is why I think doing 2D is very relaxing and fun.
I don’t get that “let it flow” feeling when doing stylesied 3D, here everything is technical and you have to think a lot so everything is being done correctly, so when I have “completed” a 3D character it usually looks very stiff and boring, like it has no soul, even if the model itself is not “wrong”.
Again, wish you good luck, and I think your model so far has great potential, keep it up.
The main challenge with 2d character to 3d character conversions is simply that often the 2d artist adjusts the shapes and forms depending on the “camera angle”.
In contrast, a typical 3d character’s shapes and forms rely on the same static look, and this may result in a less than ideal and convincing transition to 3d.
This article describes a method to avoid this:
The basic method is very simple: adjust the character’s shapes and forms according to the camera angle and this is accomplished through the use of slightly adjusted 3d model versions that seamlessly morph from one to the next depending on the camera angle.
I am working on a automorphing conversion of a comic character myself - one that I started a few years ago, but it proved to be unsatisfactory because I realized the original artist drew the face differently from the side compared to a front or 3/4 view. I couldn’t really come up with a solution then, but the above mentioned automorphing method would solve it eloquently. It would look perfect.
Yes, I know what this feeling is about. But there are lights in the end of the tunnel. At least theoretically, the main point is that, when someone doesn’t have enough familiarity with a certain human activity, there is a deep requirement for analyzing it most of the time; but, once we’ve get more experience, this analyzing process (even on certain more analytic activities which could include certain many tasks in CG art; but also in many structural approaches to Drawing, for exemple perspective drawing in comics or paintings, technical drawing, engineering drawing, anatomical drawing, architecture drawing, etc.) start becoming a synthesis: so condensed we stop “thinking” (or analyzing too much) —it becomes second nature.
This means that many of the technicality of CG might eventually become accessory, while the artist focus on the more aesthetic elements of the task. It should not change the “technical” nature of the method, but it should change the approach of the person doing it.
If none of this is good enough (as it is very hard to compare the process of 2D Art with 3D Art I think), well, there is still the remote (but mostly certain over time) possibility that new creative methods and technologies, favoring more intuitive approaches, are developed.
Personally, although I don’t seem to be able reproduce the 2D Drawing experience through making 3D stuff, the rare satisfaction of achieving good adapation results in Blender is a prize on itself for me; it talks to my “Character Designer self”. But because I’m an animator, I believe that the major satisfaction will happen on the 3D Animation stage —while Rigging relates to that previous self as well as to the “Animator self”; which is a funny thing.
Thank you for sharing your experience; I believe at some point, if you keep experimenting, you might discover a more exciting way to relate with and engage into 3D Character making —as it seems like you are attracted to this field somehow.
This is really, REALLY intriguing. I had no idea such a solution existed and could be at hand even for independent productions. Thank you for sharing the idea.
What I’ve learned from countless remakes of my own characters in 3D, with lots of model sheet propositions, was that my 2D Character Designs (and thus model sheets) on my style were just “wrong”, “incorrect”, or better: “impossible” in 3D. This lead me to a better 3D understanding of the shapes I was proposing in my 2D character designs, and some (small, yet interesting) designs readjustments, ¡from 3D to 2D!
From there, I was able to develop better model sheets from 2D to 3D, and eventually find solutions in 3D that would look “good enough” in many (but certainly not all) camera angles.
However, with this relatively new method, if it is plausible to be applied, it could contribute largely to my original goal of a more precise style adaptation; but I wasn’t even counting on anything THAT new.
That’s pretty nice. Maybe if you could try with the artist or on your own (with help of the 3D model) to retake the original model sheet. This is what I’ve done to gradually overcome some of the biggest incoherences in the “impossibility” of the 2D character design.
For the moment, I’ve got no clear idea on how to auto morph Shape Keys based on camera view/angle towards a character… On quick searches, I’ve found no tutorial on the matter; maybe there isn’t.
I can imagine for now one way to do it could be to create a Driver on a Shape Key; a Driver which might be controlled by certain spacial relation between the Camera plane or axis and a specific Bone on the character’s head that would be always points foreward.
I’m probably wrong though. ¿Would you mind presenting the basics steps? (By the way, I might be able to solve the 2D model sheet for you if you are in need; I can pretty much analyze this stuff graphically and make propositions).
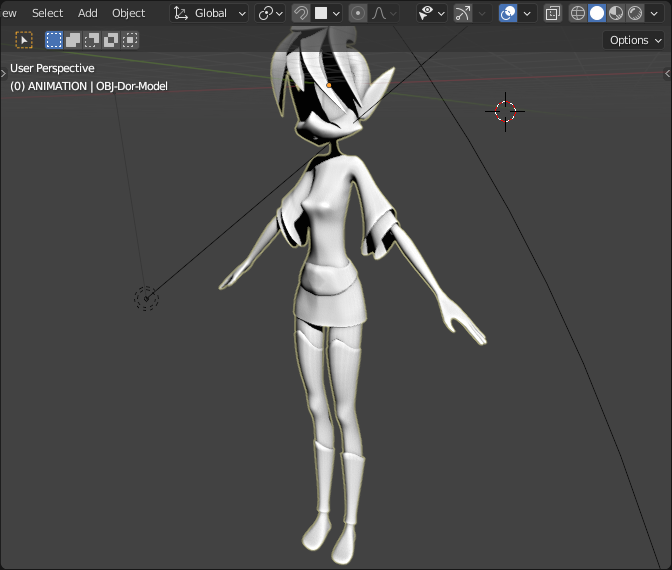
Finally, made up the Bone Controllers (with Drivers) for the current Shape Keys.
There will be many more Shape Keys to come. However, I believe it is better that I solve first the teeth/gums/arcs deforming issue (it must deform so to follow up certain very stylized and exaggerated mouth expressions. I guess it’s so specific it’s difficult to find any pre-made support on that. My inicial plan addressing this will be to make a Shape Key that stretches apart (widening up) the teeth/gums/arcs, that might be Driven (or not) by certain wider openings of the mouth references; maybe other teeth and related mesh deformations are required —I’m not sure yet.
Anyways, the terrain is being prepared. I’ve just followed some tutorials so to implement that “triple jaw bones’ system” (actually, it’s the jaw bone at the lowest spot, while the upper ones control, respectively, the bottom lip region + bottom mouth interior region (including bottom teeth/gum/arc), and upper lip region + upper mouth interior region (including upper teeth/gum/arc). I will show it in video when the Weight Paint gets in a good shape.
Also, I’m intending to use the bones (in red) surrounding the lips, mainly for Weight Paint manipulation; these shouldn’t affect the mouth interior area (unless I find some use for it). The screenshot below presents the stage of the process; it still requires a lot of attention.
Thank you too for sharing your thoughts on the matter!
Yes, this is what I’m doing currently, trying to find a way and style in 3D that I can work with and feel comfortable with. Character creation is just a hobby (for now at least), so I can (try) find my own way of making things
For 3D adaptation from 2D style I assume you’ll want NPR/toon shaders. Have you heard about Lightning Boy Studio? For NPR shaders, this is THE youtube channel to checkout.
Royal Skies has a series on the subject too. I haven’t seen his since I wasn’t interested in NPR shading at the time his came out, but considering how great his other tutorials are (there’s a series on facial rigging too, actually), probably worth a look.
¡Thank you!
I knew about Royal Skies, but I wasn’t aware of Lightning Boy Studio; sounds a very nice channel.
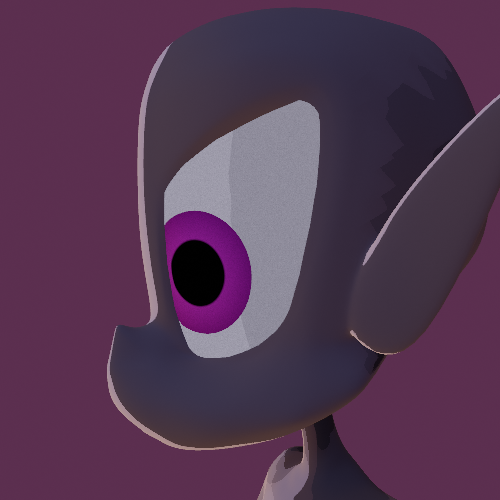
There are months I don’t really develop on the Shaders (I’m still looking for economic, yet stylized beatiful results). I have dropped it on a simple state, where (on Evee) cell/toon shading (ColorRamp Node stuff) were being also affected by the colors and tones of the Light objects; it’s a relatively easy trick to make in Shader Editor, yet the results are usually quite impressive —in theory, the ColorRamp Node is “RBG”, but it needs to be converted to “Shader”, before this data goes to the final Output Material Node.
The result looks like this (there are 2 Light Objects, each emitting a different light color, and they mix with the cell/toon shading base tones):
Still, I’m not sure of the versatility of this setup; so I’ll certainly be back at researching Shaders, Lighting and Rendering, when the Rigging major task is complete or closer to completion. My skills with Shader Editor are pretty small yet, so it’s great to have this sort of stylized resource from from CG artists using Blender.
That’s pretty nice also. Thanks for more references; I’ll certainly be checking those videos.
To be honest, I feel like Guilty Gear system is too highly-specialized — on anime style. Though some concepts there— like the adapted facial Topology for Rendering— are really fascinating (something I’d never think about on my own), I believe if I ever use any of those approaches, I’d need to deconstruct them in a way in which they relate to my pursuing style, more than it relates to needs of anime 3D adapation. So, it’s a puzzle, ¿right? For instance, for the time being, I can’t visualize any need to radically rework the Topology of my character to improve Rendering; but maybe it might prove valuable approach in the future, I just don’t know yet.
I completely agree, the Guilty Gear style is great for very specific use cases, but not much beyond that. If your style doesn’t call for that, then you can definitely ignore one of those series
The Project Feline series has some good general information outside of that style, I’d still recommend it, but I don’t follow either of those series in my work. I just use them to add to my arsenal of NPR techniques, which I ultimately combine into my own entirely unique solution
I understand. I’m still a bit overwhelmed with so many possibilities on Modelling/Rigging on their own but I also know it’s also a matter of patience (until the massive dust deposits itself): taking your time to become familiar with the tools, and to become that reliable ‘library of methods’.
I’m curious about what you’re working on. ¿Do you happen to have some achieved results published somewhere that you wouldn’t mind showing?
I have a little bit of finished work. Currently, and for the last 2 years or so, I’m working on perfecting my technical abilities and developing art skills I don’t naturally have any of to this end, most of my work is for my own learning. You get it, I’m sure, someday I’ll be an artist but I’m not there yet. However you can see a few of my hard-surface works on my portfolio, just click on my profile and choose portfolio, and I can DM you some character work! (I’m not quite ready to share with the whole world)


 but I also know it’s also a matter of patience (until the massive dust deposits itself): taking your time to become familiar with the tools, and to become that reliable ‘library of methods’.
 to this end, most of my work is for my own learning. You get it, I’m sure, someday I’ll be an artist but I’m not there yet. However you can see a few of my hard-surface works on my portfolio, just click on my profile and choose portfolio, and I can DM you some character work! (I’m not quite ready to share with the whole world)