I got stupid and began submitting bug reports once again, which of course almost immediately get closed because that’s not the place to take any sort of hints regarding things which a regular user expects should work or any feedback on UX as long as things are “technically correct”…
So, back to shouting into the void here and perhaps once in a while I will get proved wrong again and learn something new, which is a much better track record than futile bug reports!
- The “mean radius” property of a curve point is not a radius, it’s a scale because it’s only used to scale curve profile geometry or path animation. However, apart from the poor naming, it also doesn’t get applied when you apply the scale of the curve object.
- Overriden Linked things don’t count as external files. Running the Report Missing Files option in the External Data menu says nothing is missing, yet I don’t see my character and I’m guessing this white symbol here indicates a broken link? And of course, there’s still no proper UI for seeing what location links used to point to or individually re-link them.

- The right-click rename menu option for a collection is not at the top level. It’s under a sub menu called “ID Data” where of course everyone who is new to Blender automatically looks.
- Guess why I can’t see anything in my geometry node window here despite the correct object being selected… does anyone think a beginner can figure out why this happens?
- Someone finally implemented this… but only for geometry nodes, not materials because a beginner should of course know about drivers and their hidden keywords (a bit similar to something else I posted recently).

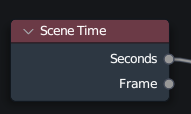
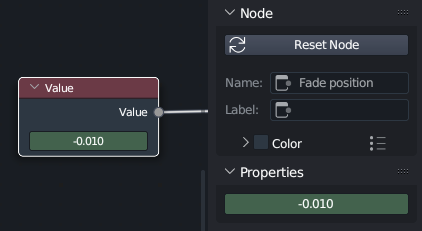
- You can rename a node in the side panel, but the editor will still show the default “value”…
- Just as how there’s no 1, 2, 3 shortcuts (even visible buttons) to select curves, points, handles in the curve edit mode like there is in the mesh edit mode, this brilliant quick filtering selection is also missing in the graph editor. A box select always selects the curves, even if you wanted just the handles. And similarly, a box select around a point always selects also the handles, so if you want to scale keyframes you have to switch to the dope sheet.
- However, in that graph editor, you do have the common show and hide shortcuts and even visible buttons, but in the dope sheet you don’t…

- The live filtering string in the graph editor refuses to work some of the time or even most of the time. Not sure what the problem is, but some words it just refuses to find, while others it can find with no issue.

- The above gets even worse because when you have an object selected you don’t see any keyframes for its materials in neither the dope sheet or animation graph. Only way to see them is to remove the selection filter and then search through the entire list.
- But with selection filtering disabled, you can’t use the next or previous frame button (in the graph editor).
- If you shift-H to hide everything but the selected curve in the graph editor, and then move to a different object which isn’t keyframed yet and add a keyframe, the new curve won’t be visible (even if you switch to selection filtering).
- If you alt-H to show everything in the graph editor, collapsed channels still won’t show (this might be good for advanced workflows, but compounded by the UX issues mentioned above, this bit me in the ass at one point… also, are certain things collapsed by default, like keyframed material nodes?).
- When you select a curve in the graph editor, it doesn’t highlight in the sidebar and you can’t zoom to it in the sidebar like you can in the graph editor either (or like how you can zoom to selections in the outliner).
- When you link an object, the first step is maybe you want to move it. For that, you need to make a library override, but the default behavior of what looks like that button is to instead make the entire thing local. But local is the last resort of something you linked, isn’t it? So why do you have to shift-click that button to take that first step? What’s the UX thinking here? I linked something, but then immediately I want to make it local?
- There doesn’t seem to be a proper vertex group input for Geometry nodes, rather you must use a Boolean group input (not logical) and then click a magic button and select your vertex group amongst a lot of other options. Further, if you rename your vertex group, the geometry node doesn’t update.
- Not sure why I have to separately save a texture painted image even though I’ve saved the .blend file itself. Seems like an unnecessary extra step, but at least Blender warns when you’re about the close the file.
- The Texture painting workspace can become de-synched between the left and right windows, so you’re actually painting on a different texture than you think. I guess this is a limitation between how loosely the workspaces are implemented, but it’s very annoying when it happens and took a long time for a first timer to figure out. (Similarly annoying as to when the same happens in the shading workspace with the texture preview in the bottom left.)

Oh, and I don’t know if this happened in 3.5 or 3.6 but:
- Blender developers finally added a confirmation dialog for applying transforms to instanced objects, but the only option they gave the users was to remove the instancing for that object. There isn’t any option to apply the transform to all other instances, so that still has to be done in two separate steps…