I’ve finished working on a fun cartoon project and I would like to share the result with you .
It was co-produced by CrossRiver productions and Xilam animation, you can see it on the web and the format is 30 x 1mn40.
It’s about two buddies living in a lost house in the middle of the desert, every-time they face a situation they find their own way to solve it.
Depending on your location you may not have access to the channels, but if you are in France you can see it here :
The production phase was about six mouth with a team of 6 cg generalists, 6 animators, 4 storyboarders, 5 script writers .
I would like to thanks all the people working on the project, we had a really fun time together !
Storyboard were done with Storyboard Pro. We used Krita, Gimp and Photoshop for texture work, everything else (including editing) was made using blender and we rendered using with Eevee.
If you have some questions I would be glad to answer them, I’m thinking about doing a little making of but I’m not sure yet about what to show. Feel free to let me know in the comment if you’re interested in something in particular.
I just love this! I love the style, the animation and the fact it was rendered in Eevee. I hope it gets featured on the top row.
In regards to explaining certain aspects of it. I am always curious about the rigging. Both from a technical standpoint and from an animators perspective. If you could do a rig breakdown of features for the little rabbit (Pimento?) I would love that. Any info would be appreciated really.
PS
I’d probably come up with lots of specific questions if you really do the rig breakdown Like I love how the eyes have this squashed state when closed. Is that just a model swap? Or a blend shape on the lids? Is it dynamic, i.e. autosquash whenever the lids meet? How did the team set up the eyelids so they deform so smoothly? (tons of questions haha)
I’ll do some rig breakdowns ! Good idea ! Still I can already give some answers to your questions.
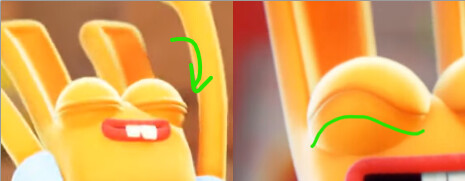
Character’s faces are rigged mostly with shape keys, eye lids are two half spheres.
The squashing was a shape key that you can activate whenever you want.
What I found quite convenient was to rig the characters with eyes closed as rest pose. That way it was easier to do these S shaped blendshapes and also easier at animation time to get them sealed for the blinks.
All that said animators have spend some times getting the poses right, parts like the sleeves and suspenders tends to break and it was hard for me to come with some automation that works. Once the animation worked there was a polish pass to solve all these issues, some of them are still visible in the final when there was no more time to fix them.
I’ll try to give more hints about the rigging process in the breakdown and feel free to ask others questions if needed !
Don’t worry about the rigs not being “perfect” (perfect rigs dont exist anyway). I am just genuinely curious what they look like and what functionality they offer.
I also had to laugh at the eye stuff being shape keys. I tend to think in overcomplicated solutions and was envisioning all kinds of fancy setups. Clearly these rigs gave the animators the tools to make appealing content which is all that matters.
I remember creating like this super complicated thing once where the eyelid curvature was driven by bones with look at constraints to a segmented smoothed row of edges (essentially a spline but not really since blender has no spline deformer) which was then controlled by other bones that drove a lattice that…
I mean I got it to work in the end (inspired by some Maya tutorial) but it probably would have collapsed into itself if a butterfly flapped its wings wrongs outside my window. Didn’t feel comfortable using that in a real rig at all. So there is much that can be said for simplicity in rigs.
You could say I am as curious to the stuff thats on the rigs as well to to the stuff thats not on there (i.e. what was good enough for this very entertaining series).
Hey !
I totally get your point ! Indeed over-complicating things is one of the fun aspect of rigging ! I try to think simpler now and put the energy where it’s needed but it takes me a while to get there. That doesn’t prevent things to break but at least it break less often …
Here is a rig breakdown, I think I’ll do other breakdowns covering other aspects of the project and latter put them together in a shorter video.
There is also a props rig demo on my vimeo page :
Feel free to asks if you have any questions or suggestions, I’m happy with the result, but still I’m aware that there is room for improvements.
The work done here is absolutely incredible and is very professional!
You say it was made by a small team, was this a passion project that you all came together to make in your spare time, or was this a more organized endeavor?
Thanks a lot @ArtAvenue !
It started a bit like a passion project with very few people involved, then it quickly become organized like any other commercial project : with producers, budget, deadlines… We were very lucky to have been joined by great people to work on the show and everyone has done his best to push the quality further.
BTW I’ll be releasing another breakdown mainly about FX, I can notice you when it’s ready if you like !
It is fun to try things sometimes just to see if you can. Totally relate to that feeling.
Thank you so much for the rig breakdown! Its very inspiring to see how straightforward it ended up being (at least from a usability perspective). Especially for the face. So few controls for so many expressions. Honestly there is a lot to unpack there.
Trying to recreate some of the functionality as a learning experience. Would you be willing to share how you split the mouth shapes up? In my own little experiments (haven’t had a lot of time to spend on them yet) I noticed for example that if I want to combine a smile with an open mouth shape I have to modulate the smile shape by the amount of open (essentially just multiply it) otherwise the two won’t blend well.
I recognized that washing machine the moment I saw it! I also can’t believe this started out as a passion project. Im in awe. I am quite curious about the FX side as well, been frame by framing through certain segments and its just so much fun to watch.
Yes, many slapstick cartoons are built that way, it was simpler to distribute the series abroad. The scripts were written in French and it wasn’t always easy to express visual comedy into text. There was a great deal of work done by storyboarders to make it work in practice.
Generally to open the mouth I use a bone with a corrective shape key. But it’s OK to use only a shape key as well.
It should work without damping the smile like you’re doing, but it may depends on the character’s design.
Some hints to make things easier :
be sure to have a very clean mesh form the start, shape keys tends to mess things up and it then get worse when they add up.
When working on important shapes ( like smile, frown, wide, narrow for the mouth) I test them with others to get a good compromise, it’s a bit of back and forth to have something that work in most cases.
At some point if the result is a bit messy, you can try to use a corrective smooth modifier with a vertex group to only smooth some parts. The downside of it is : as it’s smooth things you loose some details , that you may need to exaggerate more than necessary in the shape keys. But it can help a lot especially if you’re in a hurry.
It’s hard to make something that gives a perfect result in every situations. You can have a rig with a lot of correctives so every combinations works perfect, but it’s a lot of work. In your example, you can automate the damping of the smile shape, or just doing it yourself by lowering the smile in case it doesn’t work well when the jaw is open. Animators will try to get the most of the rig and avoid cases where there is a bad result. But of course a good basis is needed so they don’t spend their time struggling.
If you like you can PM me and send me a .blend and I’ll see if I found some fundamental issues and how to fix them.
To be clear, from the beginning we already had some specifications to start with and we known that it could be produced if accepted. Given these specifications we worked like if it was a passion project, and eventually we weren’t completely in-line with some of the originals specifications. But the project eventually gets approved and from that point it really gets organized like a standard production. From there the project still evolved a lot until the pre-production was over.
It would be really harder to get there if we only had a personal project and were looking for producers.
Wow man. I love that FX breakdown! Really appreciate you taking the time to make these. Its wonderful to get a peek behind the scenes. You destroying a set was the icing on the cake. I expected a few of them to be in the viewport but not as many. The speedlines on the sphere are genius! These are used a lot and I was wondering how they were done! I was wondering wether they were greasepencil or maybe even post. This is so much simpler!
I am also learning a bit of french as a side effect of reading all the asset names haha (‘petite fumee’ is my favorite so far) The water flowing in the kitchen was also great to see. I was wondering how that was done when I saw the episode! Some of these effects have a very claymation feel to them with their style. It really took me by surprise how simple the approach was from a technical pov. Of course its the artistry that makes it look as cool as it does.
Back onto the mouth rig. The setup reminded me a bit of jason osipa with the splitting and joystick like controls so I took a quick peek to remember the rules he uses to avoid shapes biting eachother. Its working much better now. It takes a bit of time to setup of course but that’s to be expected. I hope you don’t mind me trying to replicate some of the stuff. Its part curiosity to see if I can and part just being plain inspired by what you and your team managed to do with it. Very generous of you to take a look at the blend. When I have something more complete I’ll definitely send it your way; always open to hear your finding.
I know I sound like a broken record by now but; lovely stuff and thanks for sharing. I have submitted your work to be on the featured gallery, hopefully it won’t take too long to be approved and some more eyes will fall on this thread.
@3dioot Thanks a lot ! It’s great to have feedback on these breakdowns, I’ll try to come up with others !
Totally true !! Stop Staring was an eye opener to me, there is an insane amount of information really well explained, and most of my face rigs are based on his method !
Not at all ! It’s great if all this inspire you to study and make your own work, don’t hesitate to poke me if you want me to look at it, even if it’s in 6 mouth or 2 years ! It’s always interesting and also a great way to improve to give feedback !


 So there is much that can be said for simplicity in rigs.
 !
!


