Thank you very much for the fast reply!
1 Like
I’m still a new user and trying to see if this will work. I’ve created this using “Curves to Mesh” and wanting to unfold to get dielines for a corrugate standee. I’ve triangulated with no luck. Does anyone have suggestions or is the shape too complex? Thank you in advance!
unfold.blend (664.9 KB)
I took a look and you don’t really have a shape to “unfold”. For curved shapes like that in paper you will need a supporting frame work to help maintain the curves. You could roll the edges of the paper, then glue it, around some stiff wire and bend it into shape.
Standees are usually just a flat silhouette shape with and few supporting right angles. It might help if you posted a image of what the final result should look like.
Hey Mash3D, I appreciate the quick response!
I see your point…that was my mistake. With the shape posted earlier, I should have said flatten. Here’s a quick extrusion on that shape to create the frame/box for unfolding. The shape doesn’t solve the interior backbone needed to hold the curves currently, but trying to see if it closes the gap between structural and graphics groups with the addons. The graphics group would need the front facing for design and the structural group would need all of it to aide in the creating the backbone.
Again…I really appreciate you taking time to see if there is a solution through Blender.unfold2.blend (734.2 KB)
Ah ok in that case you will need internal cross section pieces going from left to right. The shape of each section will conform the the curve you need. The Front piece of paper only needs to be glued to each cross section as it goes across. sort of like the way airplane wings are made

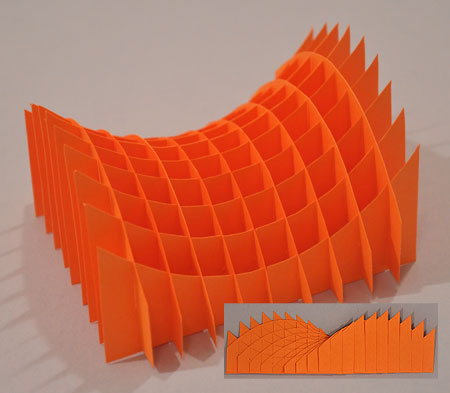
Hyperbolic Paraboloid from Parabolic Cross Sections
Not sure if I answered the question though. I’m pretty sure the add on will unfold the model Ok. But the internal cross sections will probably have to be separate objects that are just printed out flat on their own.
The outer support could in fact be enough to keep the shape. The main problem is quite technical—the script can’t calculate overlaps with the sticker tabs, so surfaces like this tend to produce impossible nets.
I believe it’s best to mark seams manually in an alternating way, so that there is empty space between each two rows of faces. Like unfold3.blend (129.7 KB) this. EDIT: Turn off Create Numbers, it won’t do any good.
If the model turns out too wiggly after folding, the solution is certainly to add supports as Mash3d suggests. Maybe you’ll only need two like a cross through the middle, that depends on the size of the model and kind of paper you use.
I really appreciate the help from both of you!
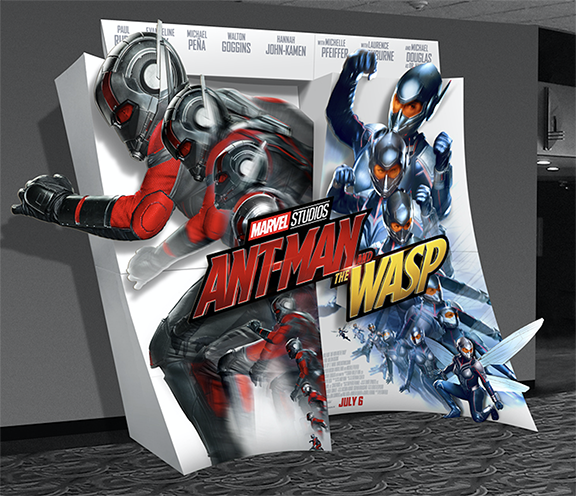
This may be giving you way too much info, but it may give you all a clearer picture of what we are trying to achieve. I’m attaching a real world project that we did where something like this should be used. Just to explain if it isn’t clear, it’s 2 columns. Each column is the same structure, but flipped. Ignore the top where the names are. Also ignore the title and characters…they are lugged on at the seam(you may be able to see the horizontal seam in the middle…it’s there because of printing press sizes). Wasp lug-on is above and below on the right and Ant-Man is lugged above on the left. It took the structural designer quite some time to figure out the angles and complex curve of the main structure. From my desk(graphics), I wouldn’t need to worry about the seam or the internal cross section(which is absolutely needed because of scale…appreciate you sharing your thoughts on that Mash3d) at the concept stage. That would be figured out by the structure group once a design is approved and such. My ultimate goal is to see if I can help the structure group solve some complex shapes through Blender and supply them starting point dielines of a complex structure to save time.
What emu sent is moving in good direction…you must not have been getting the twisted poly errors i was getting when you marked the seams where you did. If i’m clear on what you’re saying, there isn’t a way to keep the front together and have the sides and back fall where they fall? The back and sides can be separate for our needs.
Hope all of this makes sense and thank you for your efforts and input!
ah ok So it’s not so much paper as heavy corrugated cardboard. That’s a bit of a challenge. if you can cover the seams you might be able to cut it into strips length wise and glue them together to get the curves. But you probably need to be able to mass produce them also.
Yeah…that’s where the challenge lies. I know there is a flatten, but that’s more projection on a plane. I’m looking for a way to keep the curved surface together so there is a dieline vs strips.
You want to keep the curved surface together as one piece, without any seams? That’s way more evil a plan. Most surfaces cannot be unfolded like that.
I made a proof-of-concept script to make selected surface unfoldable without seams. Select the vertices in Edit Mode, copy the following script to a Text Editor and click Run Script. It takes some time.
flatten.py (1.4 KB)
It solves the mathematical problem but still it can’t do any actual magic. In the case of the curved surface you posted, it resorts to creating wrinkles. That’s perhaps not exactly what you wanted.
The front curved surface would still have the seams. The valuable part for what I do is the perimeter line to create a flat dieline for the front facing. I was really pulling for flatten that is built into LoopTools once i stumbled on it today…again…still a rookie at Blender and exploring.
HA! I like how you stated it evil…perfect way to put it. You’re correct with the script…not desired results, but I certainly appreciate you doing that. I know I threw a very complex shape at you and Mash3d.
@emu: Any plans to port Object Convert to Armature addon to 2.8?
It’s still such usefull sccript, so easy to generate armature to paper design and animate 
Thank you for info.
1 Like
Not sure if this was meant to be a support page, let me know if there’s a better place for it. I’m receiving an error (https://imgur.com/a/bPXekvl) when I try to activate the convert to armature addon at the Blender 2.79b. Does anyone knows how can I solve it?
Gabriel, you’re in the correct place. The error looks like you installed a new version of the script into old Blender. You can fix it by installing old version of the script or new Blender.
That also answers @vklidu’s question – yes, the script is working again : )
1 Like
Great news, sadly Convert to Armature gives me an error (script downloaded from main page link (2.80 version). It’s a long time I used it, but following instrutions failed with this error
Traceback (most recent call last):
  File "/Users/filip/Library/Application Support/Blender/2.81/scripts/addons/object_convert_to_armature.py", line 113, in execute
    main(context)
  File "/Users/filip/Library/Application Support/Blender/2.81/scripts/addons/object_convert_to_armature.py", line 65, in main
    vgroup = mesh_object.vertex_groups.new(name=f"Face {face.index}") #Create a vertex group for this face
AttributeError: 'NoneType' object has no attribute 'index'
- added Cube
- selected edges for split
- marked as Seam
- called Split Edges operator
- selected bottom face
- called “Convert to Armature”
- error - Create a new vertex group for this face
(I also tried to run Export Paper Model first, in case it generates the vertex groups, but script worked well, but didn’t solved the issue)
Did I skiped something?
Thank you
p.s.: I can post a blend if it helps somehow …
It’s a bug but you can easily avoid it by just selecting a face.
The script starts from the active face and apparently it crashes if no such face exists.
One face was selected.
So now I selected all of them (with bottom active), but I got an error line 113 and line 74 now
“vertex_avg” not defined
@emu: please let me know if fixed, I will update answer on https://blender.stackexchange.com/a/161399/2214
thank you
The Convert to Armature script is fixed now and it works in blender 2.81.
I also added an operator called Split Seams. It will cut the edges that were marked as seam, for easier usage with Export Paper Model.
Thank you  Awesome, works. Also “Split Seams” - handy thing to save two tedious steps
Note: probably instead of error message when running “Convert to Armature” from edit mode, would it be possible to let script at first check mode and if edit, than switch to object mode automatically?