This seems like a total Noob question, but I’m aiming for “proper” use with the Principaled shader.
And yes I know that this also depends on what shader workflow you are going to use (Specular vs Metalness) -
This because a while back I found out that for photo realistic results in general you should leave the “specular” slider set to 0,5. since this also involes IOR (1.5 for most dialectic materials).
I think that for the most part u can get away connecting these maps to the “Roughnes” slot on the prinipaled shader and maybe adding a ColorRamp shader for more control or reverse when needed.
That said, in allot of tutorials they show to just stick specular maps in the specular slot. I’m guessing this would over wright the correct setting of 1.5.
So my question is how to properly use these textures with the Principaled Shader (Specificly specular Maps).
Edit:
Here’s a brief overview of how to use the different maps with the Principaled Shader node.
A sort of recap for dummies:
-Specular maps come from and old texturing workflow (Yess we can still use it).
-Now we use a PBR (Physically-Based Rendering) workflow
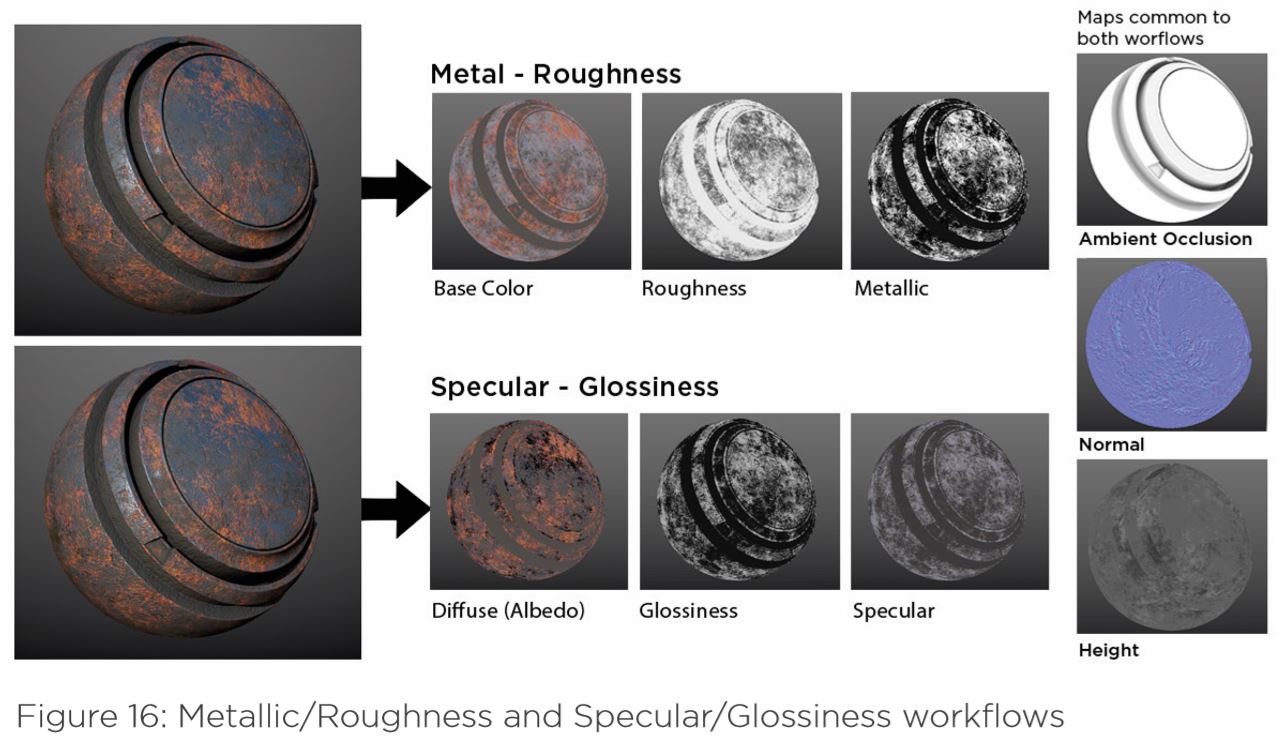
So there are to Workflows:
Metalness Workflow (PBR new)
Specular Workflow (Old)
Each comes with their own maps collection
Blender’s Principaled Shader was designed for the Metalness Workflow
(Don’t worry…we can stil use maps designed for the “Specular Workflow”)
PRINCIPALED SHADER…what map goes where???
Metalness Workflow:
Maps:
Base Color > Base Color
Roughness > Roughness
Metallic > Metallic
Specular Workflow 1:
Maps:
Diffuse (Albedo) > Base Color
Glossiness > color invert node/ColorRamp (inverted on) > Roughness
Specular > Specular
or alternatively:
Specular > Nothing…just add “Clear Coat” (for new/finished mats)
For photo realistic results in general you should leave the “Specular” slider set to 0,5. since this also involes IOR (1.5 for most dialectic materials).
Pixelgrip’s comment on use of “Clear Coat”:
Remember,the clearcoat is a seperate layer,that gets added on top of your material if you increase the clearcoat slider.
Usally if you load texture packs from materials,never is a clearcoat included or needed.its just a artistic option if you make a carpaint or something similar.
I’ve seen this some whereBut i’m looking for a more straight forward approch though, if possible.
I take it that the textures go’s in either Subtract Vlue or Add vlue?
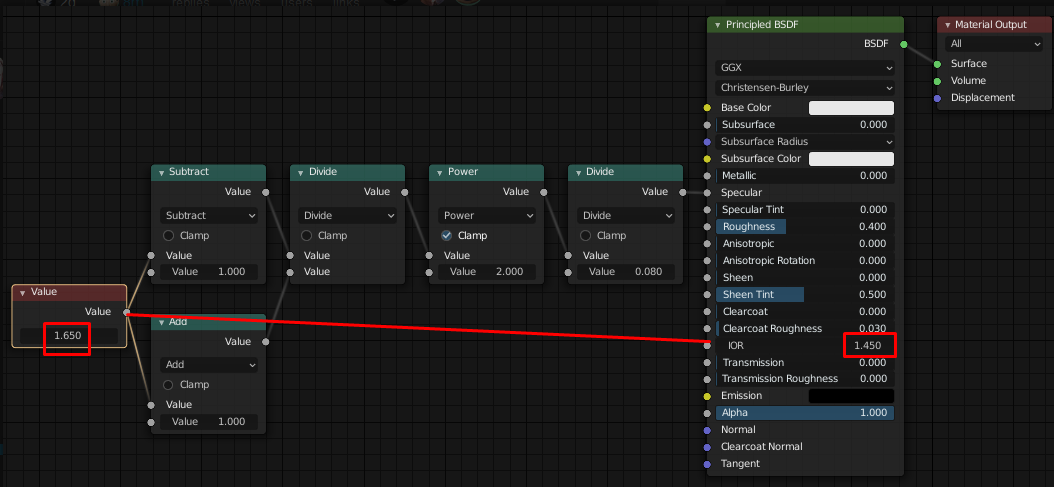
A specular map usally contains F0 reflection data (based on PBR Guide).In the principled shader,the data are artistic IOR values.With the formula Mario posted ,you can put IOR values direct.
Dont be confused,but F0 reflection data are in short,the resulting reflection amout of the Fresnel formula.
These are not IOR values and not principled specular values.
However,I have made a specular (F0) to principled specular input converting node group,based on a PBR guide.
here the link
Mario the idea behind that, the formula is even in the blender manual and the expression means that IOR and Specular are related in the real world. So I think you are making a mistake because the seed value should also be plugged in the IOR input of the Principled shader (unless you are purposely making an ‘unreal’ material).
No this IOR input is only for the clearcoat refraction,has nothing to do with the specular input.
The clearcoat is a complete seperate layer,that is added on top,if you increase the clearcoat slider.
Could one of the pro’s here make a screen shot on how to connect these maps to the principled shader for both workflow’s?
If possible 1 screenshot of a simple node setup (without extra nodes) just connecting the maps straight on.
And 1 screenshot of a somewhat accurate node setup. But to keep this also simple, just using a ColorRamp (to reverse or saturate a map) node in between some of these maps if needed.
I understand that you can go as deep as you want with these node setups to get a as real and accurate result as possible.
But for simplicity’s sake for us less experienced and starters, I would be nice to have a clear guide on what maps goes better in what slot.
Here’s a screenshot from one of the guys over @Reddit:
I forgot to mention that I mainly Use EEVEE. I imagine that results between EEVEE and Cycles can differ. But a simple setup should transfer wel between both right?
For Metallic/roughness workflow (default workflow of cycles)
roughness ->roughness ,yes
Metallic ->Metallic
For Specular/Glossiness workflow
glossiness-color invert node->roughness
specular-needs to be converted->specular principled
in your screenshot,if you go metallic workflow,then you dont need specmap,but a metallic map into metallic to tell the shader where the metalparts are.sometimes not metal map is include for download in texture packs (if wood floor ie)then you dont need metall map and no specmap (its specular value is mostly 0.5 for a IOR of around 1.5 that is a roughly common dielectric value.)
for specular you need a converter as sayed (depents of the source,from which engine in what units the specular maps are stored)in my converter example its based of the PBR Guide (from the guys who made the Substance Painter)
I’m just not clear yet on the “specular-needs to be converted” explination.
Converted how? Using nodea in the “Converter” category in blender, or do you rather mean using apps like Materialize/AwesomeBump?
remember,the clearcoat is a seperate layer,that gets added on top of your material if you increase the clearcoat slider.
usally if you load texture packs from materials,never is a clearcoat included or needed.its just a artistic option if you make a carpaint or something similar.
btw do you have a specular workflow texture pack for testing,ideal same workflows packs (specular pack and metallic pack) for check against each other?
I practically always use only color, roughness, normal and alpha. The formula and the table sometimes help when something looks wrong, but I don’t know why. For me, Blender is an artist’s tool, so things have to look cool not physically correct.
I’m mostly focused on ArchViz. Eventhough I want to achvie a realistic look…I’m not that concerned with ultra realism. But it helps if for a big part you can achieve realism by just using the tools at our disposal right.
The thing is sometimes you’re dependent on what maps a material offers (sometimes all of the maps for both workflows). So based on that its good to know how to use which maps.
But now I’m a bit confused again about this specular map thing. Because yesterday I was convinced that that was a older workflow. But its actually more dependent on what workflow the renderer uses, both are “PBR” workflows.
Or is there something like a old and new specular map type (Arroway textures for example)?.
This is more technical now, but i think that as far as the question of this topic goes, it’s answered.
So if you guys agree, I’ll edit 1st post with this answer: