Hey Chris, i have the impression that in the renders where the forehead is shown, the skin color/tone is different, or is the lighting?
For this kind of situations, and many others, a corrective shapekey of “shapekey combinations” that does not work is a great solution.
I mention some time ago that back in maya i used the BCS (Blendshape Combination System) to work out the combination (compound) blendshapes so you will never have issues with combinations that dont work.
Nowadays maya also has a corrective combination system that can work with joints.
Finding a way to do that in Blender will be a great option to solve those situations.
Yes that would solve a few things, and could no doubt be done via expressions
(if only I knew the formula for driving a shape key only when x, y and z occurs…).
I will try with a shape keys for now, I am afraid, though, that this can quicly become messy because I am linking one model to many different scenes and many .blend files.
I remember some time ago you showed this demo with the arm, are you going to implement this feature ?
I’m hitting a logistic wall with my own face rig right now. So, I want to handle displacements entirely in the skin shader so I can use drivers to control tension maps. Problem is, the hair growth cannot interact with the shader info, so my character’s vellus and stubble will intersect with the shifting displacement.
How are you handling this issue with your vellus? @ChrisJones
Interesting, I feel like that (or something like it) might have been mentioned a while ago. Does the add-on need to be active at all times, or can it be dispensed with after it’s generated drivers or something?
Do all your scenes need that pose, or could you make only the ones in question local, make a shape key, and transfer it to each of them? Or maybe you could use overrides (I haven’t used linking before though, so that might just be nonsense talk).
I’d need to do some more tests to see whether it’s practicable, although with so many other things taking precedence that’s probably more of a longer term project.
Coincidentally this is something I hadn’t noticed until shortly before I read your comment, so evidently I haven’t been handling it at all… I wasn’t able to find a way of doing it with the Displace modifier, so until hair nodes come along - and provided they interact with shader nodes - we’re stuck.
On the bright side, it’s taken me this long to notice it, so maybe it’s not too critical provided the camera doesn’t get too close, the hairs aren’t too obvious, and the wrinkles aren’t too deep…
I just did some quick tests, and it looks like shader displacement is invisible to the Surface Deform modifier as well (which is what I’m using for eyebrows and other facial hair). So that means frown wrinkles intersecting eyebrows, smiley cheeks tearing through beards, dogs and cats living together… MASS HYSTERIA!
Aha!. I think the video will be a showcase of the texture work with different skin tones with some animation showing the wrinkles. You don’t have to answer to that.
BTW, if each render is taking more than an hour, i’m guessing render the whole video will take still some months(2 or 3)?
Most of the re-rendering is done, and there are about 360 frames to go out of 1,130, so maybe half a month or so of rendering left (but then I have to make the soundtrack…).
I bought your Human Rig Face and it’s great! But as it doesn’t comes with the eye liquid mesh meniscus I’m trying to build by myself while taking advantage of your rig, drivers and shapekeys. Although creating new vertices on a previous shape keyed mesh leads to undesired results as it blends by the indices of the vertices and, you know … Do you have any advice how can I reuse some of the work in the rig but retaining the overall form of the new mesh while dynamically deforming it like in you video? How was for you doing that? Did you have to re-project the meniscus mesh for each relevant shapekey from scratch? I’d appreciate if you can share some light on this.
i am sure yet, but it i think both (RBF) and this addon should work well together, in due time when is released, tho i recommend you trying rbff drivers, i think you may need it at the moment tho…
this is a very “popular” problem with realistic hair, if you cant see the pores positioned in the base its not well done, but still i find that very convoluted, too difficult to achieve the effect in a manual and procedural way, but maybe procedural is only possible in due time as you say with shader/hair nodes can be achieved some masking effect, or even scattering of an actual single pore texture in every hair particle, well is just an idea that might be possible tho…
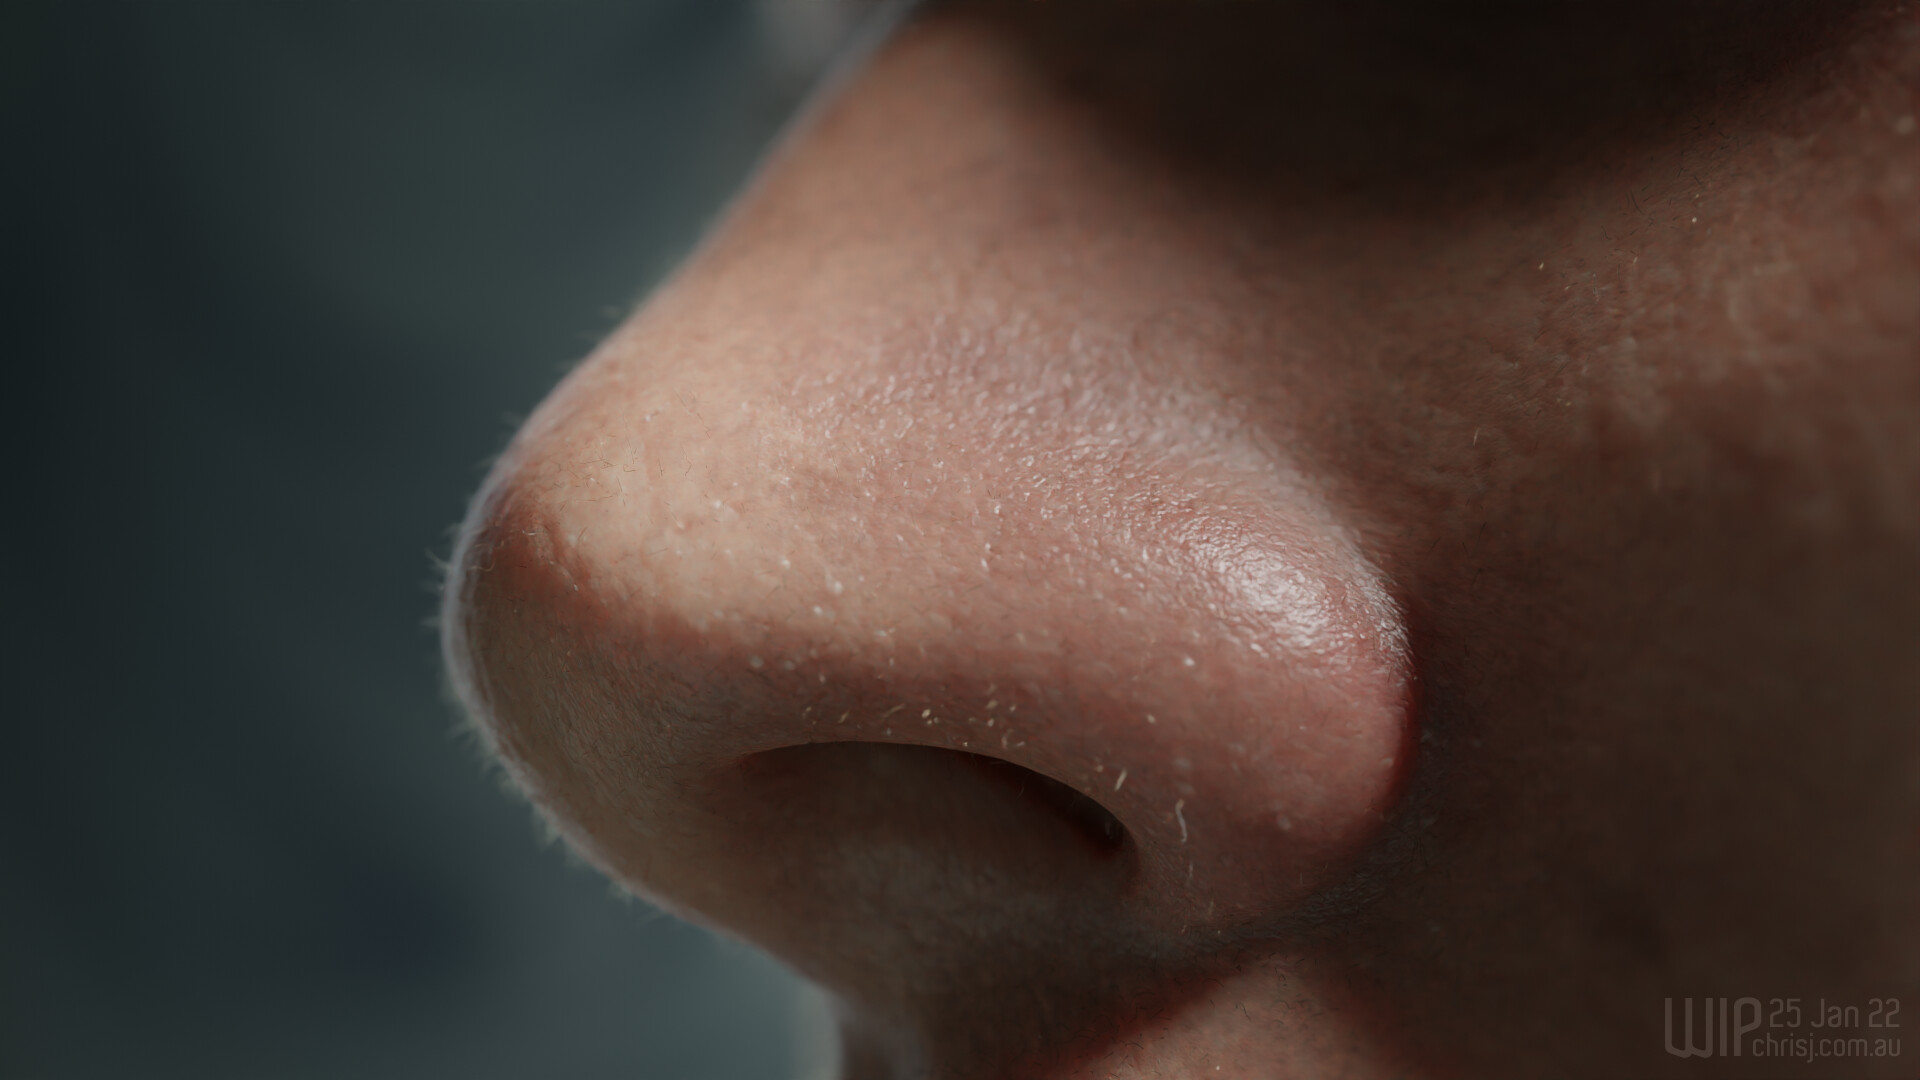
There’s some subtle shaping that was sculpted and baked; the finer bumps are painted in Krita (mainly using brush masks that were themselves sculpted and baked); and the finest bump is Voronoi.
If you duplicate the mesh around the eyelids, that brings the weights and shape keys along with it, and most of the work is done. If you add any vertices after the fact and they’re straying from the rest, you’ll have to adjust their weights and shape keys independently. It’s fiddly and tedious, but I haven’t found a better alternative thus far.
Strangely I’ve seen very little mention of it anywhere, and therefore I can’t find any workarounds. Having a displacement node that’s not recognised by hair or Surface Deform (or most likely anything outside the node system) seems like a glaring omission to me, and it puts the whole dynamic wrinkles concept in jeopardy (again).