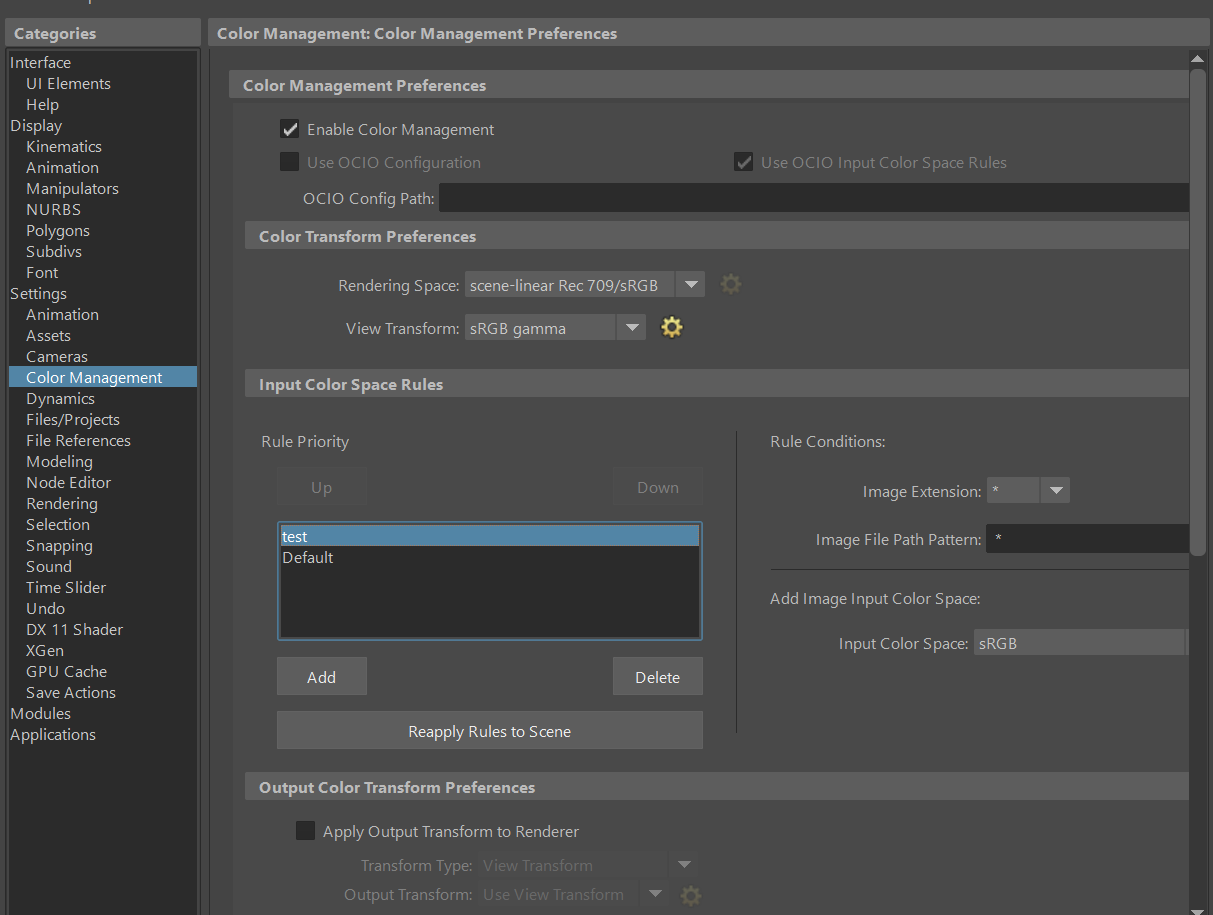
So theres this ACES system which is supposed to be better and more advanced than FILMIC blender. i installed it correctly. But you now have a choice of about 1,000 transformation modes for each texture.
I gather than for general textures you have to select Utility Linear sRGB. but its time consuming to select.
For HDRIs im not sure what transform to use. And for bump maps and others where i would normally select “non color data” i cant even find an option…
I make a scene tried making some PBR materials using just sRGB, but then open up the other version of blender with the OLD color-management for comparison and i get a different result.
Is it worth continuing with ACES? does it feed cycles with better data or more dynamic range? will my colors look more accurate?
I have trouble understanding the ACES workflow as well.
You could write book in reply to seemingly simple questions like these, so this isn’t a very full answer. It’s not even much of a jacket blurb 
The idea behind ACES is to be able to convert output from a large number of different camera formats to a single, very large colour space without data loss or distortion. So using ACES won’t create any new, better data, it just might help you lose less by keeping your data scene referred.
ACES was created more for combining film and video, however cg data has been included from the start since cgi is such a large part of film making.
The down side of ACES is that it doesn’t do gamut mapping, so renders won’t necessarily match output made with Filmic enabled. On the other hand, we might not have had Filmic without ACES having been developed soooo . . . something to be thankful for.
The short answer is if you’re not doing data transforms from different input devices you might not need ACES, and if you’re looking for ways to set colour spaces for rendering .png or .jpg textures you would be kind of missing the point.
Rendering to ACES, on it’s own, isn’t a button that will make a ‘better’ render. That’s not to say ACES isn’t a very good thing or won’t do any good, it will do a really good job at helping with the things it can help with, and maybe one day it will be the default setting.
Will your colours look more accurate? They might look the same when they come out as when they went in, but you’ll be viewing them on the same monitor.
There is a fuller answer over on stackexchange - https://blender.stackexchange.com/questions/173981/integrating-cg-imagery-with-footage-from-cameras-using-aces?noredirect=1
There is also some explanation here that will help fill a few knowledge gaps if you have any - https://hg2dc.com/
ACES is a pretty big topic, it’s not a one button solution. You will benefit even if you’re not going to be working with Camera Footage and integrating into Plates. The Lego Movie was rendered entirely in ACEScg even tough it is full CGI, to get those brilliant colors and correct looking Lights.
Will the renders look better? If you do it correctly yes. You will get a free GI bounce, you can push more lights into the scene, your colors will not look as washed out as they do with some of the Filmic Tonemapping modes.
Is the difference worth it versus the time invested? It depends. For most people it wont be worth it. The time spent reading up on the topics, making sure you don’t make an error along the way and fuck up your color pipeline will most likely overshadow everything else.
Collaboration and working together in ACES is a bit of a pain, because everybody needs to know how things are done correctly to not break the color pipeline. Also any Assets you get online need to be checked/converted.
Every Flat Color you input into any Shader/Material needs to be ACEScg instead of Linear.
(Bonus: Blenders Color Picker widget is completely fucking broken in HSV mode when you are in ACEScg; only typing in RGB works)
If you’re rendering in ACEScg you most likely want to do Compositing work also in that space, so you’d have to learn how to do that in Fusion, Nuke or Davinci Resolve/Fusion. I don’t care for Blenders Compositor workspace it is pretty ham-fisted/useless and can’t be executed properly without rerendering.
>>Filmic is easy to use and the results can be very good.<<
Conversion:
Also you don’t want to convert everything, Textures that contain COLOR (Basecolor, Albedo) are going to be converted to ACEScg while textures that contain DATA (Roughness, Spec, Normalmaps) are gonna be left alone and input as Non-Color/Raw (Linear sRGB) just as you did before.
For sRGB you’d use the “Utility - sRGB - Texture” transform, same for the HDRI. They are both in Gamma 2.2 sRGB; only difference is the HDRI is 32-bit floating point while the other texture most likely is 8 or 16-bit integer.
EDIT: Correction Actually for HDRI and floating point textures a use of “Utility - Linear - sRGB” is being suggested.
The “Utility - Linear - sRGB” is for textures in Linear sRGB space, meaning Gamma 1.0 and not for images with a Gamma 2.2 curve. So don’t use that for standard sRGB textures (8/16 -bit integer)
Additionally you actually don’t want to load sRGB textures into Blender / any 3D DCC-App if you are creating bigger scenes. Because then they get converted to the ACEScg color space upon Rendering initialization. You can save time here by preconverting your textures (via OpenImageIO’s oiiotool, or OpenColorIO’s ocioconvert binary). A Linux server with pipeline tools like (OCIO, OIIO, ffmpeg, imagemagick, Alembic, USD) compiled from source is perfect for work like this and helps with the boring/technical stuff if you have a team that needs to work in ACES.
ACES doesn’t do any magic. It exacerbates problems across the board. In no particular order:
- It uses wide primaries that are close to BT.2020 with an imaginary green component. This leads to negative values, and because of the lack of gamut mapping, will break all imagery by default. This is easy to see.
- ACES for the sRGB output misplaces middle grey to a value that ends up approximately 0.8 EV lower than that of an sRGB-like display.
- LEGO, as cited, was passed off to a professional colourist who had to fix quite a few gamut mapping issues I believe. It was a different transform as well.
- ACES default RRT is vastly too contrasty to a disproportionate number of people. The nature of the aesthetic transfer function, coupled with this exaggerated contrast, exacerbates the default woeful looking results due to the lack of gamut mapping.
- ACES and Filmic share precisely the same dynamic range for sRGB display output. 16.5 stops, -10 EV to +6.5 EV. This can be confirmed by examining the ACES shaper for the sRGB output. This was by design.
There are plenty of demos out there on Twitter when this came up last time.
So where can ACES benefit you? In theory if you want to render to a wider gamut destination, the primaries of the rendering space are wide enough, but the lack of gamut mapping generates plenty of horrific looking issues and outright broken looking imagery.
Why is it adopted in pipelines? Post houses deal with a lack of colour knowledge on a day to day basis. ACES at least asserts a baseline. Very few places will be using the RRT as it is, and they all will have a professional colourist at the very least standing by to try and fix the issues, or at worst a colour scientist.
Finally, Blender is not colour managed. Had it been, Filmic would have been wide gamut using BT.2020 primaries.
Until Blender is fully colour managed, it simply isn’t ready to make the leap to wide gamut working spaces. The audience is barely ready as a whole, and the developers won’t have a care in the world until that pressure develops.
Will ACES help you generate “better” looking imagery by default? Flatly false. I’ll leave it to the folks who have done their homework to point out how clearly busted up the default output is, or one can search on Twitter for apples to apples comparisons, done by folks who know what they are doing.
False. It was rendered using DCI-P3 primaries.
Am I biased? I can happily bash Filmic on the technical issues. I can point out the warts on the Filmic colourspace and transforms easily. Will Filmic by default generate a better looking image? Do those tests. ![]()
Thanks for the tips.
Sounds like a job for AI… If they fed a lot of proper output with all the issues fixed by a color scientist and use it as a discriminator in a adversarial neural network could they not train an AI to take any color input like frames of a movie and convert it to a more proper looking output with wide color gamut for things like Rec2020 TV??
Also what would be nice is a new JPEG standard that has even better compression and wider dynamic range & color, along with better tvs, monitors that are closer to rec2020.
For me as im just a hobbyist im definitely going back to standard filmic blender.
Thanks for the corrections troy!
Very good info!
There is a ACES Working group for the Gamut mapping problems, so we might see a solution for this in the near future.
If you have the time, could you link some of those twitter comparisons? I find it very hard to navigate twitter / find examples. And even then i can’t know if the person transformed all colors / textures correctly and didn’t just hit render with the OCIO Environment variable set to ACES.
Thanks.
@organic pretty much nailed the core issue above, but it goes unnoticed, or misunderstood.
Currently, the gamut mapping VWG only addresses the working space issue, which while a step in the right direction, is less of an impact than the display referred output. In order to address the whole problem, it would need to also effect the output to display as well. There is hesitance to do this, sadly, as there is a diverse group of stakeholders each with their own needs. Flatly, there doesn’t appear to be much concern.
I can try to explain it here for those folks who are interested, as I’d hope that more than a few would be, but that’s not always the case. I am happy to try and flesh out understanding of the tremendous influence gamut mapping has on work. It’s absolutely mind bogglingly huge.
There are several really well done examples out there. If we look at only the sRGB primaries case, for an apples to apples comparison, the following applies. Note that the huge impact on work that the lack of gamut mapping has cannot be understated. In fact, this rather nuanced subject results in video games, cell phone imagery, and plenty of other things yielding entirely broken and horribly skewed results that even introductory level image makers can spot once they are pointed out.
In the comparisons, there are many places that things can go off the rails that make the results appear quite different. To be very clear, ACES is not some magical creature; all colour spaces ultimately come down to:
- A set of working rendering primaries and a white point.
- A set of transfer functions that determine encoding and aesthetic output.
In terms of the radiometric-like RGB values present in the rendering system, both ACES and Filmic use precisely the same dynamic range. That is, as outlined above, both grab -10 EV to +6.5 EV around middle grey, which is assumed in both cases to be pegged at 0.18.
ACES uses different rendering primary lights compared to default Blender and Filmic. That is, the three reddish, greenish, and blueish lights it fires into the scene in the path tracer are different. For the following, sRGB mixtures are derived, to keep the comparison similar.
If we focus on those things, and keep some of the minor details off the table, there are several issues with ACES out of box:
- When we view on an sRGB-like display, our “middle perceptual” value is a byproduct of an evaluation against the maximum display output value, and our minimum. Typically this means that on SDR displays, the “middle of the display’s emission” is around 18-20% of the light. The problem is that ACES doesn’t output the scene radiometric-like values at this point, but several code values lower. This is roughly akin to about a 0.8 EV reduction at the display. It’s a nonlinear result however, so not strictly an exposure shift, as it collapses values down too low.
- The default aesthetic transfer function baked into the RRT is exceptionally “contrasty”. This has to do with the history of ACES as an archival attempt, where emulating a certain baseline negative to print stock chain was important. In the early going of Filmic, it became clear that folks were attached very heavily to sRGB and required something close to the sRGB “aesthetic” result, and as such, the default aesthetic transfer function had to roughly approximate that sRGB tonality to avoid exploding everyone’s work up too far. Due to this difference of design, the Filmic medium high and high contrasts are closer to the default ACES aesthetic in terms of contrast.
Phew. With that out of the way, some folks have tried to do some apples-to-apples comparisons. That is, implement a +0.8 EV shift on the radiometry in the scene for the ACES outputs, and use a suitable transfer function under Filmic that more closely maps to the ACES look.
First is Adriano Oliveira’s comparison. Note that due to the lack of colour management in the UI, the light source is not a 1:1 mixture with the achromatic sRGB light colour. Minor detail, as the images speak for themselves:

In terms of the gamut mapping adverse effects, here’s a quick sample of mixtures increasing in intensity.
To fully appreciate what happens, as a radiometric-like set of RGB values ascends in the rendered scene, it requires mapping to the output context, typically a display. This is indeed a part of gamut mapping, and the ever in vogue “ZOMFG TONE MAPPZ!!!111” silliness read all over.
An aesthetic transfer function however, does not make for a gamut map. In fact, as values are mapped to the display, the aesthetic transfer function will put a single value of the triplet up quite high. At some point, there is no more “room” to express the proper scene ratio, and the ratios “skew”.
Warning: The following will likely break your ability to look at imagery forever. You have been warned, as once you start spotting the breakage, you can’t help but see it all over the place.
First, here’s a general manifestation of digital RGB lack of gamut mapping; values collapse and skew. Notice how the upper mixtures transform into the broken compliments as we progress down the sample image, forming what I call the “Notorious Six”, being purely saturated red, green, blue, cyan, magenta, and yellow. The cyan, magenta, and yellow are the most frequent due to the nature of the mixtures.
This will happen to all mixtures, in nearly every image made, as typically scenes will have a larger range of radiometric-like intensities.
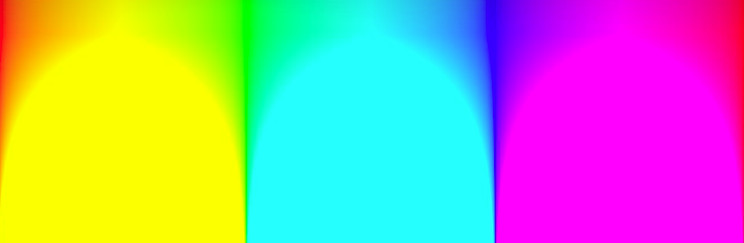
See how a majority of the discrete mixtures all turn into a swamp of identical colour? This is ultimately a gamut mapping problem.
It also happens with any mixture of reds, along through green. Green foliage, skin tones, etc. all skew to the completely broken yellow output. Skies will burst to cyan, etc. Everyone reading this has likely seen it happen in video games. Here’s a good example of an aesthetic “filmic” transfer function in Demon’s Souls. See the sky?
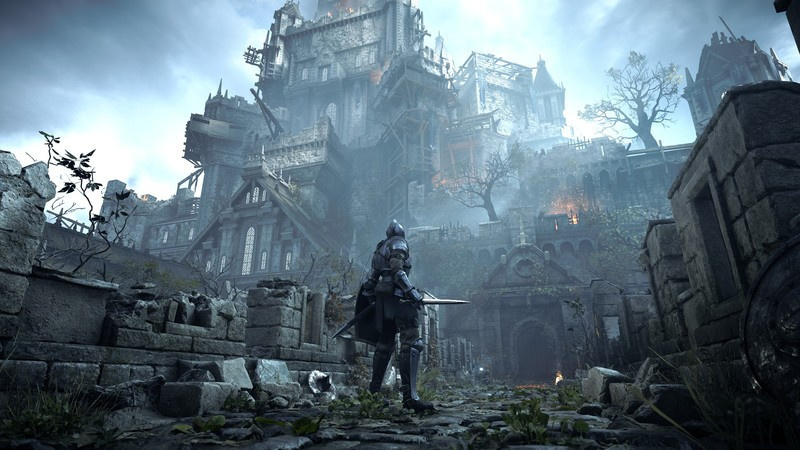
Note how the broken skew to cyan detracts from the overall aesthetic gritty vibe of the whole piece as a result. It’s subtle, but very clearly tearing apart.
Mike Pan did some very good demonstrations of the broken gamut mapping problems all around us. Here’s a simple demo from a cellular phone. Note the familiar broken skew, and Mike’s quick pass to correct for it. Despite being a cellular phone example, these problems happen in all display rendering transforms unless accounted for.
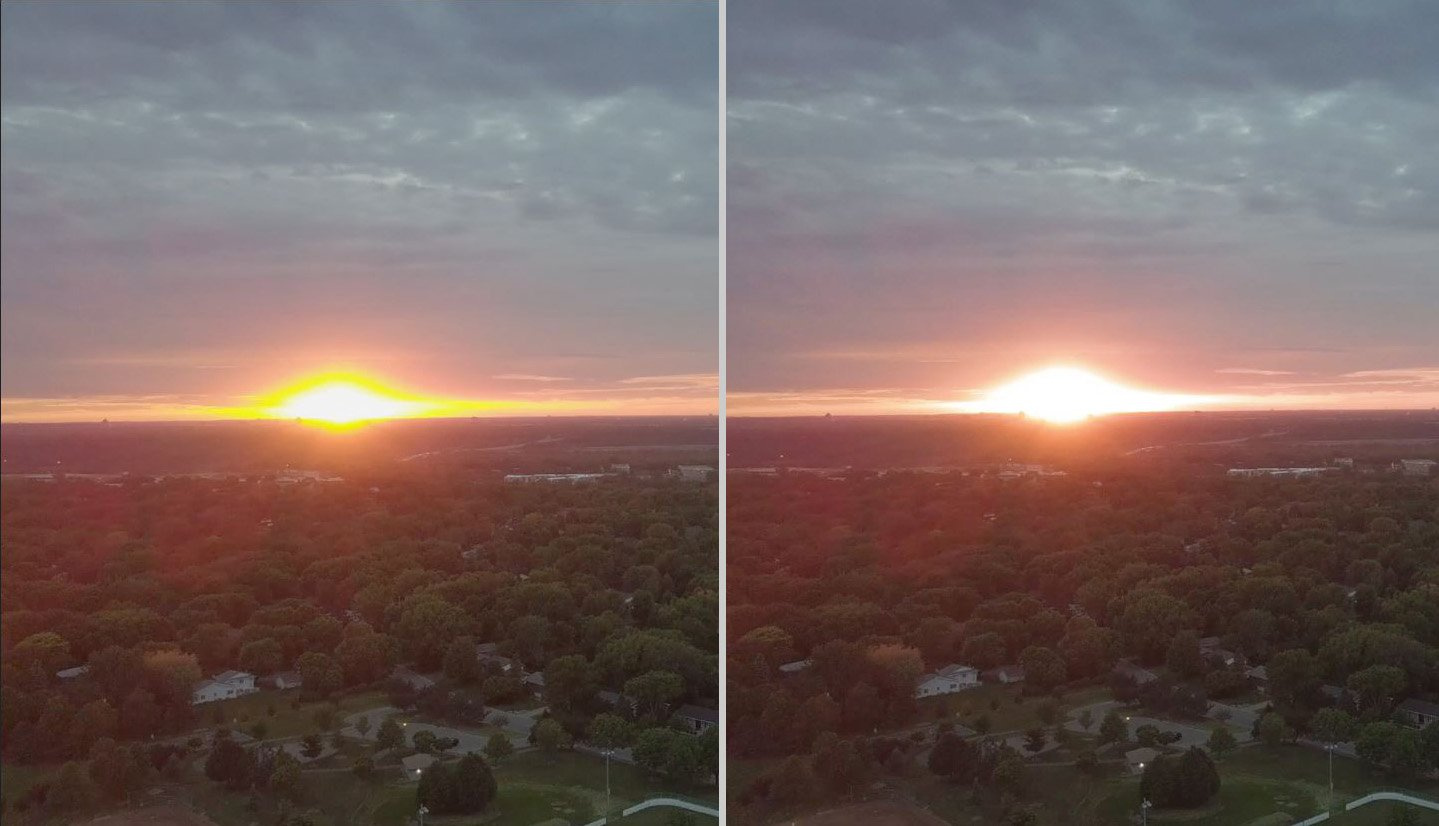
Hopefully this is a decent introduction to the tip of the gamut mapping iceberg.
TL;DR: When the comparisons are done properly, with no massaging beyond the exposure and contrast selection, the results speak for themselves.
Thank you so much troy. This is Amazing!
I learned a lot today.
Here’s a sample of the gamut mapping shearing via some recent demos that Jason Clarke kindly did via Twitter.
Let’s look at Jason’s examples.
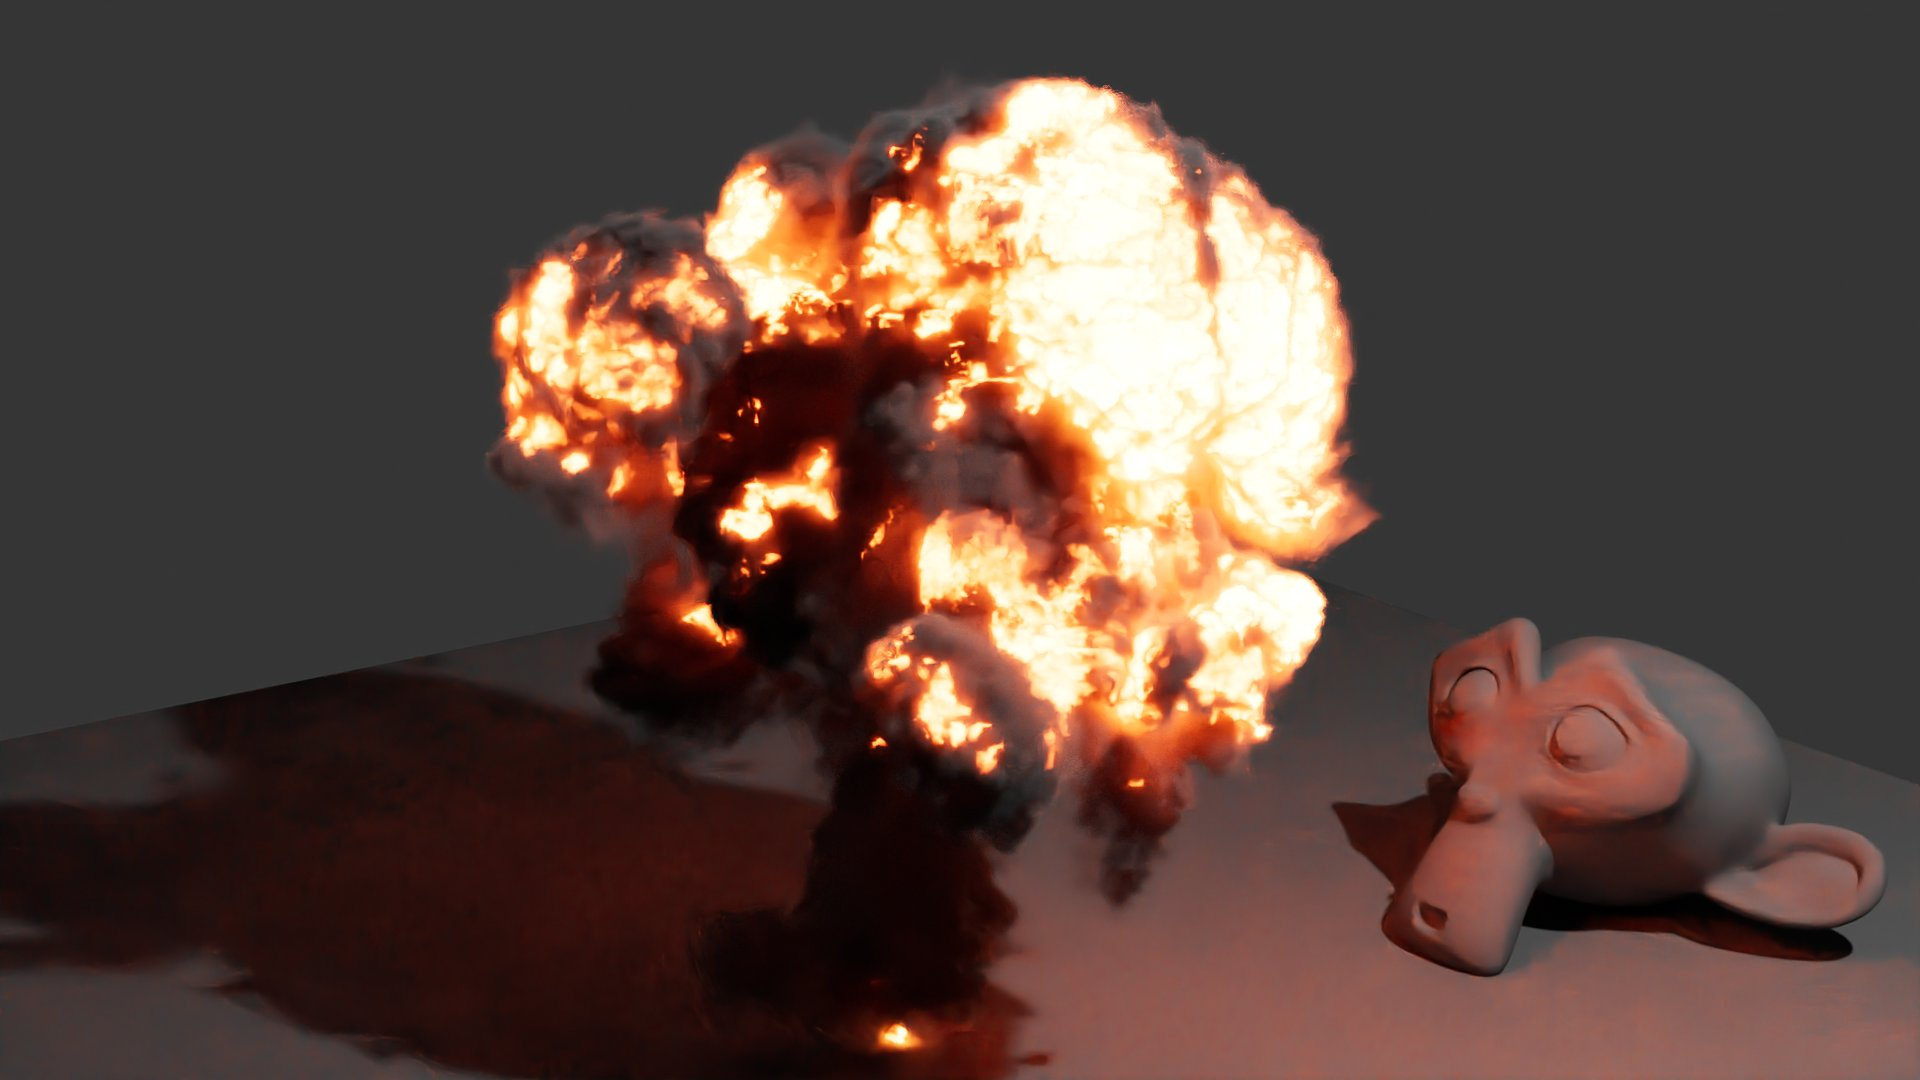
ACES default RRT +0.8 EV hack, using sRGB based mixtures to avoid wide gamut errors being more glaring:
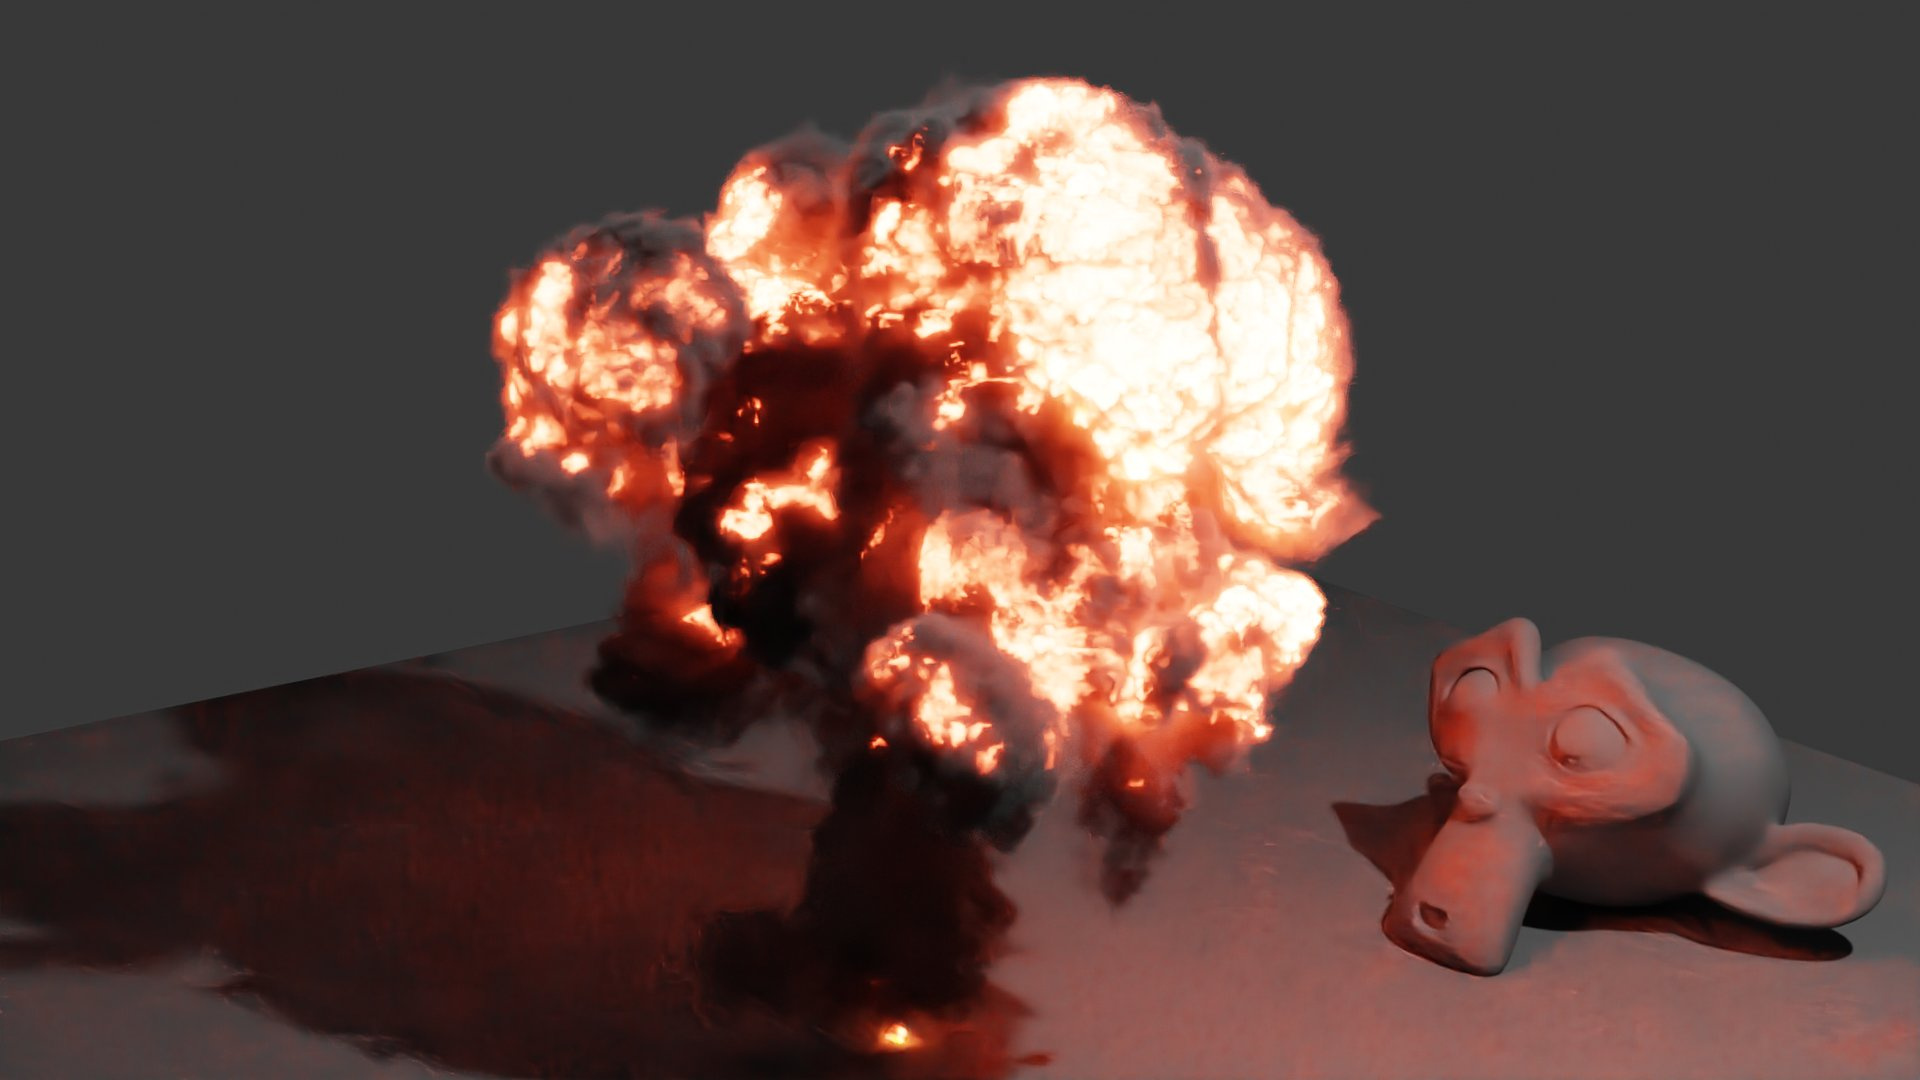
Filmic, high contrast:
So notice the familiar yellow on the top ACES image in the transition? Here the scene’s RGB ratios are being mangled up at the display output side, collapsing to the exact progression to cyan, magenta, and yellow. It is barely acceptable here, because it’s a fire, and folks have unique memory colour for things like fire that make things like broken yellow less glaringly obvious.
In the Filmic case, the RGB mixture cannot be expressed at the display, so the logical result is to increase brightness. Given we cannot maintain the original mixture, a closer “at higher intensity” value is output, which includes complimentary light, thus desaturating. This isn’t entirely illogical, as the fire must get “brighter” at the output in some way, and has a good bit of precedent in film emulsions where the dye layers burned off the film stock.
“Ah, but the ACES image goes to white too!”
This is correct, but it’s literally an accident due to the ratios moving up and up and up, eventually all hitting peak display output. This accident is exactly what leads to the skewing! It’s possible to even see some ratio skewing happening on the Suzanne model if the two images are flipped back and forth.
It is also worth noting that it’s not simply about the gamut compression at the high end, as the Filmic result actually ends up with a tiny bit more detail in the flames themselves. This of course varies from image to image, but the gist is hopefully clear.
Here’s a sample from There Will Be Blood, as shot on film, with a reasonable digital rendering, with a low peak display referred output:

“But I like the yellow!!!11!”
This goofy line has been used before, and an experienced image maker would be hard pressed to suggest that Yoda’s green lightsaber should skew to bright yellow as the broken mixture moves up in intensity. It’s a ridiculous take, but even if it were true, and someone wanted that broken digital look like anachronistic scratchy tracking marks on VHS tapes or gatey MP3 over compressed sounds are an aesthetic, those should be creative choices, not forced upon every image maker. Do that in a grade, not shear apart by default in the display rendering transform.

Phew. Sorry for the long posts.
Again, if anyone is keen to further understand how and why the gamut problems happen, including significant manifestations at the noise floor, that sadly neither Filmic handles, feel free to let me know and I’ll do my best to provide information on this rather fascinating subject.
Some folks think I’m trying to defend stuff. I’m really not; I don’t have any emotional attachment to anything. I wish I had done more to be honest, but alas… even the rudimentary gamut map still holds up reasonably well five years later.
I hope that these sorts of examples help to get the fascinating subject in front of more people. It’s a hugely deep subject, believe it or not! There’s no easy answers in any of this!
The goal of these sorts of walk throughs will hopefully excite image makers, and help them spot the issues in their own imagery.
With specific regard to display rendering transforms, my personal and utterly subjective opinion is that by default a display rendering transform should handle all aspects of gamut mapping to, at the best of it’s ability, provide a chrominance-neutral output. Filmic and ACES both utterly poop the sheets on this front, due to the nature of their shared single channel lookup approaches.
Within that, when Filmic was being designed five years ago (yikes that long?) it was specifically designed to include a rather basic gamut map to negotiate some of the complexities.
So again, this isn’t an aesthetic tirade, nor should these posts be interpreted as such. The sole goal is to get folks to pay closer attention to their own work and start spotting somewhat “invisible” or hard to express ideas that they may have seen / be seeing in their work.
Hope this helps!
I’m confused by this. Doesn’t this mean it was indeed render in ACEScg and display in DCI-P3? I’m honestly asking as this is a new thing to me.
I know I’m only copying a portion of the page, below the link to the full page. It’s something I read a while back and I seem to remember the author said they rendered in ACEScg. Or maybe not?
I’m reasonably sure recalling that the original LEGO movie wasn’t using the entire ACES pipeline (common) and only a chunk. I believe it may even predate the ACES AP1 designation. You can see some of Steve Agland’s explorations timestamped from 2014, which was a result of some of his work at Animal Logic at that time I believe. Sadly the original ACES forum is not public, so some of the connecting conversations are not currently available.
If memory serves from discussions, the original rendering primaries were DCI-P3, which is extremely common of course, given it is a theatrical standard.
ACES was designed as an archival format, so some of these issues were somewhat evolutionary. Regarding Blender, the reason that OCIO ended up integrated is directly tied to Tears of Steel. Some of the history of that can be found here. At the time, the whole notion around rendering using the native original ACES primaries was not entirely a clear option. Most of the problems that popped up led to the development of AP1.
Confirmed with a very reliable source that LEGO was DCI-P3 D60 as a working space.
According to this presentation by Alex Fry, it was indeed rendered in DCI-P3 (LEGOP3) and then converted into ACES together with Footage from Arri and Canon 5D Camera.
")
Back in 2017, Autodesk took over the OCIO development(branched) and are set to deliver OCIO 2.0 after Siggraph in August. OCIO 2.0 is a big improvement and will incorporate Autodesk’s Syncolor tech - which is Maya’s native colour management and uses more accurate CTF/CLT and is closer to ‘ground truth’ spectral rendering.
Max dev team are also working on colour management and early next year autodesk will start incorporating OCIO 2.0 into Max/Maya. Also, Adesk will release OCIO 2.0 and it will remain opensource and will no doubt be the standard when ACEScg finally irons out its remaining issues and we all migrate to it, just as we all once did from legacy non-physical lighting/rendering to the LWF.
I would advise going here for all the info you will ever need on ACEScg https://community.acescentral.com/
It’s awash with experts and you will see people like Chris Brejon(linked above) and the legendary Thomas Mansencal of WETA post regularly.
We used the same on a recent project. Rendered raw images (Maya/Renderman) in Linear/ACEScg with DCI-P3 D60 as the view transform both in Maya and Nuke. The advantage of this vs. sRGB was mostly a better rolloff in the brights.
I would welcome the ability to set Blender to output ACEScg and use a P3-D60 view transform. It is noticeably nicer than sRGB.
Wouldn’t that be using ACEScg as your rendering space, not P3-D60? And why use P3-D60 as the view anyway? Are your monitor calibrated for that?