Modeling Modern Sonic

So um. I’m a Sonic fan. (Kinda reluctant to admit that)

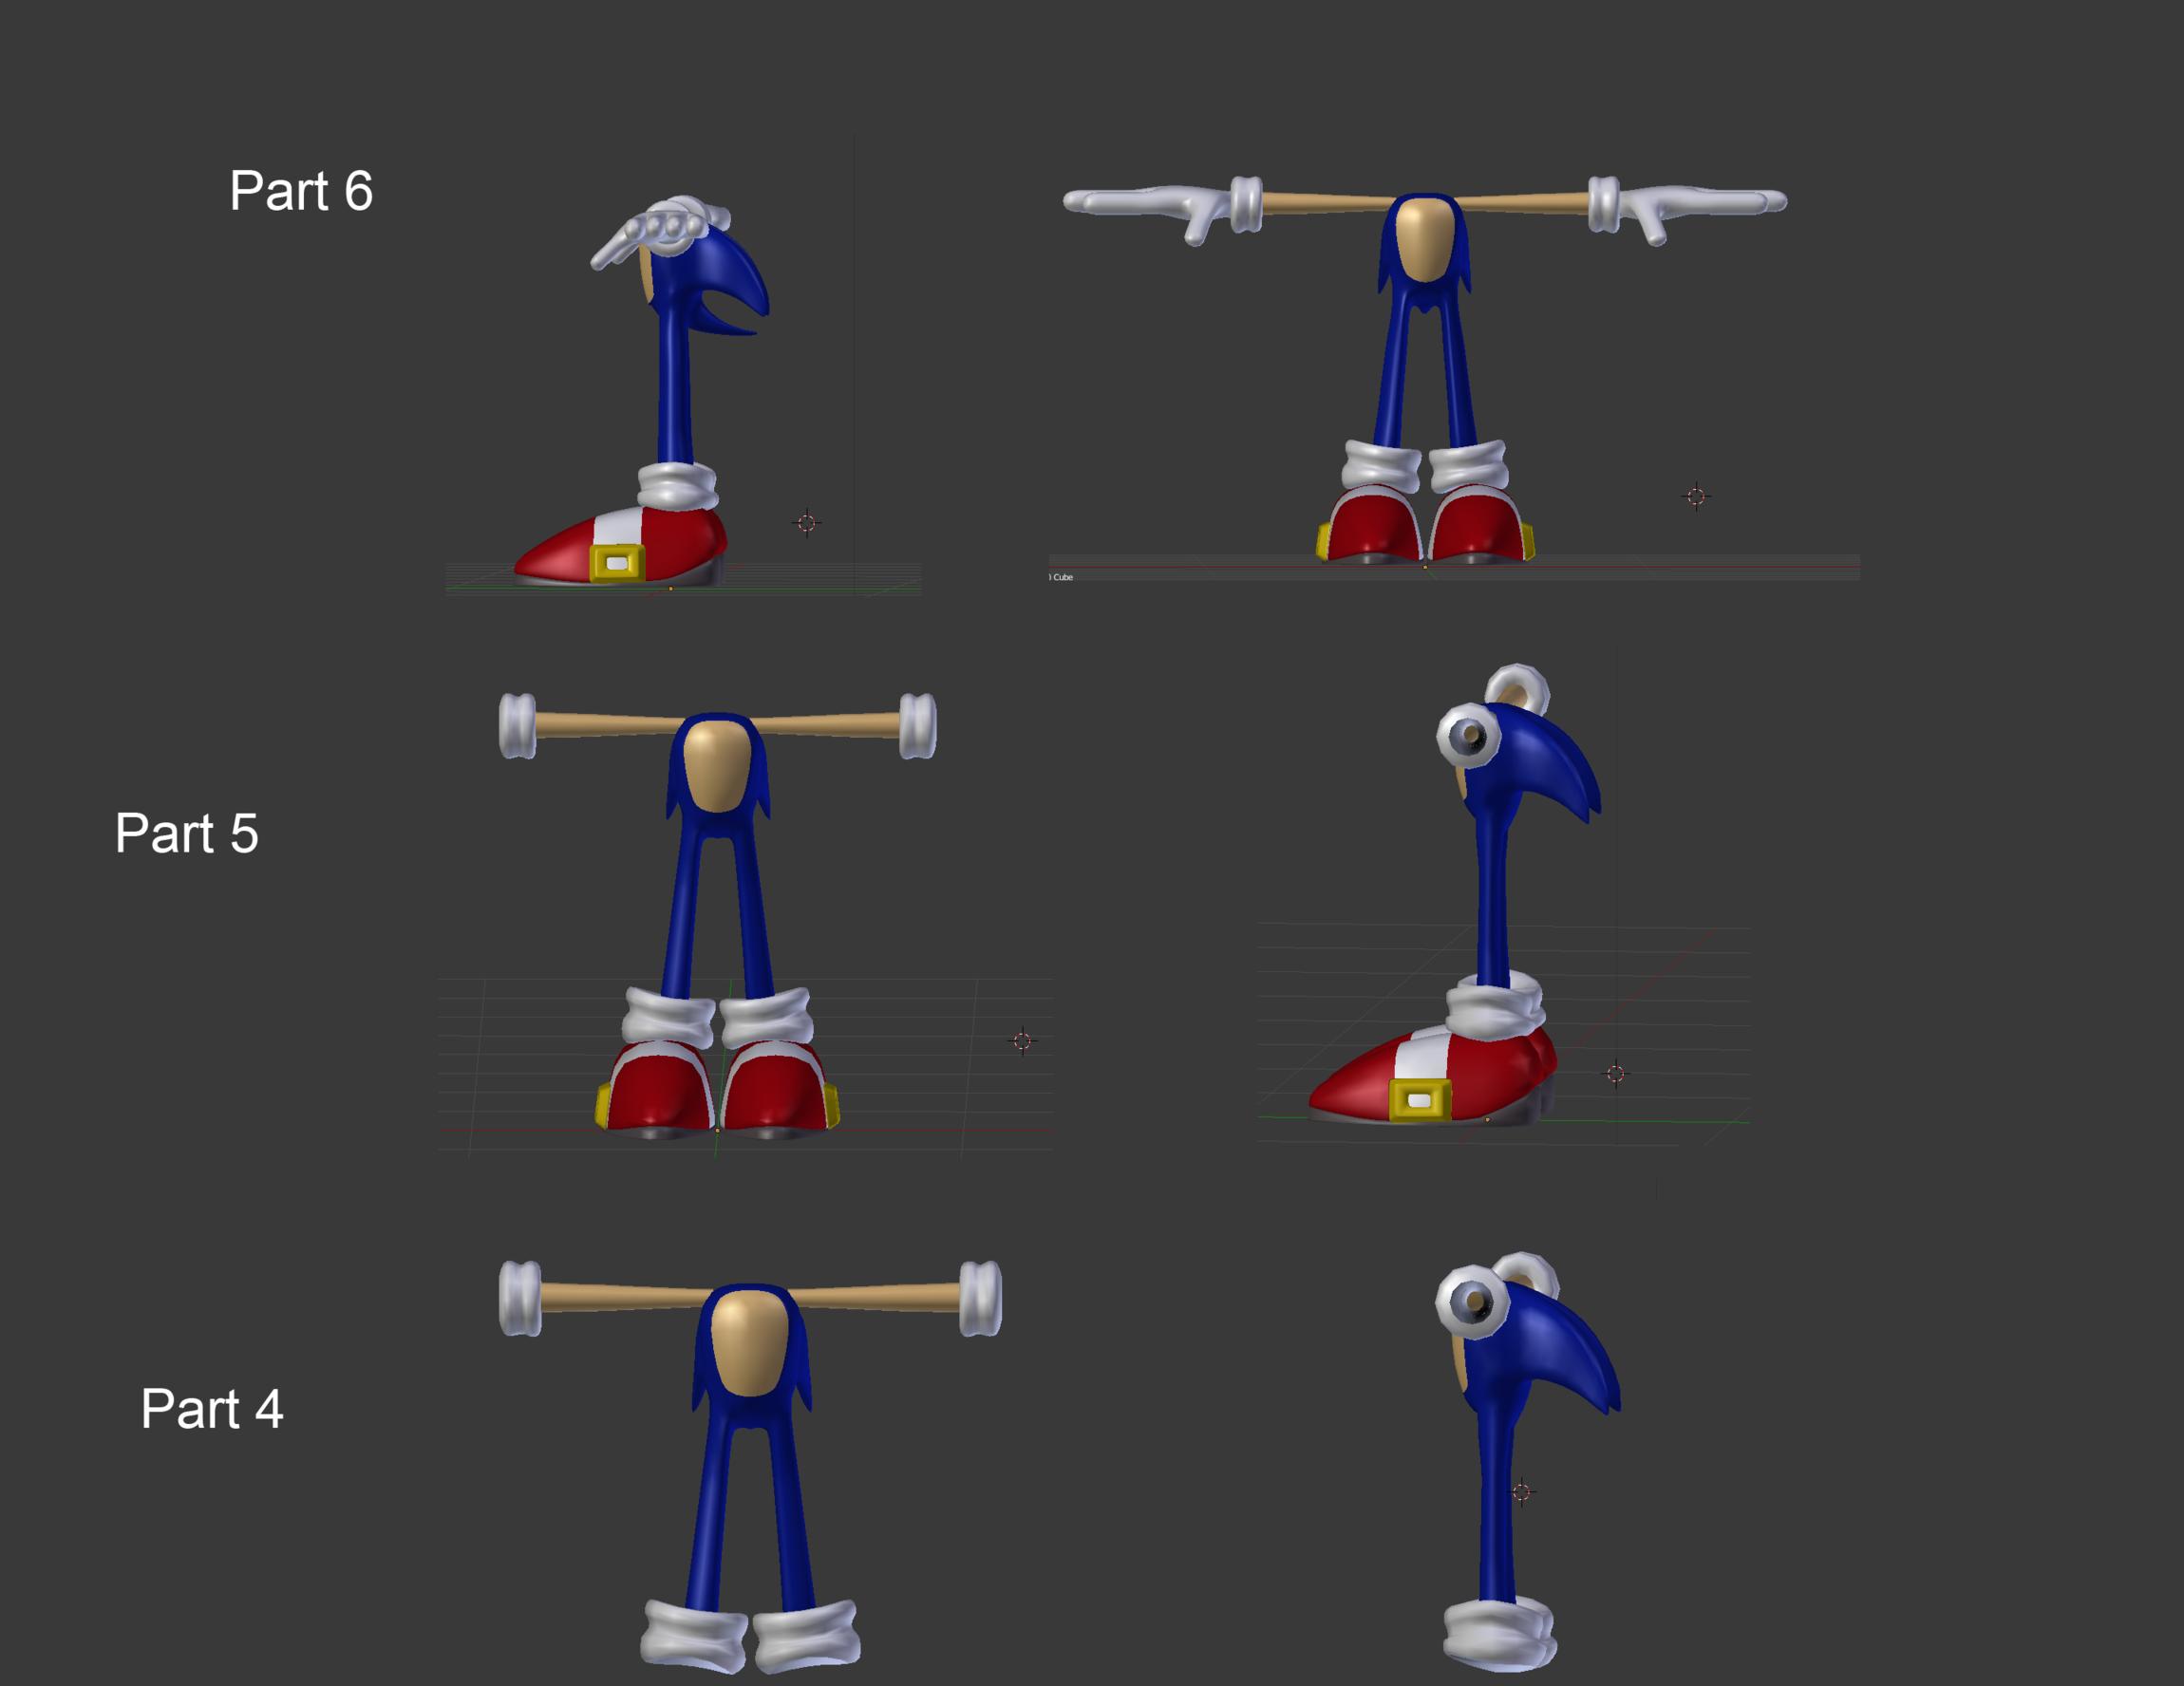
As shown with my provided image, I am trying to create my own Sonic model. I know there are downloads but I figured the best way to learn Blender is to start from scratch and in that way, I can have my own unique model. I want to become self sufficient in modeling.

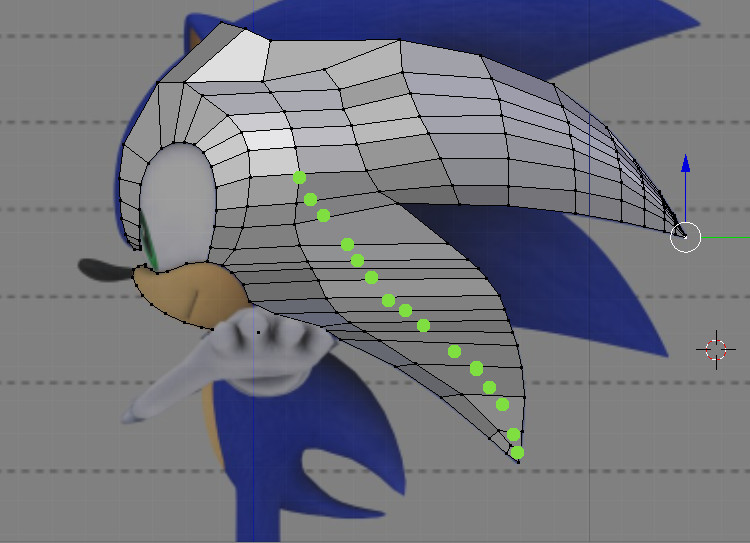
I have a sheet to use as a reference. My problem is I don’t know the best way to approach this. I’ve tried the cube, tried planes and for this attempt I am trying vertices. I feel pretty confident with vertices placement. It reminds me of the pen tool in Photoshop. (In a way)

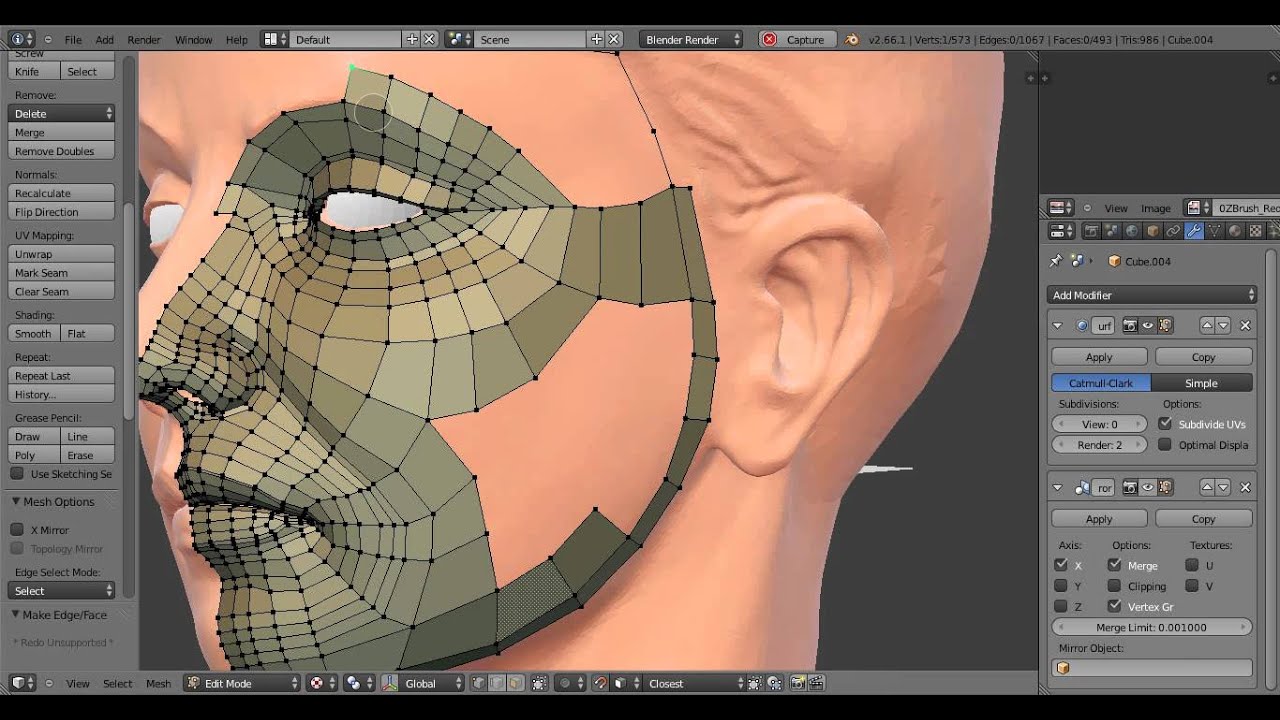
I’ve watched many videos on character creation modeling but that hasn’t helped me too much when it comes to modeling this unique shaped character.

My understanding is that for mesh modeling, (I think is what it is called?) is to have good topology, meaning good edge flow, quad shapes etc. And pulling points and adjusting as needed. However I have consistently run into problems in trying to recreate this character.

I simply don’t know how many times to extrude, how to connect extrusions, where to extrude, how to connect the head with the muzzle, even how to shape the quills here. I’m seeking that understanding of how it will work, how it will look, how it will bend when the model is actually finished. I feel that I add too many extrusions.

When I work in this, I see that sometimes I may have added too many vertices. And then I wonder how am I suppose to connect all the faces when I come back around when there are more vertices than face being extruded?

I find myself stumped and not sure what to do. I’m not sure what my problem is and hoping someone here could help identify it and lead me in the correct direction. Blender isn’t one of those things in life where it comes natural, it can be learned by anyone, right?

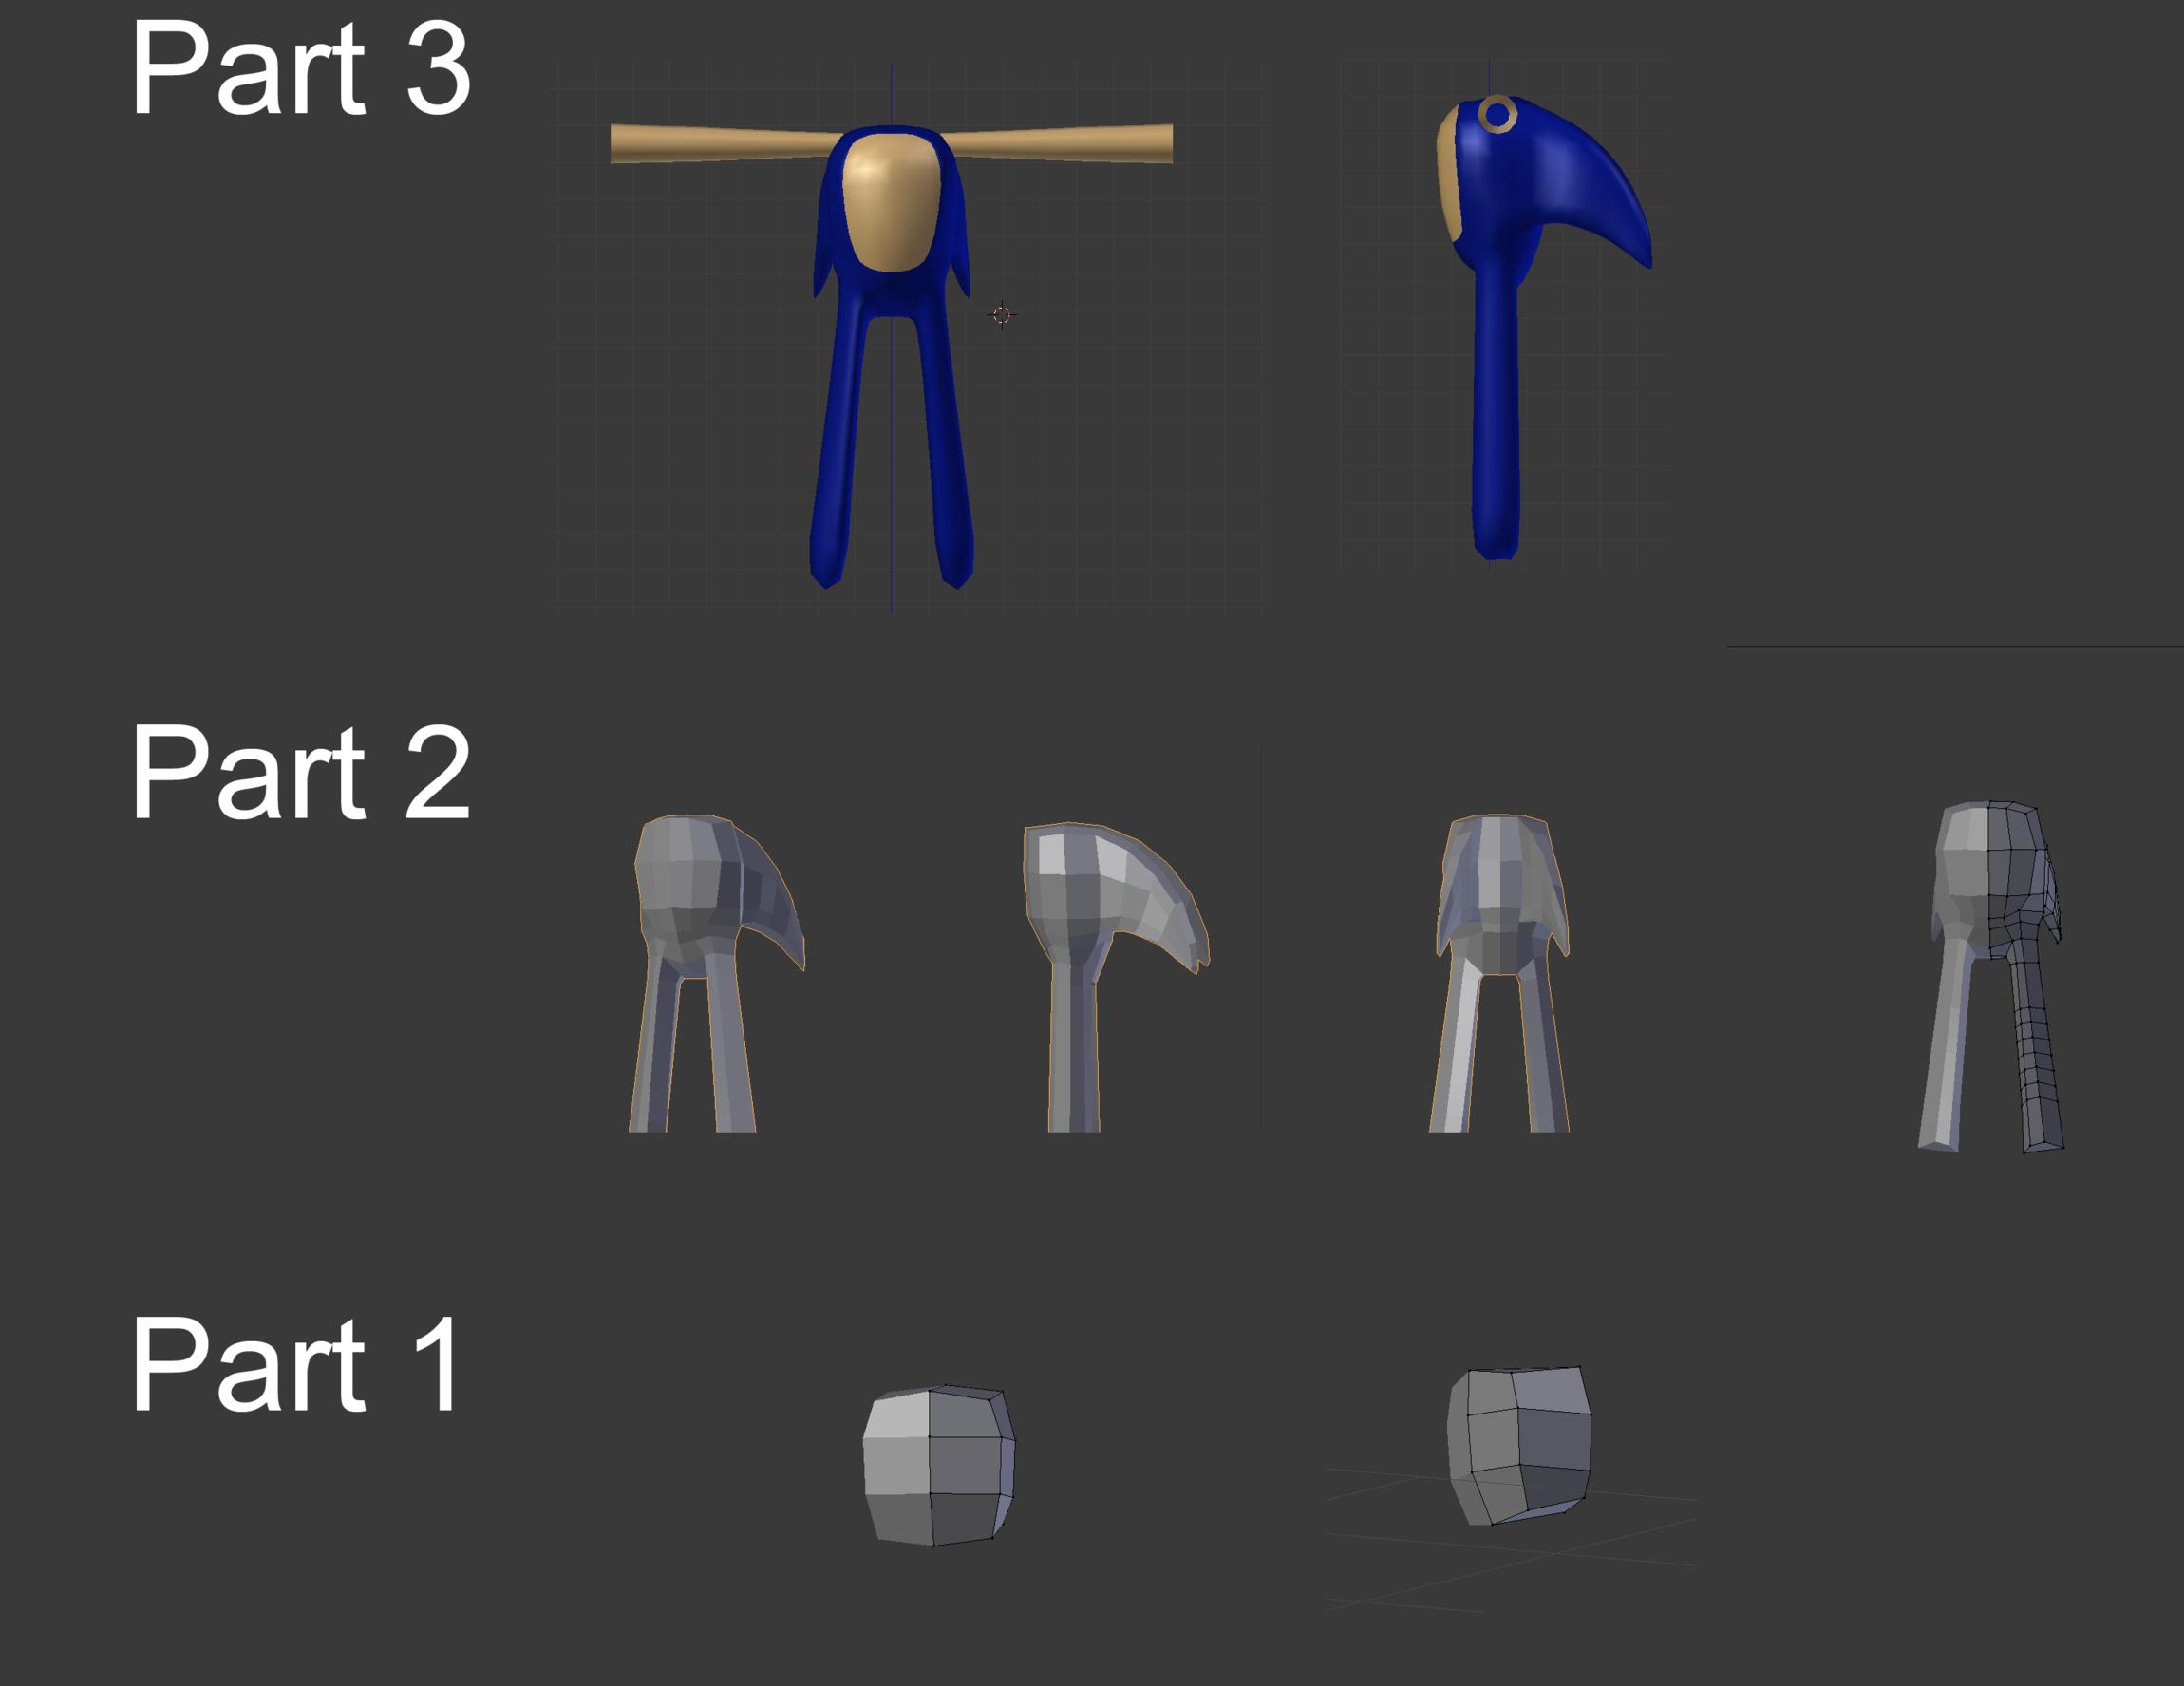
In Blender I started with an object, deleted it and created sole vertices. I applied a mirror modifier and started placing vertices around the eyes. Then I extruded for the head. I’ve seen people model with cubes yet I have heard modeling with cubes is not recommend in some videos.

I am willing to hear what I need to do. I am willing to learn. Thanks in advance.

Attachments


Hi Sakura, found you after your introduction post :slight_smile: 
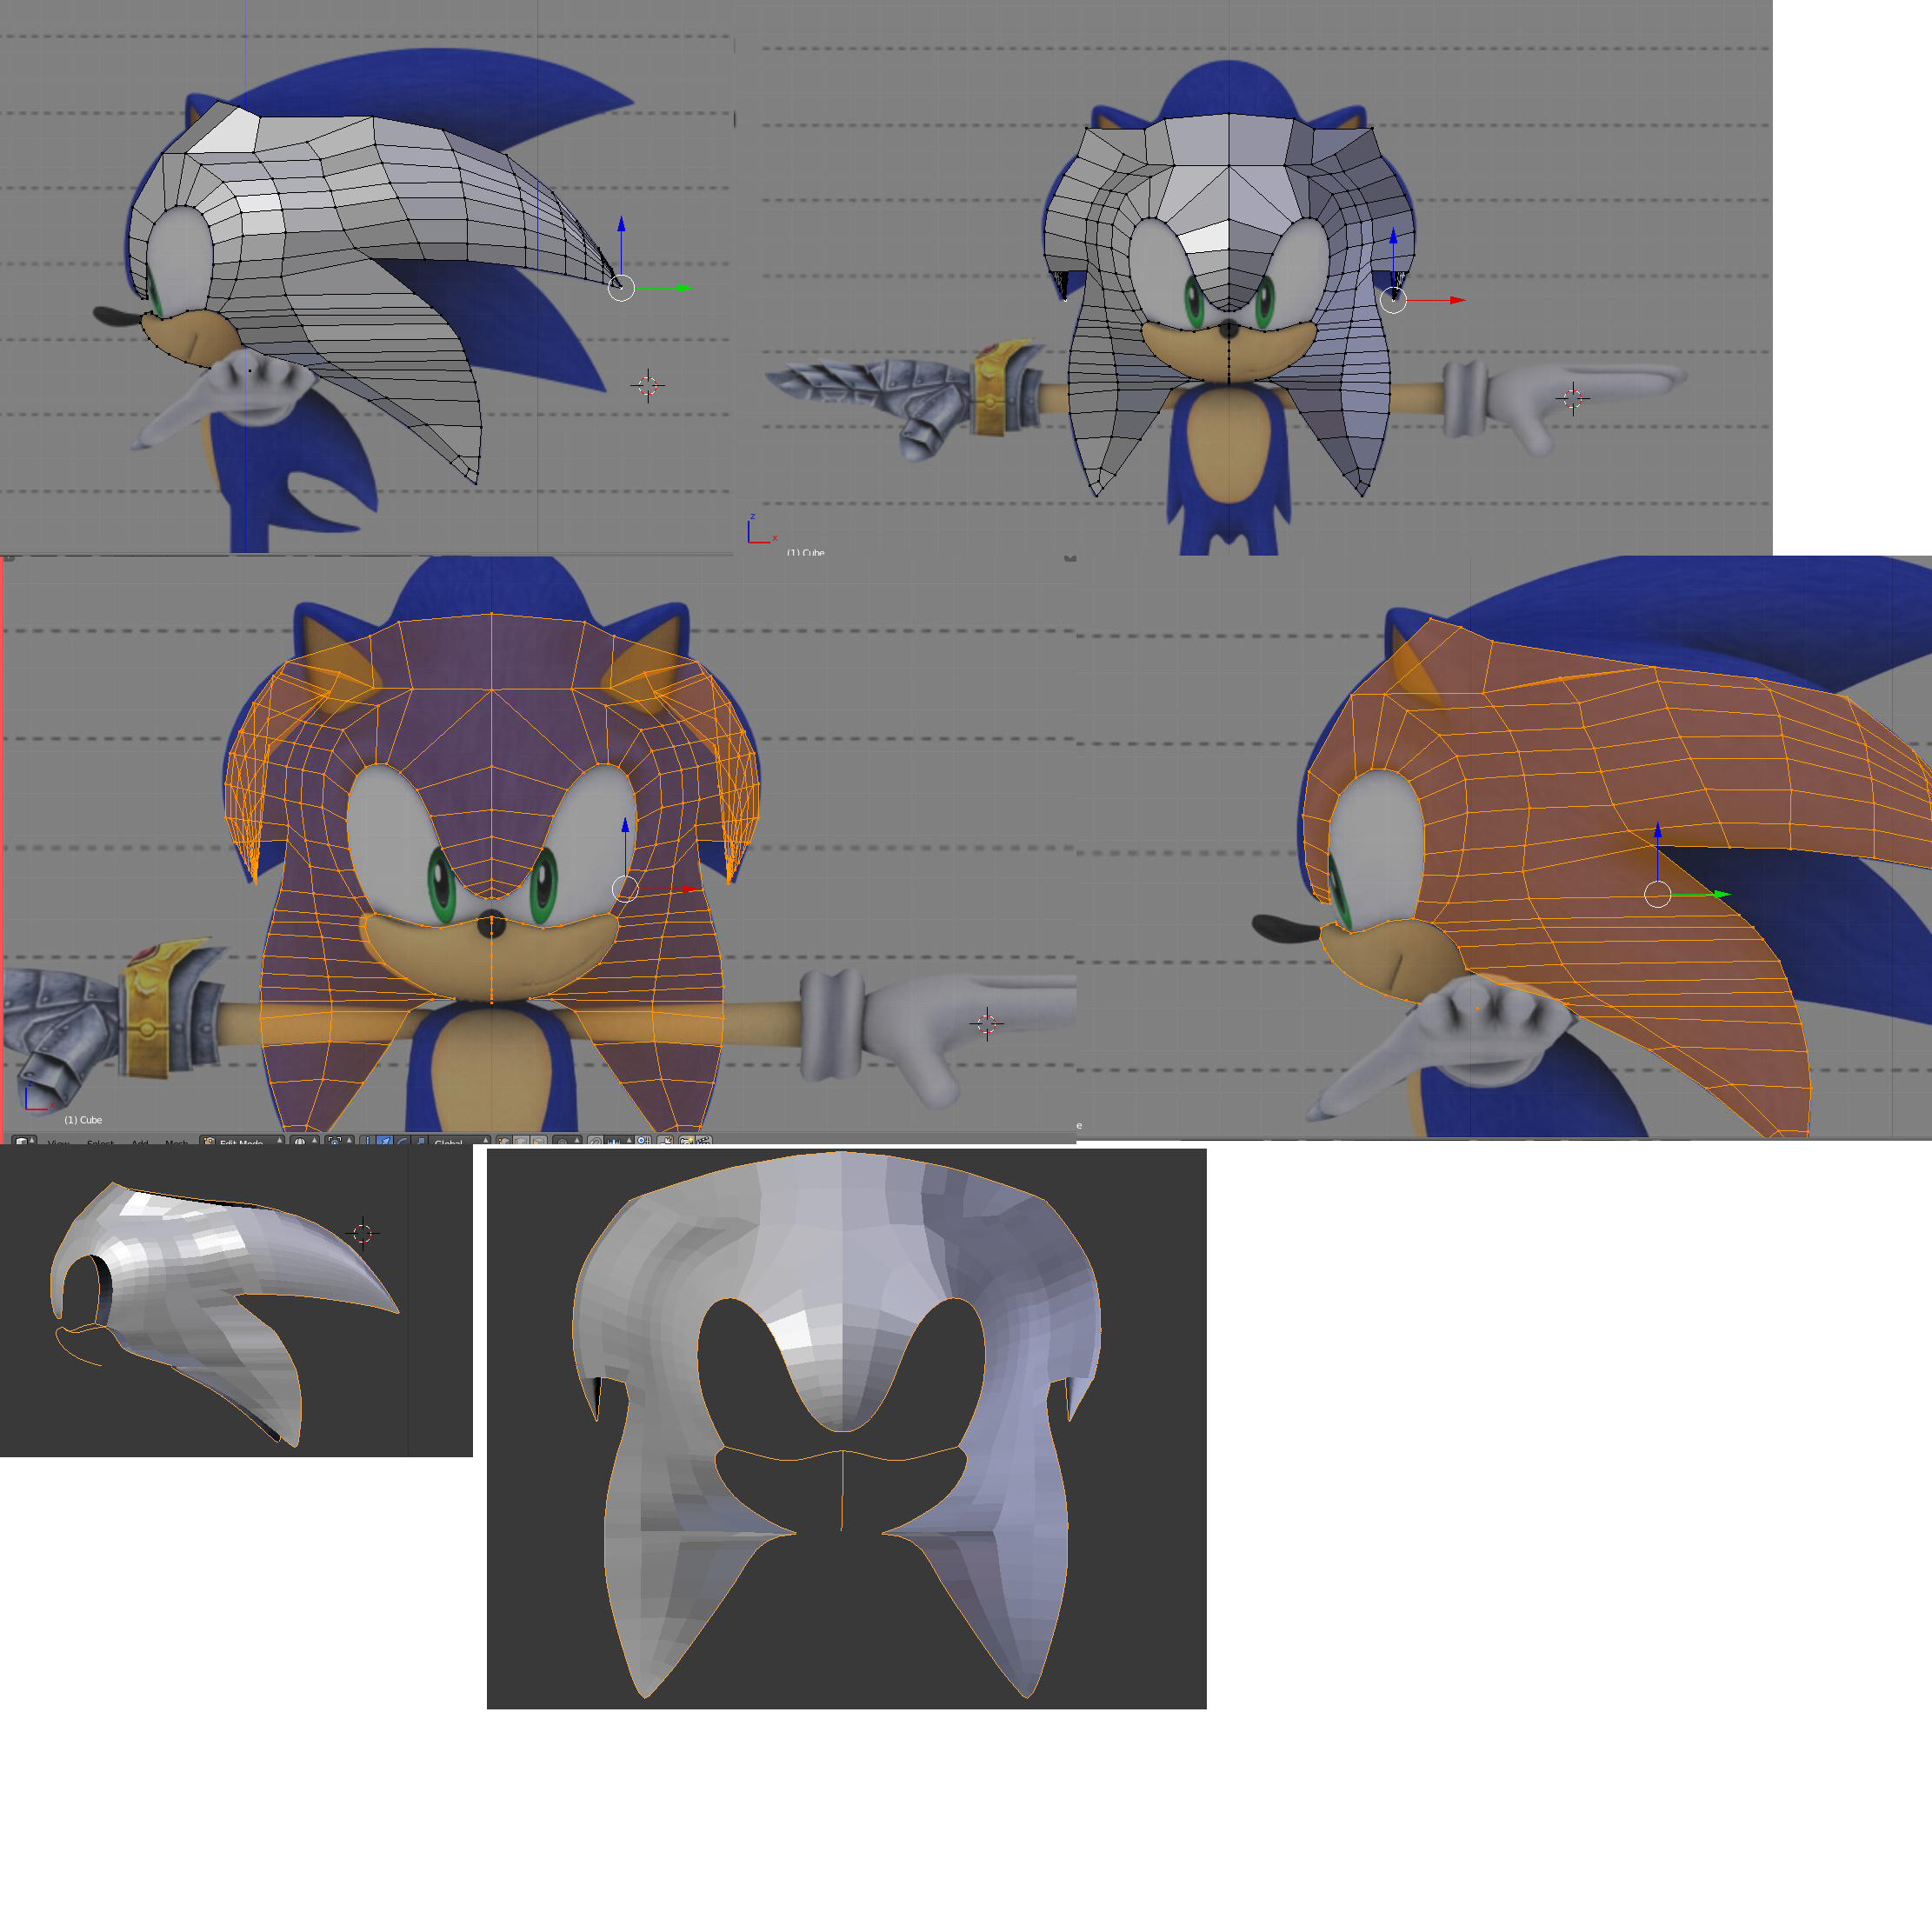
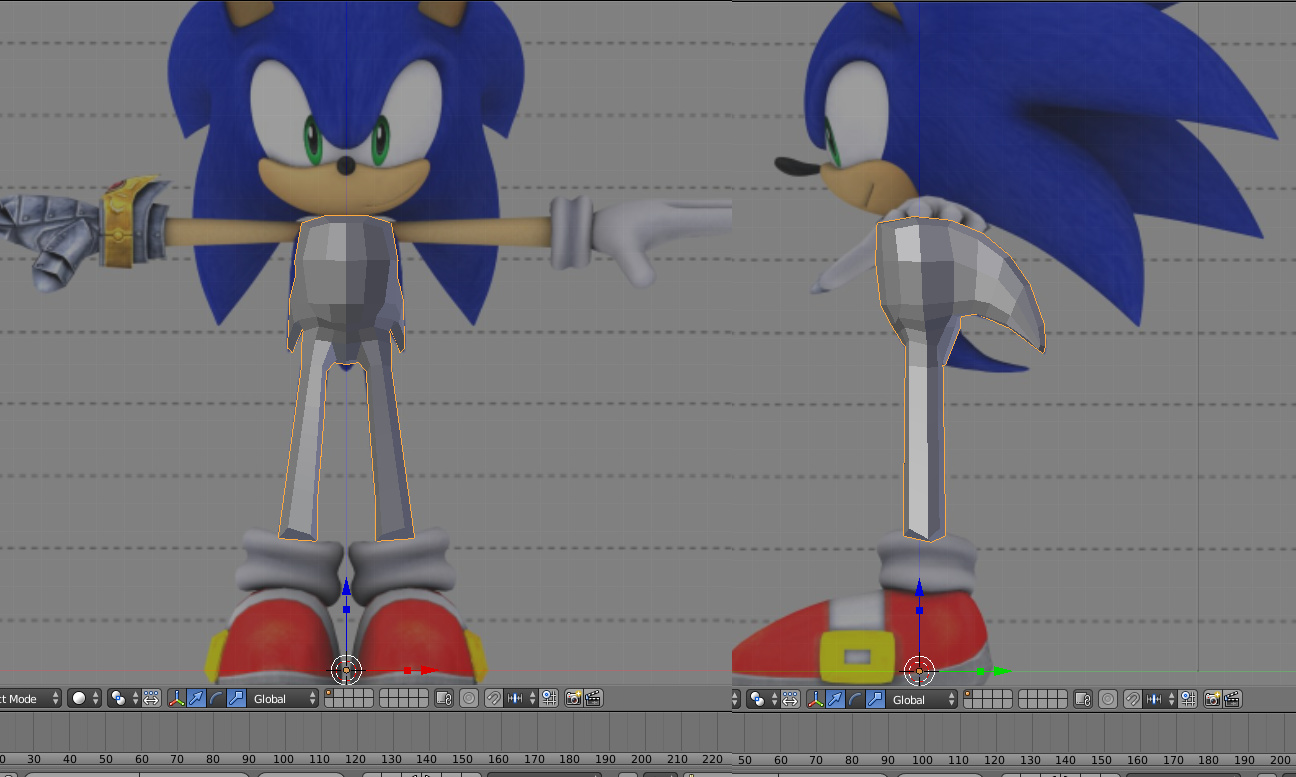
This is actually a good start. And for character modeling this kind of vertex modeling is a good approach. You did everything right. You have reference images from different view angles and you aligned them. The vertices for the lower stands could be spaced more evenly, though. But I k now this is at early stages.

Vertex modeling for organic shapes and characters is not the most modern approach, though. And maybe - because you mentioned that you feel comfortable with painting and Photoshop - you want to look into sculpting with dyntopo and retopologizing. Many people say that sculpting with a tablet is a more artistic method because you can concentrate on the shapes and not on the modeling technique. And personally, I find it easier to model with a sculpted mesh as a guide in the retoloplogy step.

Hi minoribus. Thank you for your kind words. They are encouraging. It is a relief to know that I may be doing some things right. Could you please specify by what you mean “lower stands”?

As for sculpting, I’m not exactly sure how I feel about it. I have not been able to really work with that area because I use a mouse and do not have a tablet as of yet. (I hope to buy one in the future) To be honest, I have not really looked into sculpting so I assume it’s my mouse and that I need pressure sensitivity to do any sculpting.

Is this considered an “organic shape”? The tutorial videos I have seen for character modeling have been vertices (like this one) planes and cube. By “modern approach” do you mean the most convenient? I’m not really sure I am modeling this character correctly.

I assume that minor meant “lower strands” as in the spiky hair strands on your Sonic model. You could select some vertices and press G twice to slide them along an edge to space them further apart. If your vertices aren’t evenly spaced apart, especially with subdivision on, you will get sharper edges.

Looks good so far. If you’re stuck, the approach I’d try out would be to start modeling the hair spikes separately first by creating multiple circles and extruding, then trying to connect them to the head instead of starting from the head and moving outwards towards the hair spikes. Hopefully that might give you an idea.

If I understood that correctly, you mean space out the very end of the quill, the tip. (In the picture top left where my cursor is currently selected) As for the circles, something like add circle in the side view (like this?)
I photoshopped a picture with pen tool

I will admit, I sometimes have trouble with understanding things. :o

So, keep my vertices evenly spaced is important. I will keep that in mind. Does most of my topology look okay? That is one of my biggest concerns. (I know some parts need some working on, just haven’t point pulled yet)

Thank you both!

I’m using Blender since late 2011. But I’m a self thought Blender user, so please take anything I say with a grain of salt :slight_smile:

Sorry, I mistyped it and as The Omnilord guessed I meant “strands”. And I meant that the vertices should be better placed along the dotted line. Evenly spaced edges work better with the subdivision modifier, which you will use later on.


People still discuss when to use vertex modeling (sometimes also referred to as polygon modeling) and when to use sculpting. But from my observation a widely accepted rule of thumb is: vertex modeling is best for hard surface objects (most of man made stuff like machines, weapons, tools and so on) and sculpting is best for organic objects (characters, clothes, everything that is grown and not constructed). And yes, sculpting with a mouse is possible but difficult, but once you have a tablet most people say that it is much fun.

Box modeling means that you start with a cube or another primitive and bring that into shape be adding edges and extruding and so on.

Yes, Sonic is an organic shape. And me and many others speak of sculpting and retopology as a more modern approach, because since we have sculpting in 3D packages we don’t have to model characters by box or vertex modeling. It is easier and more convenient to sculpt a character. And then you can use snapping to place your vertices directly at the sculpted surface of your character. That makes it so much easier to place the vertices in 3D space.

Here you can see, how a sculpted mesh can help to place the geometry directly at the surface of a sculpted mesh in the step of retopology. Retopoloy means that you create a new mesh of lower resolution by remodeling on top of the scuplted mesh. The difference is that the sculpted mesh acts as a guide in 3D space for where to place the vertices.


That said it is - of course - still a valid approach to model a character from scratch by placing vertices, edges and faces.

More than that I’d say that it is a good exercise, because you can learn much about good topology when you do it by hand. That knowledge will help you later, when you use this techniques to retopologize a sculpted character.

I found an older thread where you can see, how BA user ronthehybrid did the topolgy for the head.

Don’t be confused why his model is so smooth. He uses a subsurface modifier and smooth shading. I would have done the eye area a bit different, but he did a good job. You can see how everything is spaced nicely and evenly. I see mostly quads (except the tip of the strands, which is OK) and you can also see what The Omnilord meant for the hair spikes.

A lot of this information is news to me. I have some troubling understanding it. ^^; I have been looking up sculpting videos on Youtube however. Do you have any video recommendations?

It is easier and more convenient to sculpt a character. And then you can use snapping to place your vertices directly at the sculpted surface of your character. That makes it so much easier to place the vertices in 3D space.

So there is a filter that automatically places down vertices after sculpting?

And I meant that the vertices should be better placed along the dotted line. Evenly spaced edges work better with the subdivision modifier, which you will use later on.

Meaning a general rule of thumb is to have a consistent, even out work when modeling? Is this what they call edge flow? I have not been able to figure out how to determine where to extrude, how many times to extrude, when to resize the extrude etc. Is there a method that can be relied on or is this mainly intuitive?

I’m using Blender since late 2011. But I’m a self thought Blender user, so please take anything I say with a grain of salt

That seems quite modest of you. I for one am impressed in what you know. And very happy in all what you are sharing. I do however, feel a little ashamed in my lack of understanding but I won’t let that discourage me. =)

Hi Sakura, CG is a wide field and character modeling is challenging. And please don’t be discouraged at all. When I started I was less prepared than you are now. I didn’t know anything and just dived into modeling for the fun of it. My first project on BA was a little character and like you do I modeled it. You did already better than me, back then. :slight_smile:

From your reasonable questions I think that this tutorial series can help you. I found someone who modeled Sonic step by step, and best of all, he shows the process in Blender. It’s a series of 11 parts, but a really detailed step by step guide.

Don’t worry too much about all the rest, like terminology and techniques, for now. It will come automatically to you after time and practicing. But since you asked, here are some videos about

edge loops, the importance of topology and subdivision surfaces

an introduction into retopology and how the vertices are placed during that

and a quick introduction for the sculpting tools:

Other software packages like zBrush or 3DCoat or others do indeed have something called auto retopology. This does not work like a filter in Photoshop but makes a lower resolution mesh for sculpted mesh.

I don’t want to talk you into sculpting and learning to model something like Sonic isn’t wasted time at all.

So, again, please let all that new stuff don’t discourage you. Maybe it would be a good idea, to just follow the tutorial series I linked to in the top of the post and share your progress here.

Ah! I saw this guy before. I actually started the series.


But I stopped because his finished Sonic model dissatisfied me in appearances. Regardless, your idea of following along and sharing my work in progress is a good one. So in the mean time I will do just that. (I need the practice :p)

I hope to finish a Sonic I am satisfied with and hopefully create other things than Sonic in the future. Thank you!

Edit: Since it has been awhile I may plan to restart this tutorial.

Hello. I am restarting this tutorial. Thought I share my work in progress.

[ATTACH=CONFIG]477216[/ATTACH]
[ATTACH=CONFIG]477217[/ATTACH]

The attachments don’t work, but I would love to see the progress :slight_smile:


I apologize I did not notice sooner. Hopefully this upload works. ^^;
I am uploading in parts as seen in the tutorial.

Here are parts 4 to 6.


Looks great, Sakura. Keep working on it :slight_smile:

When I approached into modeling Shadow the Hedgehog, I was able to take the video game model and retopo the thing. Of course at certain parts I had to use the knowledge I learned to make the mouth and the eyes.

Thank you! Your encouragement means a lot.

@XensoShadow

I would like to model Shadow someday. I have a ref sheet but I am not sure if it use sable as the side view is not completely facing side ways.

I also want to model an anime looking character at some point too. For now I am just following this tutorial to try to understand Blender. :slight_smile:

Question: In the tutorial the uploader says to hit “Ctrl + o” to activate something that uses the scrolling of the middle mouse wheel. Except when I hit that it opens up Blender file search and when I hit Alt + o, the whole model is grabbed when dragged.

So what is he talking about? I have been doing this without it and am thinking I need to now what it is exactly.

It is to activate “proportional editing” Here is a link to the manual how it works. https://docs.blender.org/manual/en/dev/editors/3dview/object/editing/transform/control/proportional_edit.html

alt+o is the hotkey to toggle proportional editing on in connected mode and off. It’s also on the header, along with the falloff setting. shift+o to cycle through the falloff options.

Proportional edit has an influence area, if it’s too big, it seems to move everything. Scroll wheel up/down or page up/down to change the size while moving, or from the operator panel afterwards.