You need to take that leap of faith and stop using low opacity/soft brushes read up on the different types of edges that you get in a painting hard, soft, lost etc and also starting pushing your value contrast a bit more aggressively.
Tryant I looked up the Edges so far I got some reference photos will get more stuff.
We are alike but you seem to be a bit ahead of me. I will continue to grow and learn. Key is never give up. Thanks.
Another three Painting done before the advice. Will need to explore more.
Attachments

I tried a little more to do what tyrant monkey suggested. Still hard to get out of ones comfort zone. Still if I ever want to get it to a better spot I need to stretch.


Really good job! You improve your skills from picture to picture) Congratulations with improvement)
Thanks Estona and MisterR. Art as with life is a constant progression towards something greater. Thanks for the kind comments.
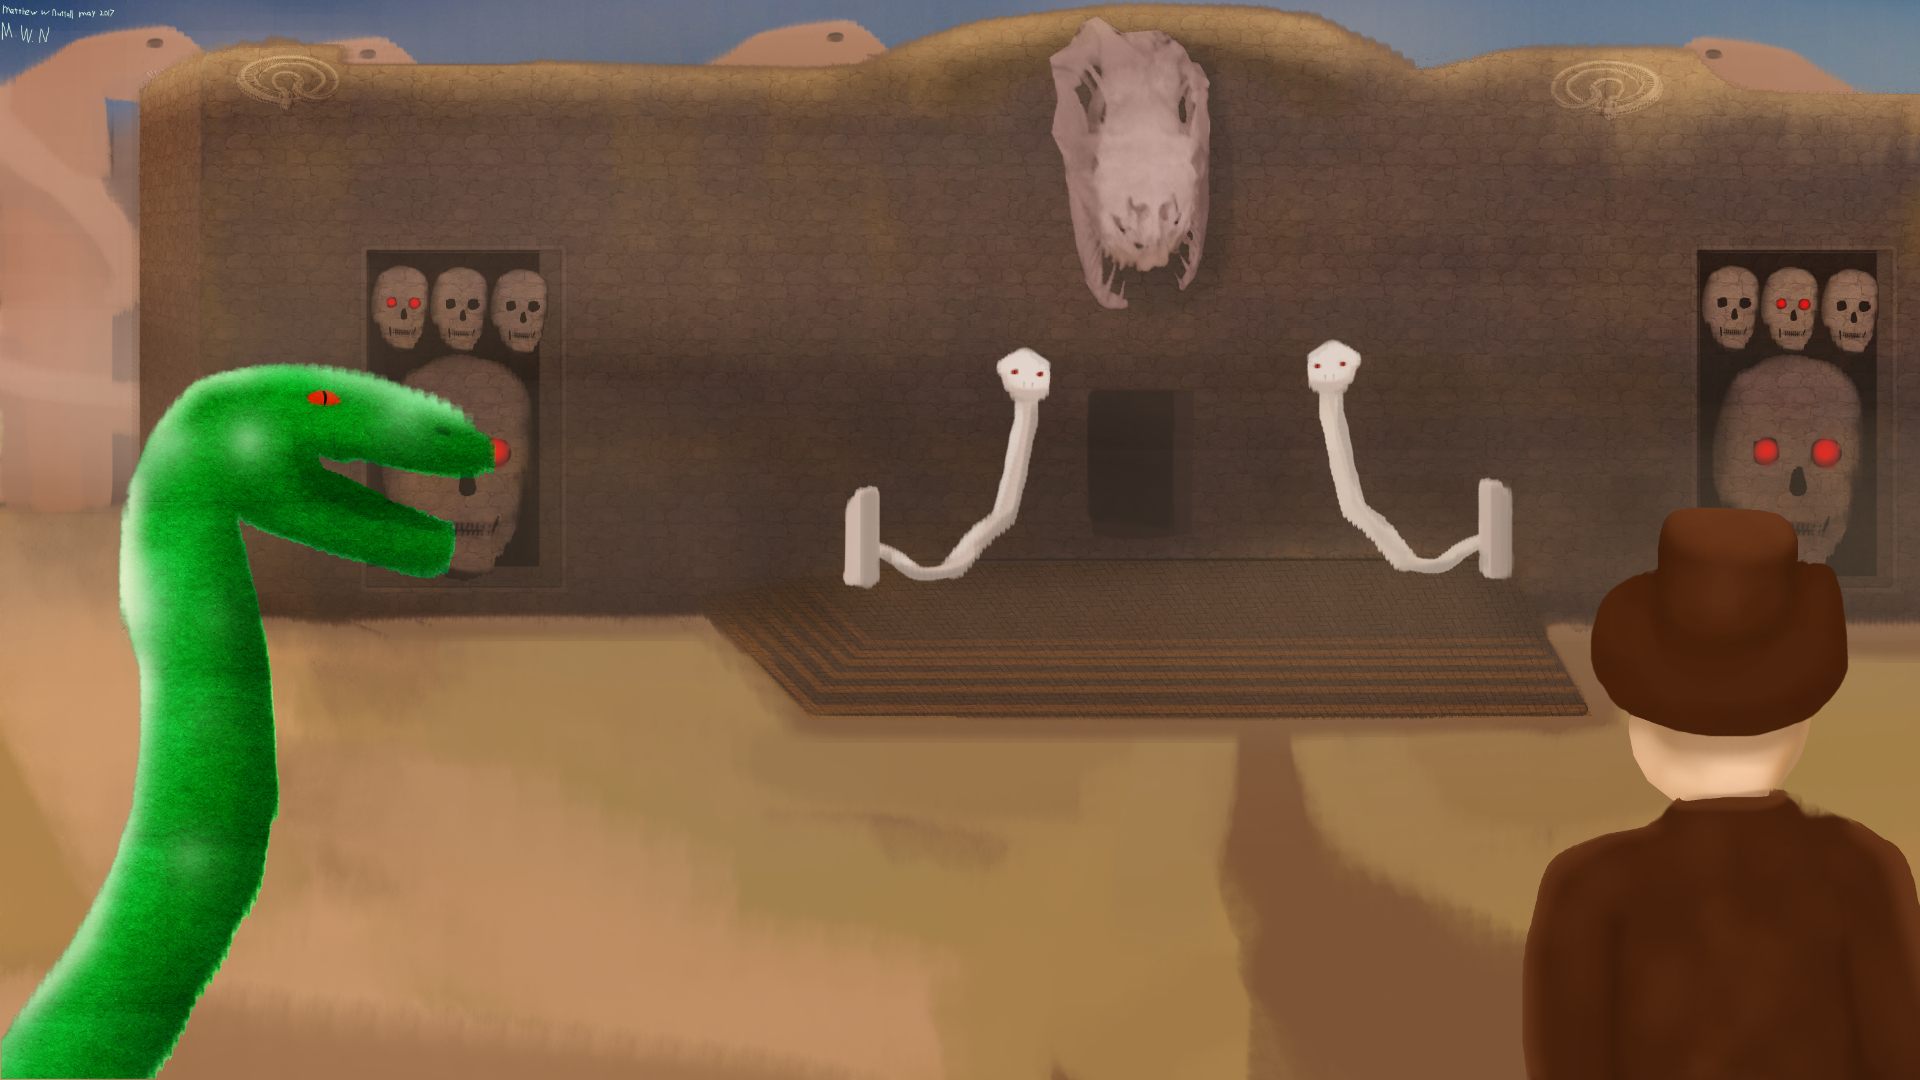
A Painting based upon an assignment a certain School gives to its students. You take a photo this case black and white photo and paint something into it matching what is happening in the photo.
This is just a quick test in keeping the traditional feel but using digital to paint it.

Another WIP picture. I would of just added it to the other post but the advanced button Chrome didn’t like.

tyrant monkey I did as you suggested with the brush. I started using the hard round or others like it. I got the painted look as I wanted. I am not great with faces so that will need work. Still I am quite happy to now know how to achieve the painted look. Now to continue. I still need to find good learning material for Industrial design. Thanks for the help.

A bit of feedback that might help.
Two main problems in everything: you’re drawing/painting symbols, and related is that the perspective is wrong. When creating an illusion of 3D, you have to think in 3-dimensions, and objects in 3D space look very different depending on the viewpoint and direction.
Most of the trees you’ve painted so far are symbols of trees. In a photograph, such trees would have to be shot from very far away with a telephoto lens so that it flattens the perspective. The same tree looks very different when standing next to it, or when climbing on a hill and taking the photo from high above it, looking down. Or going next to the trunk, looking up, and taking a photo of the branches. The photos in those three cases wouldn’t look like the symbol of it: 1st might not show the branches/leaves, second wouldn’t show the trunk if it has leaves, and third would mostly be filled with thick looking branches and leaves.
I posted a simple example in another thread of a workflow for perspective construction. It’s just a simple branch, but it could be anything
and a bit more explanation of what those are down below https://blenderartists.org/forum/showthread.php?438281-My-2d-art&p=3256263&viewfull=1#post3256263
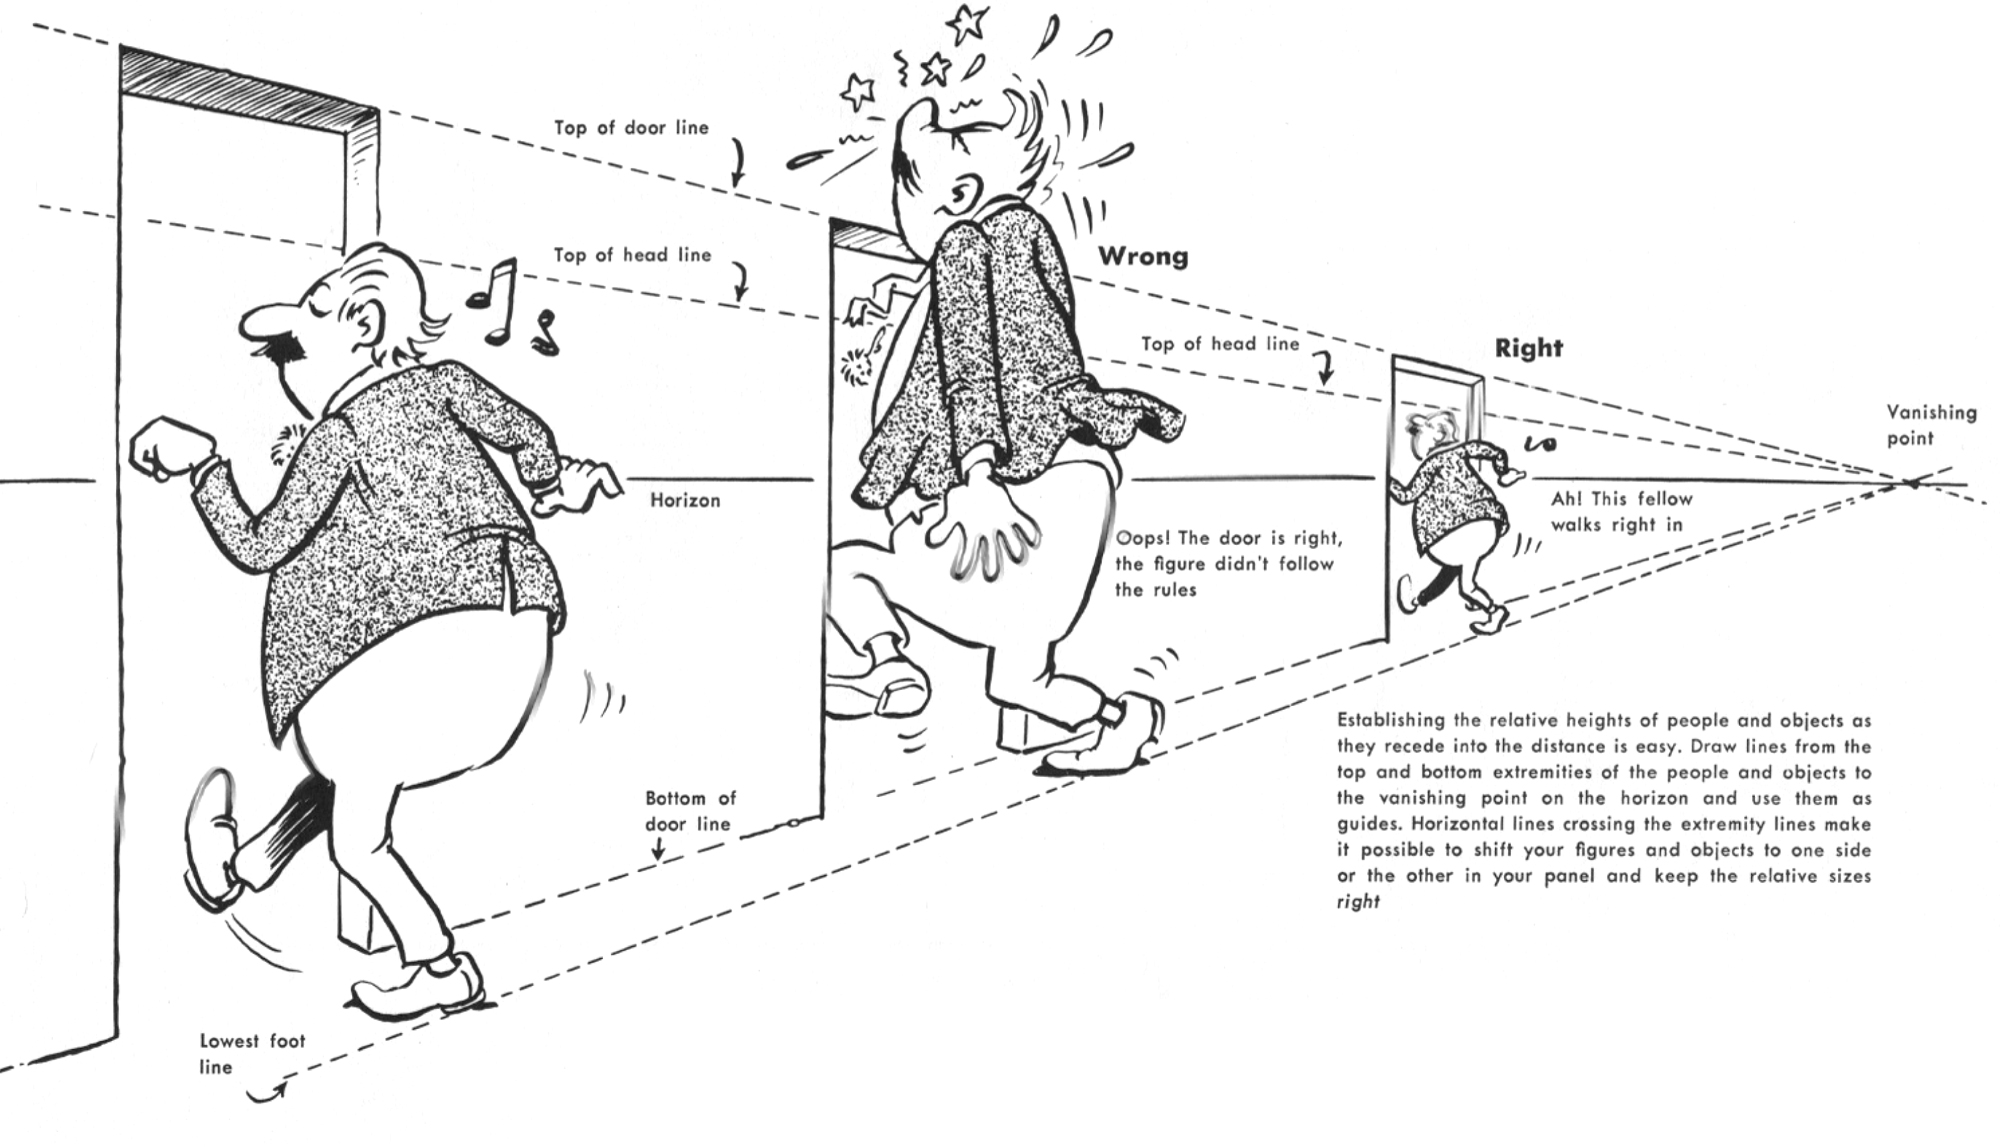
The example first asks where is horizon. I noticed that google image search for “sitting on pier” gives good examples to determine where the camera is. If the horizon is above the persons’ eyes, the camera is looking down on them. Below eyes, looking up.
In post #90 there’s some attempt on perspective but it’s not correct. It’s tricky though

A. The distance from ground to the camera sensor. If the photograph is taken by a person holding the camera, it’s around eye-level, the same where the horizon is.
B. Moving that height in depth to the centerline of the pier, the person would look very tiny even standing up.
C. If the person sitting on the pier was the height it’s in your image, it would be around here. I doubled the height since the person is sitting and moved it in perspective until it fit. The camera would be looking at the person from above, the same as someone next to you would be below your eyelevel when they’re sitting down.
Comparing the distance check to a photograph, the person in the photo should be around half the size as the proportions image at that distance. Looks about right.
What are the circles? They’re approximated field of views for 60° and 90° cones. Things closer to the camera but inside 60° wouldn’t get distorted much, as they don’t in the photo.
Maybe try the perspective construction. You mentioned industrial design, so perhaps some simple thing in 3/4 view, and the same in 3/4 view from the back next to it.
1 Like
JA12 Thanks for the info. I do have some understanding of perspective my perspective line was at the end of the water base of the mountain. Still I don’t understand the tree thing so I will look at that. I also have a hard time figuring out distortion and how small I usually just eye ball it. So that will be helpful.
So you say your link will go to an example to help plot that out. Thanks oh and I mentioned Industrial Design I know about the 3/4 view and in my attempts I have had a few things come out ok. The problem is I only have a vague understanding of it and am in need of some good learning material.
I understand perspective to a degree in a Landscape. I don’t always plan it out as I should. Still what you have said will be most helpful to me so thanks. I knew perspective and what would be looking up and down I know with boxes how to shrink things but not as much other things. Like if its within 60 degrees very little distortion. Or the idea of how trees would differ. So that is most useful thanks.
Again I know I have very little understanding of the industrial design aspect; so if you know of any good learning material, for Industrial design type stuff let me know, thanks.
References help. Even if your subject matter is completely different, you could search references for many things
- Perspective. You could even take any image, trace the perspective and key proportions from it, and then get rid of the image
- Composition
- Colors
- Mood
- Materials
You’ve been watching FZDSchool videos. They’ve posted many videos where Feng explains design in entertainment context. Many of those are partially or completely lecture type of videos, some jump right into the process of creating something but might list the design parameters for the subject matter.
The school focuses most of the time on teaching the fundamentals so the students know how to visualize whatever they like. The design aspect comes after that. Design is about ideas and solving a problem within given parameters, and creating something that doesn’t exist. They pull ideas from the real world, experiences, books, movies, even music if that helps. Most of the designs will be rejected, as it’s a process of elimination to iterate and get to the right one.
It’s still the ideas that are the most important ones. It doesn’t necessarily mean pretty pictures. If it conveys the ideas, it might be enough for someone else to take that and turn it into something useful
Same goes for functional design. Many studios that design real life objects like vehicles, boats, power tools, use Blender for design because it’s a tool that lets iterate the ideas faster than rigid CAD packages. Once they have the design, they can go ahead and make it in CAD as a model or assembly to support the engineering process.
JA12 first thanks for the helpful information. The Videos don’t go over the setting up the 3/4 view. That is the struggle is getting it set up right. I struggle with getting a good scene set up and composition. I have a design of some large temple buildings I like the design but not sure the presentation. It will be posted when I get it to a point I am at least satisfied. I like to learn things I program, write music, write in general. I also can model, rig. Those those two are ok. I can do video green screen roto-scoping. I can do art but do have the points I struggle with.
So I keep working at it and learning. I appreciate the help. For some reason when just drawing a single object like a vehicle I struggle with creating a basic perspective I am used to doing it for a landscape and even then I sometimes just rough it out and then just use it for what is above and what is below. Still I think I can put into google setting up a 3/4 view and I should get something. Thanks for the help and I have used a photo before to get the layout and perspective though need to learn it well enough not to need it. Thanks.
I need to use photos more for color and mood. That I am not so good at and I know it can be very helpful I just have not tried it yet. I need to use photos more as reference I always struggle with that. I tend to just want to paint. My Old Art instructor kept telling me use reference. Again thanks.
3/4 views are usually for product or character design. The perspective for that is about grid construction, but could cut corners and use Blender to get a basic grid. What to look for is that the grid doesn’t have too much distortion where the model is, which depends on the camera lens and framing.
The default scene has the grid floor and a cube, and you could view the cube in wireframe and capture the viewport or camera view with render -> opengl render image. That alone might be enough to get the perspective right for what you’re drawing using the grid, and extending, dividing or multiplying the cube edges to get more helper lines.
I have gathered the information from many sources. If I’d have to name one, Scott Robertson’s book ‘How To Draw’ would be the one for perspective construction drawing. There’s a lot of information and it’s very technical. He also has a youtube channel https://www.youtube.com/user/scottrobertsondesign/videos?disable_polymer=1
Thanks JA12 You have been most helpful. Now to just absorb all the information you have generously provided me. I didn’t think about using blender to get the 3/4 grid that is a great idea. Thanks and now to absorb and use all the information. Thanks. Thanks for the information on the book and the youtube channel I subscribed to it. Thanks. I have both a technical mind and a artistic one. So With time I should get it. Thanks.
JA12 I noticed to determine the size of a person you took the horizon and then simply kept that at eye level so drawing a line at the point the person is on the ground you used that to guide you? So if I want to know how small to make the person; I can take a photo of a person and place the feet at the point I want them to be and shrink it down tell the feet are there and the eye line matches? If I want them sitting down same general idea but just keeping in mind body proportions.
Yes and no. I based my height measurement on the things in the image and on the assumption that the cameraman is an adult, is standing on the ground that is visible in the image, holds the camera at eye level, and that the person you’re drawing is the same height. I then transferred that assumed height between two points in the perspective http://www.chasrowe.com/howTo/images/scale.jpg which can be fairly accurate, knowing where the horizon is, where the ground is, and where the things in the image are supposed to be relative to those http://lalive.s3.amazonaws.com/img/Line3.png http://www.drawinghowtodraw.com/stepbystepdrawinglessons/wp-content/uploads/2016/05/drawing-people-in-perspective-02.jpg
Using a photo for that would mean finding one that uses similar camera lens that you’re using, or in other words, same perspective grid. Sizes and distances look different depending on the lens

The height is relative. If you have nothing on the page, you could decide a reference height and keep everything you draw consistent with that. https://gramos14.files.wordpress.com/2010/09/twopoint.jpg
So for example in that you could decide that the vertical line you draw is your doorway and get a common height for that, and then transfer that height in perspective so that all the people you draw will fit through the doorway. That probably is the case in that image but the windows are really big.
I normally use a generic Photo like the ones used for showing off clothes. Like http://meilange.com/image/cache/catalog/product-images/Structured%20Bikini%20Stripes%2001-800x1200.png I get what you are saying. Like if I have a building and a door take the top of the door bottom and such figure out how a person right next to the door would be and using lines going out like in the grid often used for perspective I can figure out how tall the person is any where else in the image. I made that grid by hand it takes a little time to do. I know there are some programs where I can do it automatically. I believe first learn to do it yourself then once you know find ways to help the process. Thanks for all the help. I found I need to find some tree reference of looking up into a tree. I can get a general idea out but for me reference always makes my work better. Thanks that is a lot of information I am now going to absorb. Thanks.
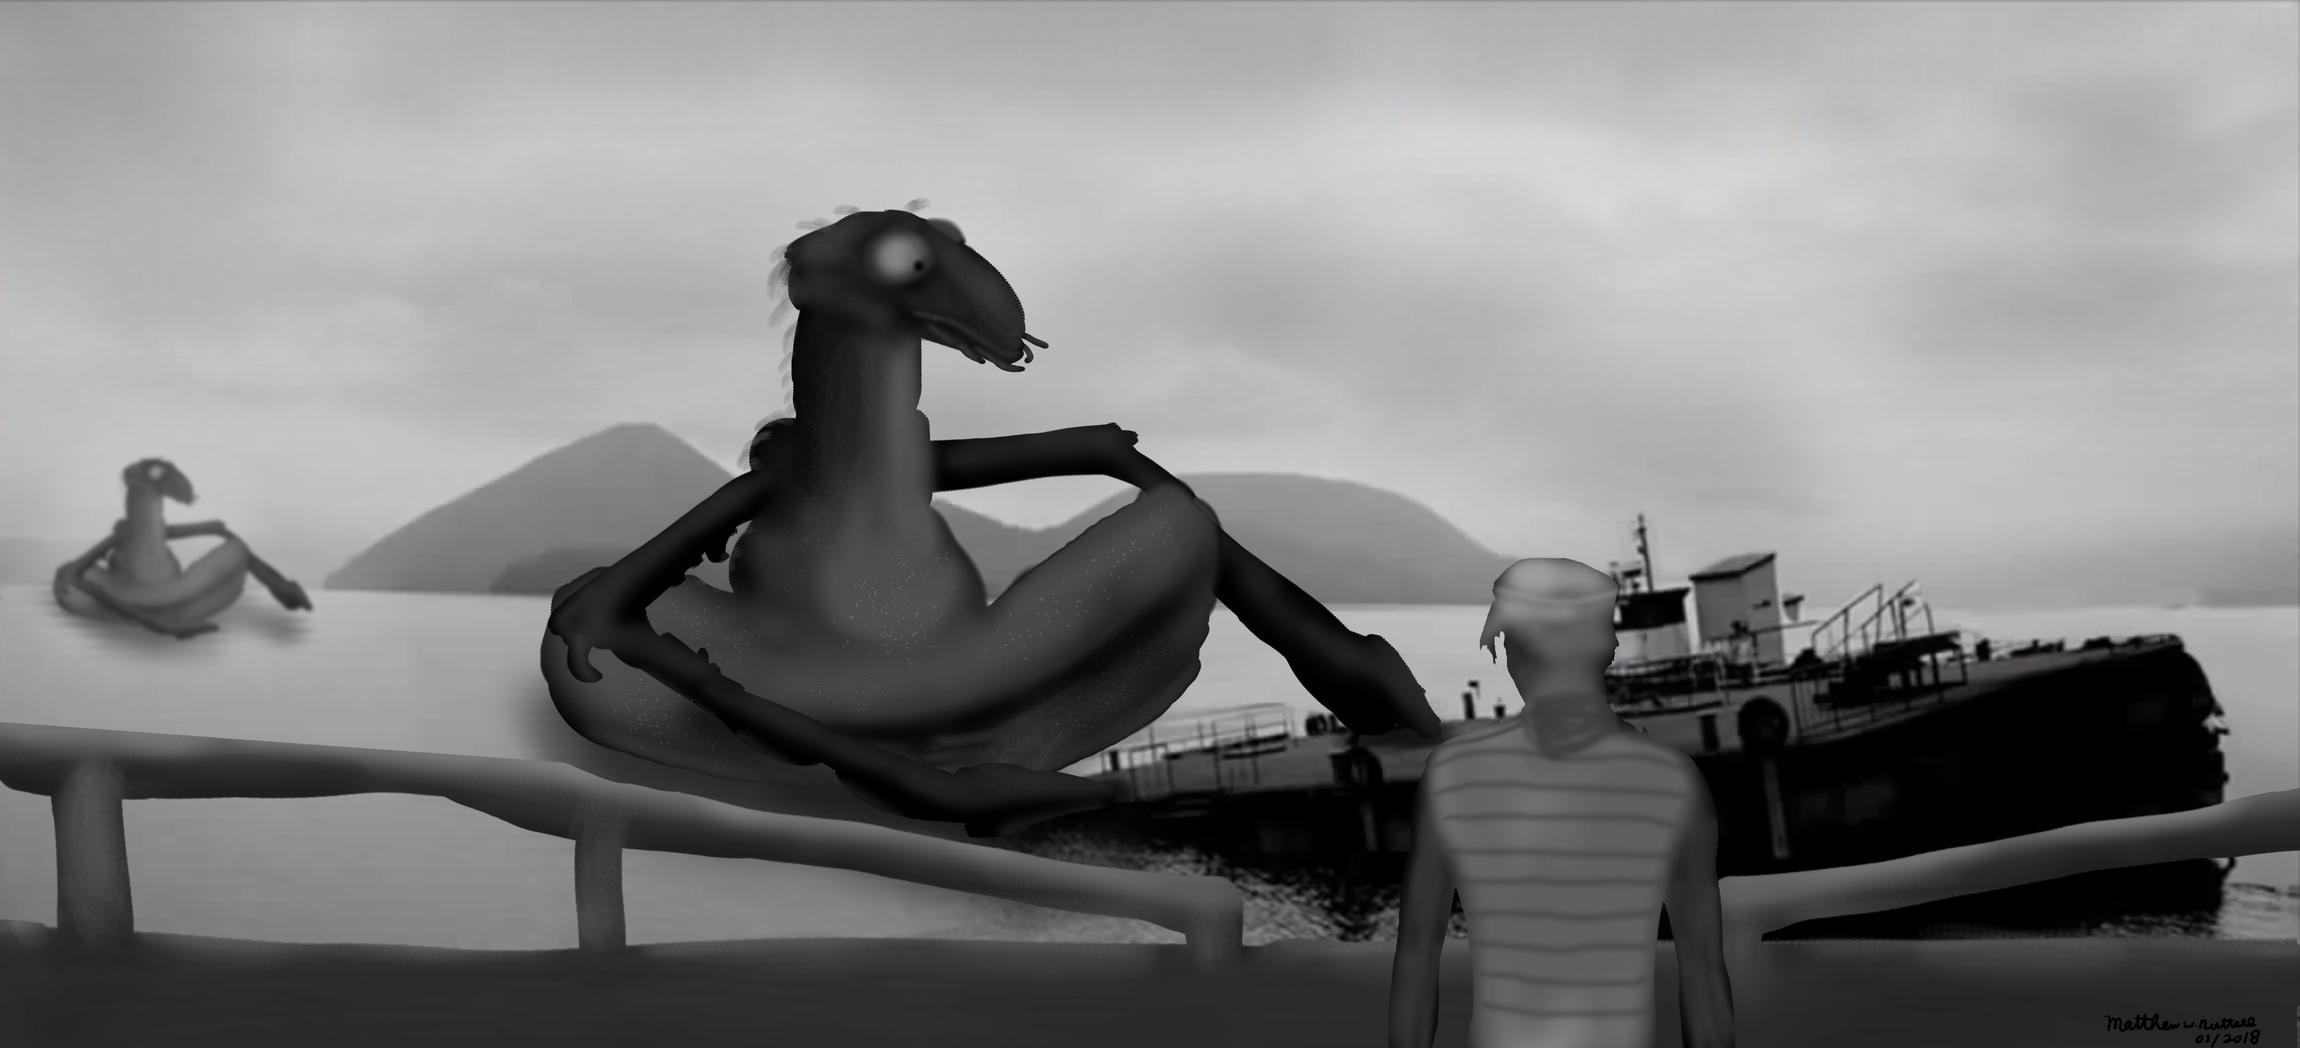
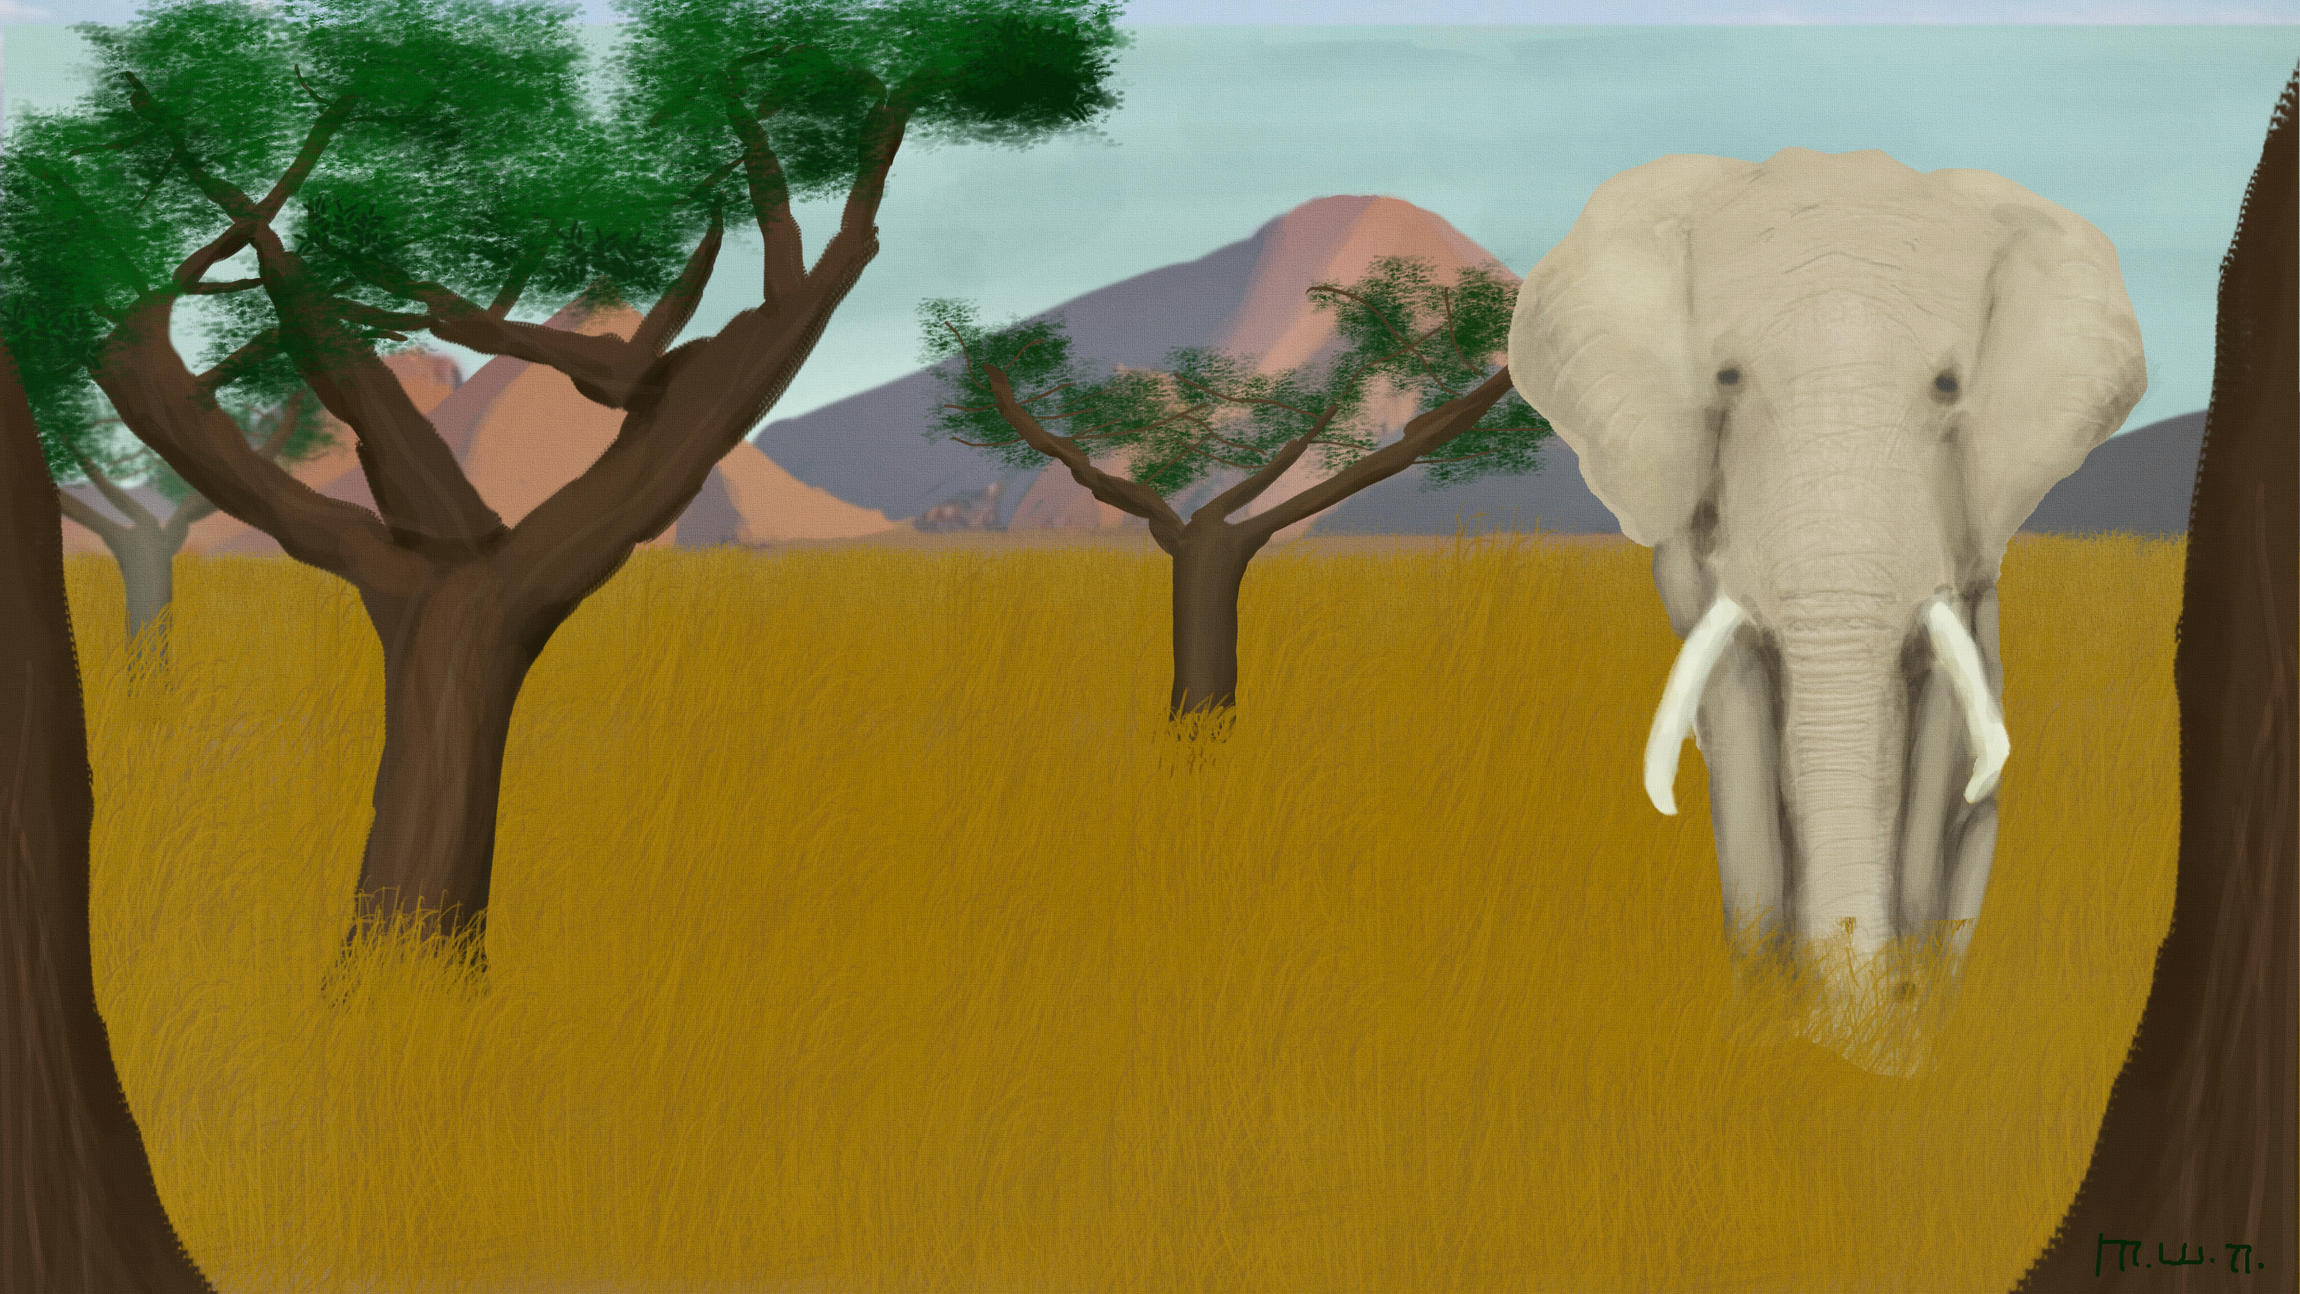
JA12 Here is a digital painting with trees. Not just a symbol of a tree. Not sure if I am completely satisfied with the Composition but its done for now.
Right. I think it’s an improvement. Things are sitting in 3D space now.
There’s a whole list of things that could be improved, but correct perspective makes the image communicate very differently. The first impression is much better when the things in the whole image look like they belong. The level of refinement isn’t as important, as long it’s consistent, and also follow perspective.
Aside all of that, I’ve also noticed the jagged pattern on the edges in many of the images you’ve posted. That probably is caused by the spacing setting of the brush. Some texture brushes could need a lot of space in between and making it too small would make the brush unusably slow. But if crisp edges is what you’re after, a simple hard edge brush/eraser with small spacing should do it. Alternatively could use the lasso/freehand selection tool and fill in the color on another layer, then lock the transparency to keep the edges when painting over it.
1 Like