Hi, I would like to share my first Blender addon, “HDRI Sun Aligner” (latest version 1.6), available on my GitHub repository.
HDRI Sun Aligner is a Blender 2.8 addon for automatically rotating an object (e.g. a sun) to match the brightest point in a HDRI environment texture. Some ideas when this may be useful:
Adding a sun to a scene rendered by EEVEE, as EEVEE cannot render shadows from HDRI environment textures
Adding any light to enhance a scene, in alignment with direct light from the environment
Usage
Add a HDRI environment texture (equirectangular projection) to the World in Blender
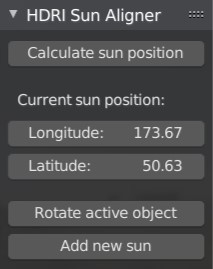
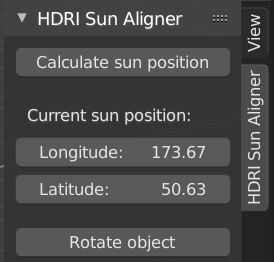
HDRI Sun Aligner is accessed from the panel to the right:
Calculate the brightest point in the HDRI used for the environment by clicking on “Calculate sun position”
A preview of the calculated position is displayed in the image editor:
Updated “Longitude and Latitude” values are displayed in the panel (can be edited)
Select any object and click “Rotate object” to align it with a vector from the calculated point to origo
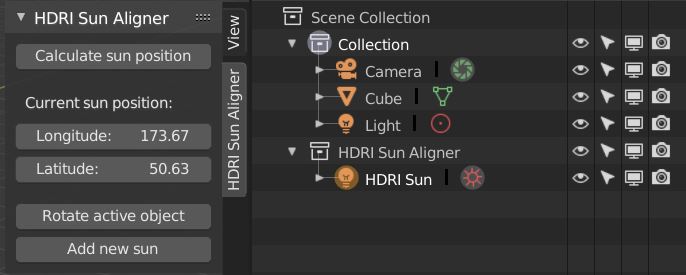
To add a new sun (rotated in alignment with the current sun position), click “Add new sun”
The new sun will be located in a new collection, “HDRI Sun Aligner”
Find more details and installation instructions on my GitHub repository.
Version 1.2 - fixes and improvements
“Add new sun” operator to add a new sun, rotated in alignment with the current sun position
Version 1.1 - fixes and improvements
No dependency on OpenCV, only Numpy which is already included with Python in Blender
I.e. no need to install any additional Python library
Improved usability with new panel in 3D Viewport
Update sun position (calculate brightest spot in HDRI)
Display of calculated Longitude and Latitude (can be changed by user)
Rotation of selected object according to coordinates
Preview is displayed in the Image Editor
Ideas for future updates:
Handle rotated HDRI’s (i.e. if the HDRI is rotated by a mapping node)
Change the static preview to something dynamic where you can click on a coordinate in the preview and automatically add a light source at that position (with correct rotation of course), including sampling of the color at that coordinate
Make it possible to change the position of the detected brightest point (dynamically by clicking in the HDRI preview)
I didn’t tested it yet, but from what I can see it would be nice to add multiple directional lights with clicking on the hdri preview - like in marmoset toolbag.
The sun samples the color of the indicator the user placed and by changing the position of it everything changes in realtime.
This is a great idea. I’m currently using OpenCV and the “imshow” function for displaying the static preview window, but if this is changed to use e.g. the Image Editor instead, I believe it’s possible to get the coordinates and color sample in real time? The mapping from 2D coordiates to 3D rotation is already in place and can be reused (that was the most complicated thing to get right). Let me do some tests and see how it goes.
Nice, but it require openCV lib. So i cannot activate the plugin.
Modules Installed () from 'C:\\Users\\wx^c\\Downloads\\hdri-sun-aligner-master.z
ip' into 'C:\\Users\\wx^c\\AppData\\Roaming\\Blender Foundation\\Blender\\2.80\\
scripts\\addons'
Traceback (most recent call last):
  File "E:\blender-2.80.0-git.84c06e996a7a-windows64\2.80\scripts\modules\addon_
utils.py", line 351, in enable
    mod = __import__(module_name)
  File "C:\Users\wx^c\AppData\Roaming\Blender Foundation\Blender\2.80\scripts\ad
dons\hdri-sun-aligner-master\__init__.py", line 15, in <module>
    import cv2
ModuleNotFoundError: No module named 'cv2'
Edit : After install python-opencv with pip inside the bundler python, I can activate it.
It looks to work nice. Maybe you can add the way to move the blue circle in case of false detection ?
Thanks @warnotte for testing, I updated the initial post with a reference to the Readme where there are more details on the required OpenCV library and how to install it using “pip”.
I will for sure try to make the HDRI preview interactive, allowing for adjusting the position of the detected sun position as well as the possibility to dynamically add a light source at any position by clicking on the image (and sampling the color as suggested by @gestoryscht).
You can temporarily replace 3DView with Image editor (mask mode because of cursor is there) and let user pick the sun position. I did that way for Vray addon.
Nice!! You could easily achieve the same functionality with just numpy and matplotlib instead of the rather clunky opencv. Matplotlib also allows you to query mouse click positions. You could perhaps use local maxima to detect several light sources automatically.
Do you have the same problem that the “cv2” module cannot be imported when you activate the addon? If so, you need to open a Command Prompt (assuming you are on a Windows environment) and run the following commands (one by one). Note that you need to replace <path to blender> with the actual path where you have extracted the Blender ZIP file (from the daily builds), e.g. C:\Downloads\Blender\
Let me know if this works out or if you get any problems running the above commands. To open the command prompt, search for “cmd” in the Windows search field (next to the start menu in Windows 10).
For clarification, the above commans do the following:
Installs the Python package manager (called “pip”) in the Python distribution bundled with Blender.
Installs the “opencv-python” python package (which is imported as “cv2” in the Python code).
Please let me know if you have any suggestions or improvement ideas for the next version. It was a good learning exercise to implement functions from OpenCV using only Numpy
New operator, “Add new sun” to add a new sun, rotated in alignment with the current sun position.
The sun will be added to a new collection, “HDRI Sun Aligner”
Note that the “Current sun position” can be changed manually if needed. I plan to add an interactive mode for the next version, to update the latitude and longitude by clicking on the preview image.
Note on mapping of image x-y coordinates to spherical coordinates:
Latitude: from +90 (north pole, i.e. top of image) to -90 (south pole, i.e. bottom of image)
Longitude: from -180 to +180, with 0 in the middle of the image