Live Scene Capture to Texture

LIVE SCENE CAPTURE → IMAGE TEXTURE

Lets talk abour rendering your scene in realtime and outputting the result into a texture. This is a common technique used in games for portal effects and whatnot but it is not an essential feature to have in offline rendering software like Blender. There still seems to be demand for this technique though. This post has been prompted by the frequent requests to break this effect down on a twitter post:

https://twitter.com/kolupsy/status/1525811584718741505?s=20&t=2eDLtjrgVcKw-TmsQXDutA

To take on this effect we make use of a hidden but very potent part of the Blender API: the GPU module. You can find out more about it here.

If you look at the many examples posted there you will find snippets that generate images from offscreen rendering and ones that capture the scene view from a camera and display it as a little window on your UI. By combining both techniques, we can achieve the “live texture” effect.

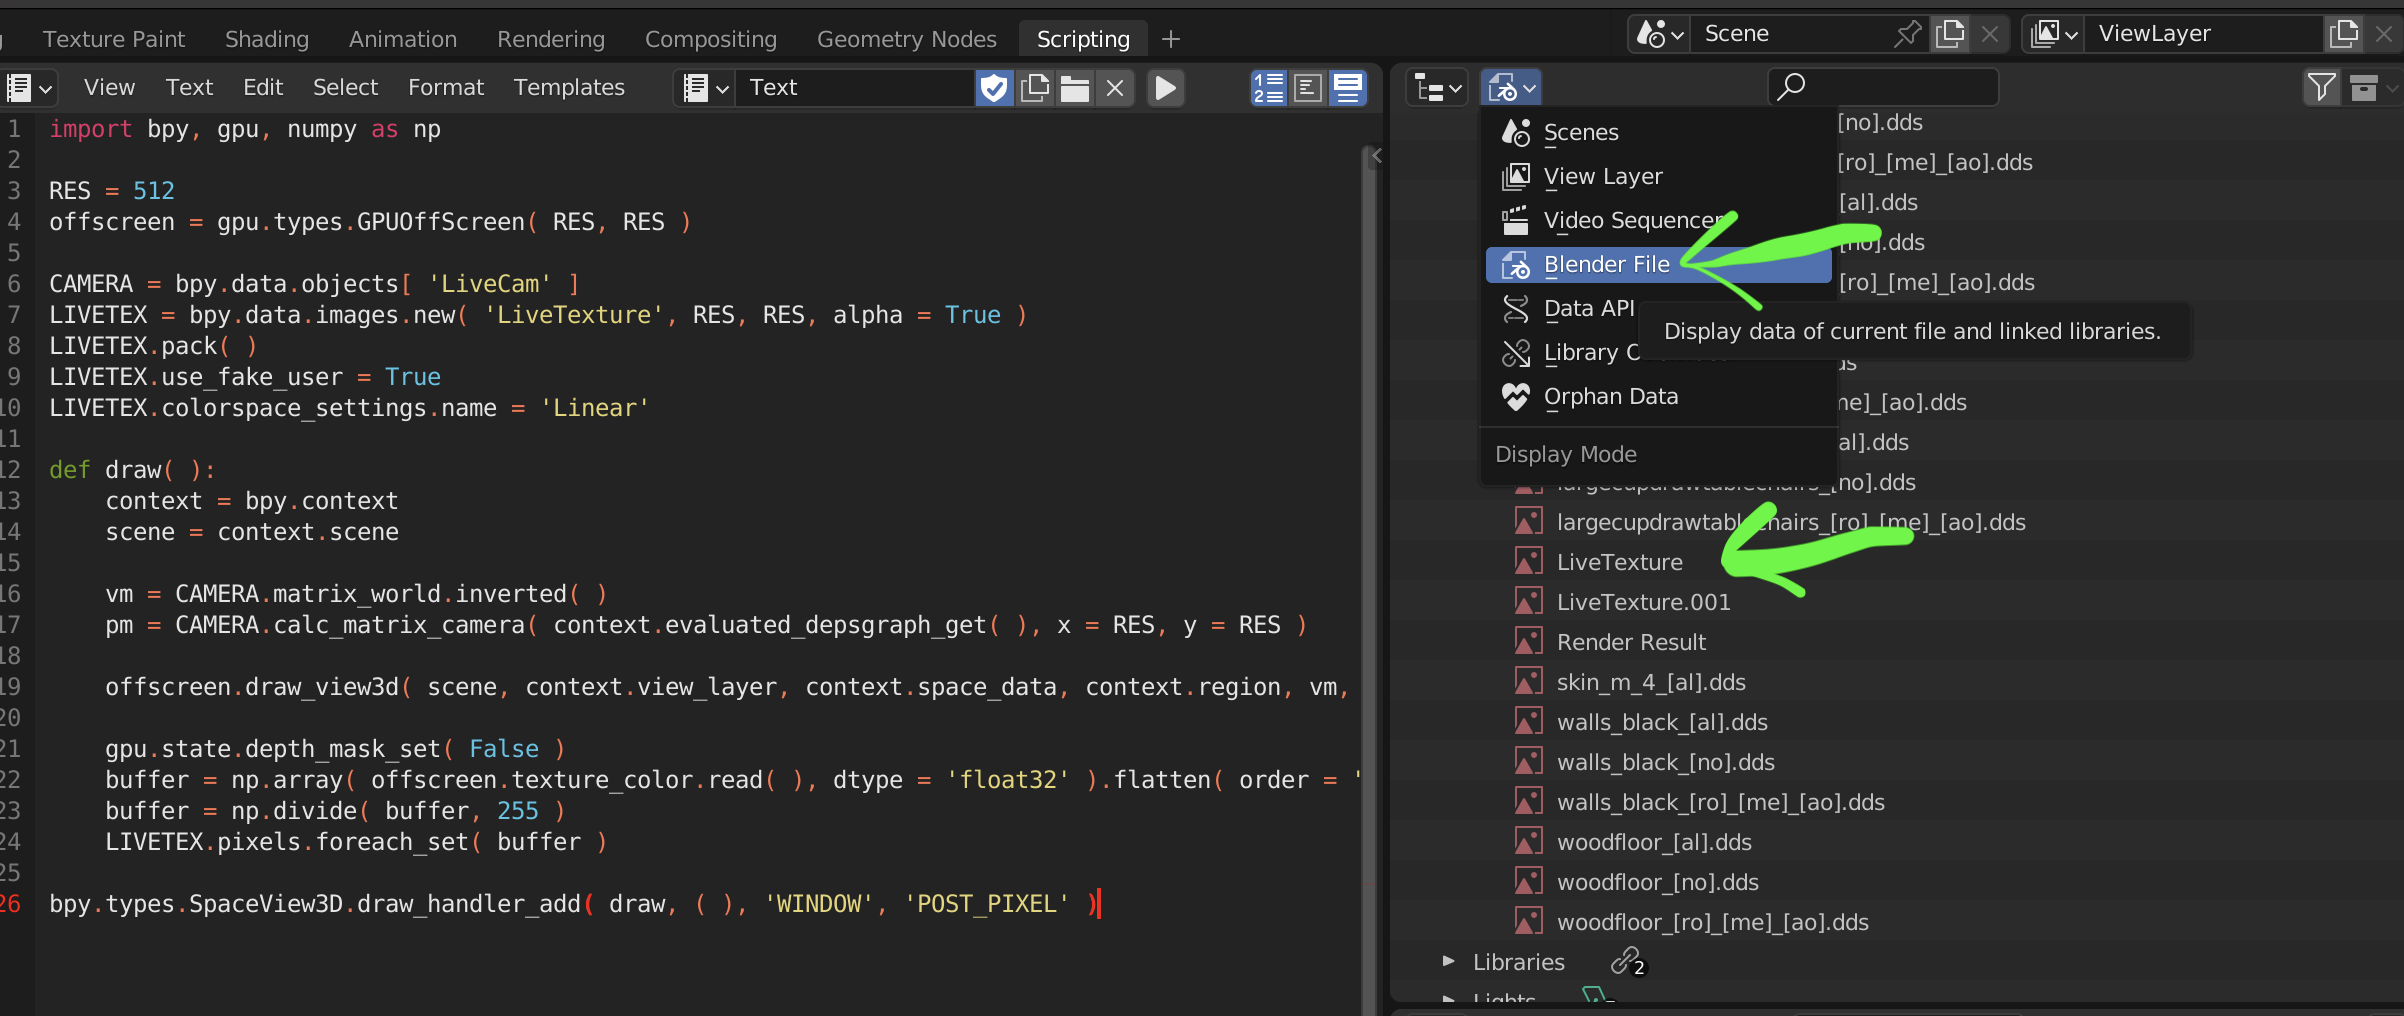
Below is the code that I used in the twitter post. Before running it you need to make sure to have a camera object called ‘LiveCam’ in your scene or else the script wont work properly.

import bpy, gpu, numpy as np

RES = 512
offscreen = gpu.types.GPUOffScreen( RES, RES )

CAMERA = bpy.data.objects[ 'LiveCam' ]
LIVETEX = bpy.data.images.new( 'LiveTexture', RES, RES, alpha = True )
LIVETEX.pack( )
LIVETEX.use_fake_user = True
LIVETEX.colorspace_settings.name = 'Linear'

def draw( ):
    context = bpy.context
    scene = context.scene
    
    vm = CAMERA.matrix_world.inverted( )
    pm = CAMERA.calc_matrix_camera( context.evaluated_depsgraph_get( ), x = RES, y = RES )
    
    offscreen.draw_view3d( scene, context.view_layer, context.space_data, context.region, vm, pm )
    
    gpu.state.depth_mask_set( False )
    buffer = np.array( offscreen.texture_color.read( ), dtype = 'float32' ).flatten( order = 'F' )
    buffer = np.divide( buffer, 255 ) 
    LIVETEX.pixels.foreach_set( buffer )

bpy.types.SpaceView3D.draw_handler_add( draw, ( ), 'WINDOW', 'POST_PIXEL' )

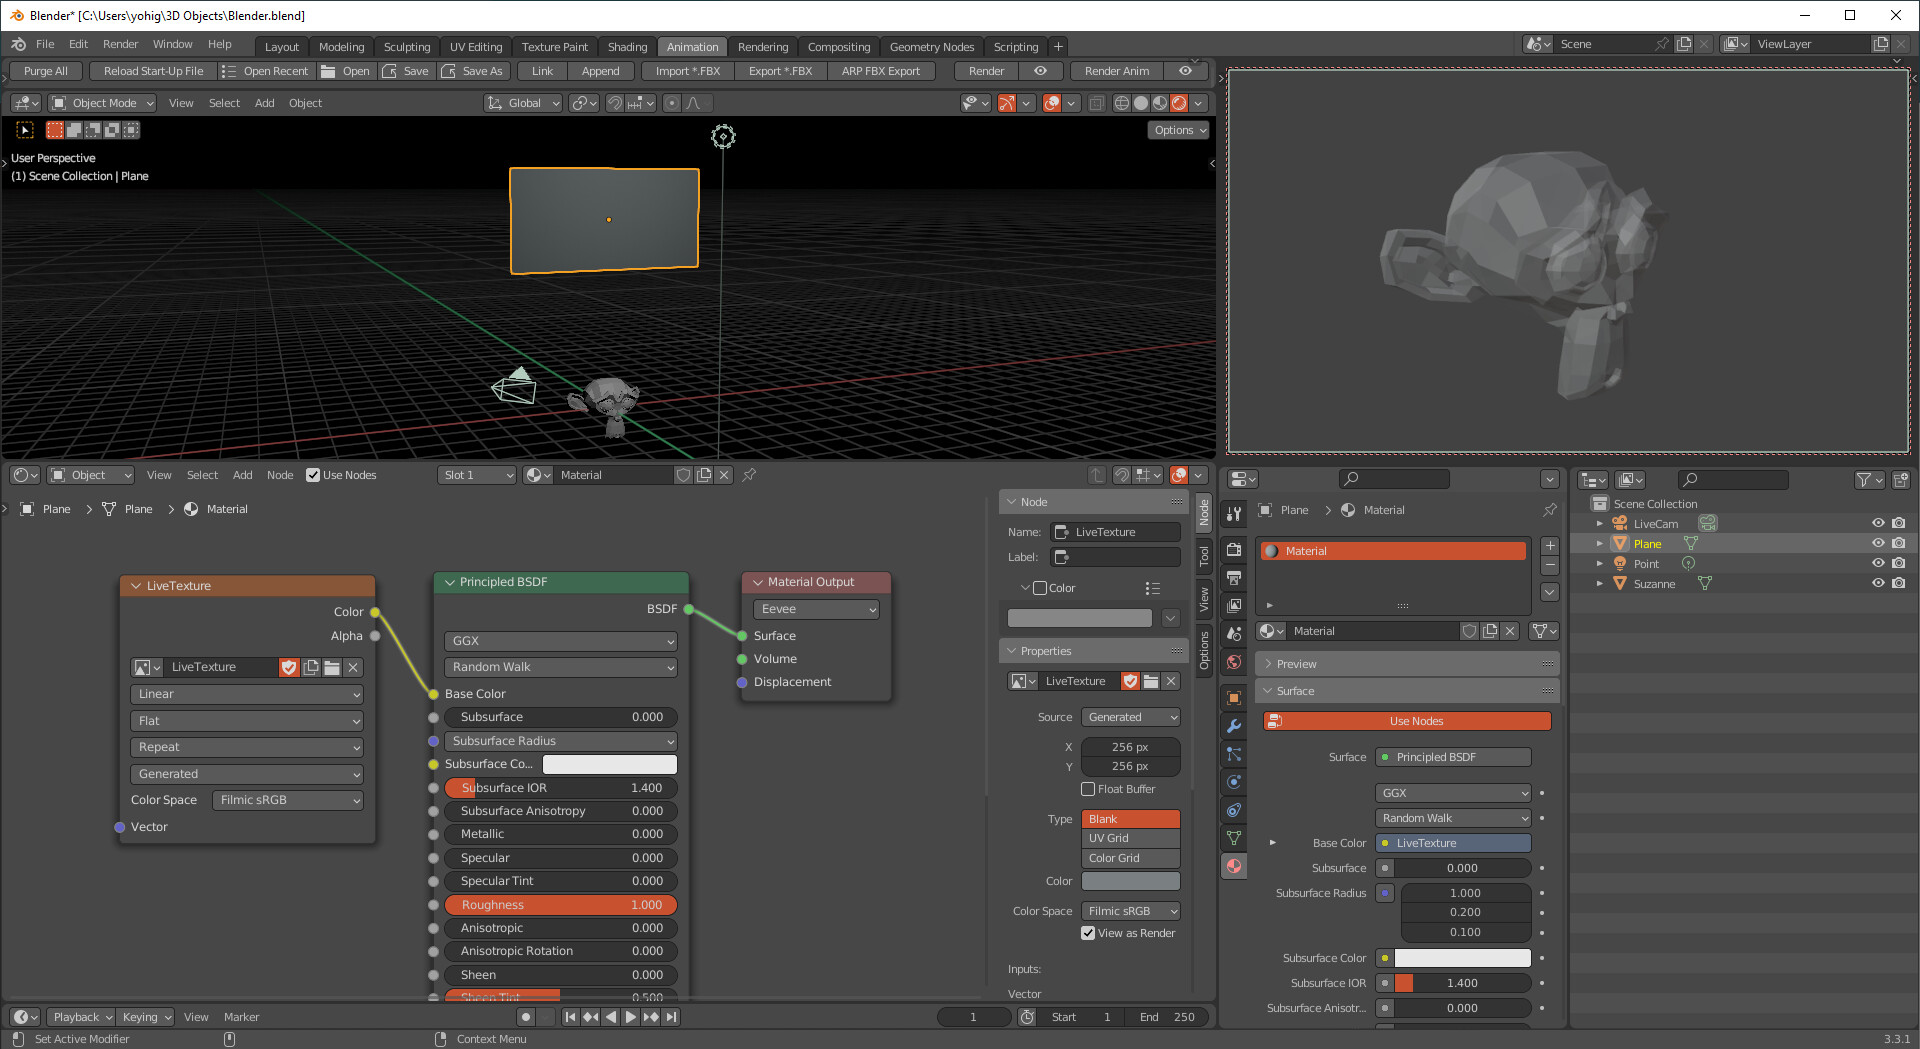
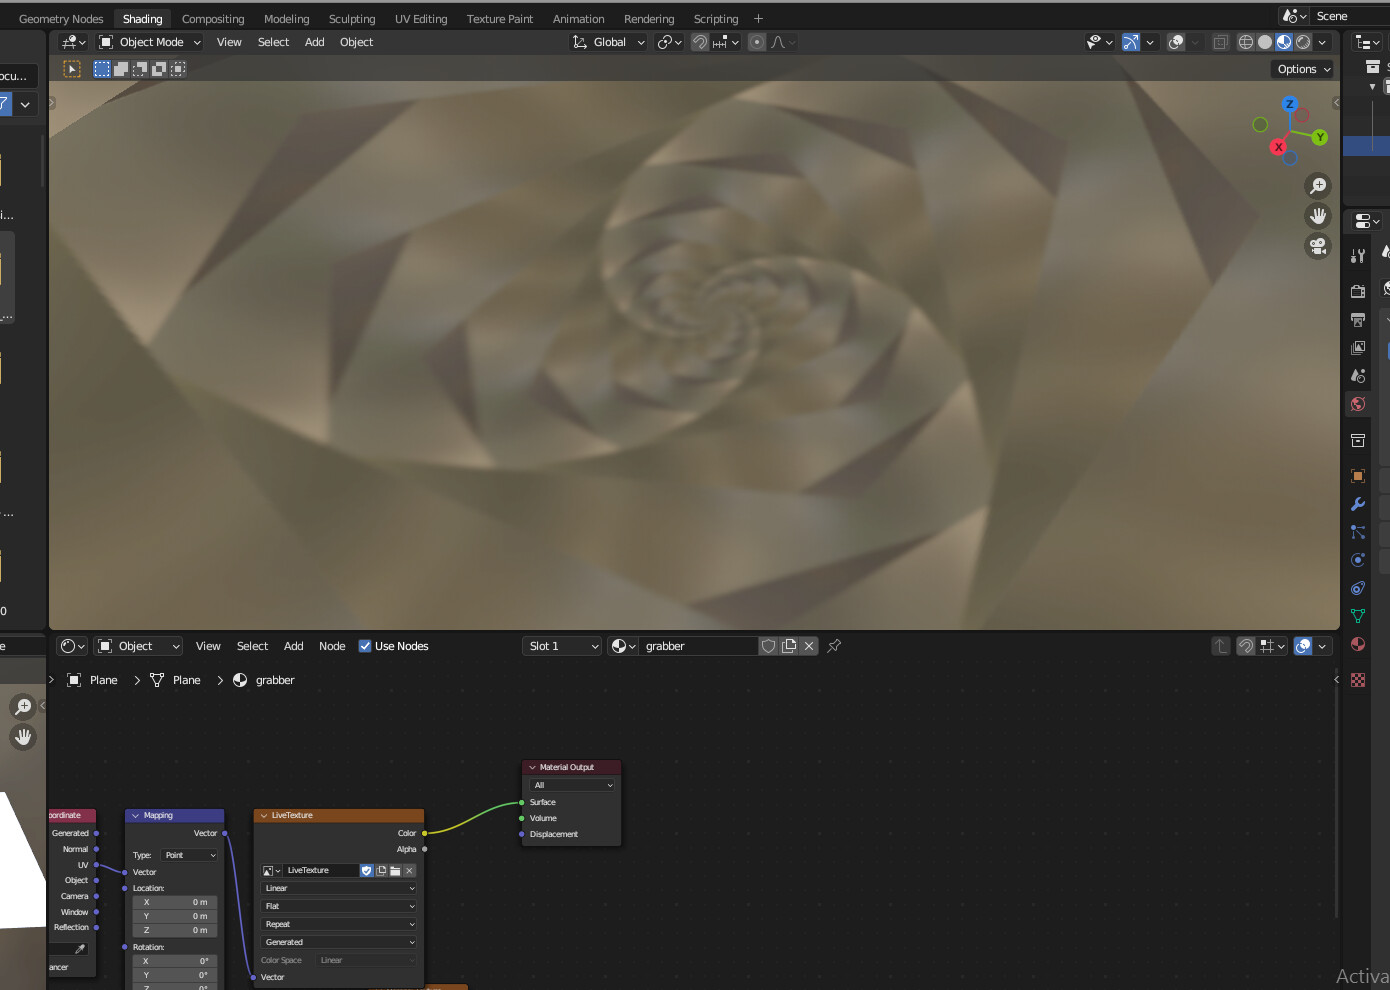
Now we will get a new image in our blend file called ‘LiveTexture’ as long as their is not already an image of the same name in the same file. This image can be used like any other image as a texture for the shader graph, Geometry Nodes ect…

Limitations:

  1. This will only work in the viewport, material preview or Eevee render. It will not capture Cycles renders. You can modify the script to render a cycles image on every frame update but this is not recommended for obvious performance reasons
  2. Speaking of performance. It is not great. Now this is not exactly a hack but I am sure Blender was not built with “texture streaming” in mind. Large captures with a lot of samples will tank preview performance fairly quickly.
  3. The script above does not handle On-Render updates, they can be implemented using app handlers altough I have not tested it myself yet.
  4. The capture will always include the entire visible UI. You can toggle of overlays if you want to capture only the relevant parts of the scene.

Tips:

  1. Use 1 or 0 Eevee viewport samples. Each viewport sample contributes to the performance load of the capture so keeping it low will help with performance. 0 samples allowes you to have unlimited samples in your scene but the capture will still only use 1 (very useful).
  2. Disable viewport denoising. This will make your viewport less slushy and clean up your capture.
  3. Change the resolution in the script to your liking. It currently is set up for a 1:1 ratio but you can modifiy the script to have any resolution you want. Just keep it low. 256x256 can be heavy enough. 512x512 has worked great too in simple scenes. Just try to find the limit for your scene.
  4. If you want to iteratively make changes to the script, either make sure to reopen Blender with every update of the script or implement script updating yourself.

Final remarks:
I personally dont find this technique too useful, it is a bit janky especially in its current state. BUT I will gladly listen to what you have to say about it and why it is ACTUALLY useful. I would be open to expand on this idea given a good enough reason to do so.
If you decide to do something cool with it, then I am very glad to have helped. Be sure to tag me on twitter so that I can see what cool things you were able to do with it. My twitter handle is @kolupsy. You can also follow me on twitter where I am most active on social media and often post funky stuff like this.

https://twitter.com/kolupsy/status/1525924648168333315?s=20&t=2eDLtjrgVcKw-TmsQXDutA

18 Likes

Great one, Kolupsy! I wasn’t even aware of the gpu module until today. Saw this yesterday on twitter and have been waiting for a breakdown. :grinning:

2 Likes

As someone who is using Blender as a pseudo game engine/live virtual scene for a kind of V-tubing this interests me greatly, I know my next question is probably a straight no however I’ve not got time to read it all right now, but can you bring a source in from outside of Blender?

1 Like

Do you mean a real camera source, such as webcam? if so yes that is possible but you’ll need to install some external packages.

Hi, I really wanted this feature from a long time, I’ve seen many thread or feature requests about this.

So sad, it is still only a viewport gpu drawcall and not something you can actually use… I wish you create an addon to integrate it as it is really needed. I had to pass to Unreal Engine only to get render target.

It is usable, not a gpu overlay. You can delete the draw handler bit and use:

for _area in context.screen.areas:
        if _area.type == 'VIEW_3D':
            space_data = _area.spaces[0]
            for _region in _area.regions:
                if _region.type == 'WINDOW':
                    region = _region 
                    break

and…
offscreen.draw_view3d( scene, context.view_layer, space_data, region, vm, pm )

then call draw() as you wish. The handler is just for realtime updates. Because its being essentially a ‘render texture’ you can then use that data for anything. I know Unity uses it for some special reflective shaders, what would you use it for?

Actually I was thinking a virtual camera like to have a desktop or browser.

import bpy, gpu, numpy as np
from gpu_extras.presets import draw_texture_2d

RES = 256
offscreen = gpu.types.GPUOffScreen( RES, RES )

CAMERA = bpy.data.objects[ 'LiveCam' ]
if not 'LiveTexture' in bpy.data.images.keys( ):
    bpy.data.images.new( 'LiveTexture', RES, RES, alpha = True )
LIVETEX = bpy.data.images['LiveTexture']
LIVETEX.pack( )
LIVETEX.use_fake_user = True
LIVETEX.colorspace_settings.name = 'Linear'

def draw( ):
    
    context = bpy.context
    scene = context.scene
    vm = CAMERA.matrix_world.inverted( )
    pm = CAMERA.calc_matrix_camera( context.evaluated_depsgraph_get( ), x = RES, y = RES )
    
    original_overlays = context.space_data.overlay.show_overlays
    context.space_data.overlay.show_overlays = False
    offscreen.draw_view3d( scene, context.view_layer, context.space_data, context.region, vm, pm )
    context.space_data.overlay.show_overlays = original_overlays
    
    gpu.state.depth_mask_set( False )
    buffer = np.array( offscreen.texture_color.read( ), dtype = 'float32' ).flatten( order = 'F' )
    buffer = np.divide( buffer, 255 ) 
    LIVETEX.pixels.foreach_set( buffer )
    draw_texture_2d(offscreen.texture_color, (10, 10), RES/4, RES/4 )

class LiveCapture_OT_capture( bpy.types.Operator ):
    bl_idname = 'livecapture.capture'
    bl_label = 'Live Capture'

    def execute( self, context ):
        self.report({'WARNING'}, 'Operator has no execution. Use as modal.')
        return{'CANCELLED'}
    
    def invoke( self, context, event ):
        self.report( {'INFO'}, 'Start realtime update.' )
        self._handler = bpy.types.SpaceView3D.draw_handler_add( draw, ( ), 'WINDOW', 'POST_PIXEL' )
        context.window_manager.modal_handler_add( self )
        return{'RUNNING_MODAL'}
    
    def modal(self, context, event ):
        if event.type == 'ESC':
            return self.finish( context )
        return{'PASS_THROUGH'}
    
    def finish( self, context ):
        bpy.types.SpaceView3D.draw_handler_remove( self._handler, 'WINDOW' )
        self.report( {'INFO'}, 'Stopped realtime update.' )
        return{'FINISHED'}

bpy.utils.register_class( LiveCapture_OT_capture )

Small update to the script. I wrapped the realtime update function in a modal operator that can be called from the Search menu. It will also force the overlays to be invisible. You can remove that if you dont want it. Its also still very context sensitive so keep that in mind. Cancel by pressing escape. You can see when the modal is active when there is a little preview of whats happening appearing in the 3d view lower-left corner.

4 Likes

Like this? https://twitter.com/OTrealms/status/1527108079586000897?s=20&t=Qbjx2egloOBe_BrapId7CA .Its the same whether virtual or real camera. You need to use the virtual camera plugin if using OBS. Plus OpenCV installed in Blender. Also works if you want to green screen yourself into Blender! I knew it wasn’t hard to make but never saw any reason to do it. I can make a separate topic with instructions when I have time.

3 Likes

Amazing, so cool, I’m going to try and implement this into my setup any advice you could give would be great as I hit confusion mode when I started looking into OpenCV.

is this not working for me because i havent got a gpu? is there a way to do this without a gpu? thanks

I’ve wanted something like this for ages, for using in live, responsive visuals in EEVEE. I’ve done a lot of fun stuff with UV warping and such, and always found myself missing a render-to-texture. One usecase: hall of mirrors-type effects. Particularly those with a colour-shift applied, as in 70’s video effects, but the technique’s more broadly applicable too!

Let’s say I have a great gpu and a simple scene. How would one modify the script to work with Cycles?

I’ve tried to test your script and I can’t get it to work, I don’t know what I’m doing wrong. Can you make a step by step video?

Thank you

It is sadly not a performance question. The type of scene capture only works using the viewport or Eevee engine.

What is wrong in my configuration?

This makes the old VJ in me very happy, thanks for this!

Best (VJ) Christmas present ever.

Greetings! You have done a very useful thing, thank you. But I don’t understand how to use this script. Could you briefly explain? I have a scene with a camera (LiveCam) plane with a created texture saved in the project folder and a Suzanne object that needs to be rendered. I copied your script into a new text document in upbge but nothing happens when I run it. I don’t understand what to do…

[/quote]


Run the script, open the blender file as shown in the top green arrow. Select the “livetexture” image and drag it to your shading workspace and use it as any normal texture.

1 Like

Hi, can anyone instruct me as to how to change the aspect ratio of the captured image? I want to make a widescreen tv feed.

Cheers.