I’m setting up a problem for unwrapping someting in an uncommon way.
I searched ( for hours now ) but found no way of doing this. I’m not even sure there’s one
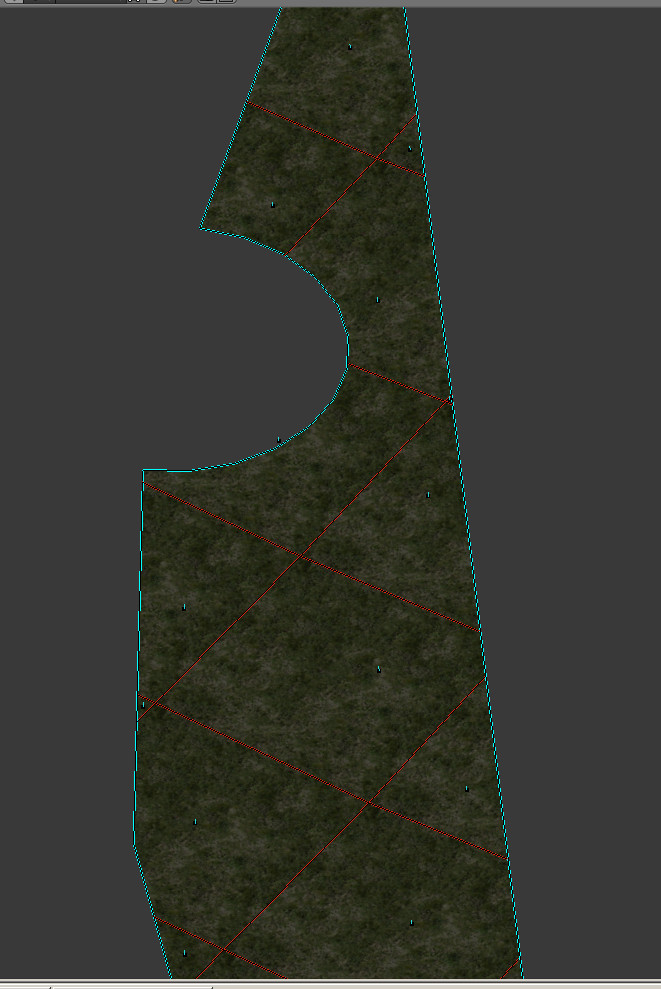
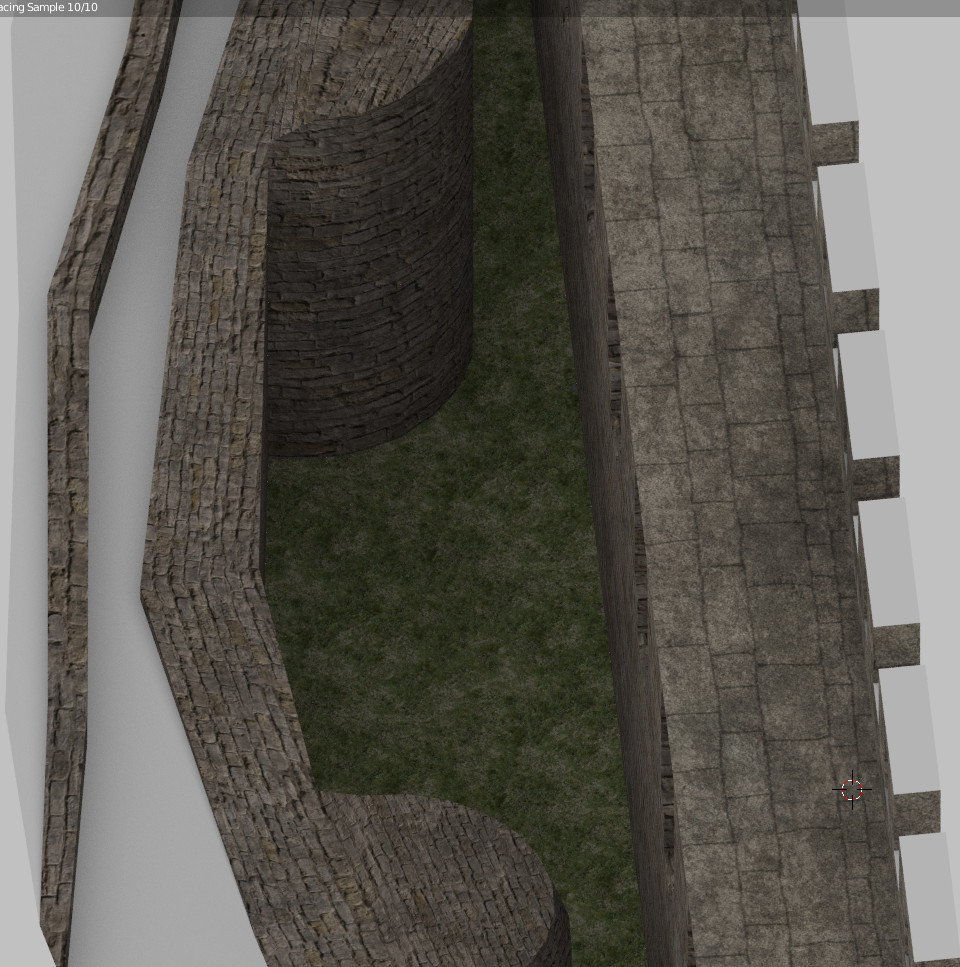
finally, what i want to do is map all part of my grided mesh on the same grassy part of the texture.
so that i have on my mesh a repeating pattern coming from a part of a texture.
and i’m stuck !!!
i found no way of simply doing this ( only UV per UV hand editing ) and the add-on ‘magic UV’ didn’t help.
if I have correctly understood your request, you must select all the faces in edit mode and press U->Reset, then you can adjust all the selected faces to match the portion of the image as you need.
Why would you need to this that exactly? Why having boundaries of each repeat of the texture on edges exactly? It is much better to just unwrap normally (Project from View e.g.) and scale texture so that texture size fits as needed. Then the ratio of the texture will be preserved as long as you scale proportionally.
If there’s special reason to have that done as explained above then probably you need to do this manually
This does not answer why not mapping whole UV island to UV space and then scaling it up or scaling texture coordinates in material in Node editor. No 8k textures needed then, just texture should be tileable.
Side note, this is not a case (there aren’t any here) but just a question on the forum. If someone answers it you indicate it by marking green checkbox, that’s all you need to do.
Well then you’re likely restricted to more complex way of unwrapping, either manually or some script which maybe isn’t written yet (technically it’s possible to use Edit mode > select all > Ctrl+E > Edge Split > unwrap and use UV Align Distribute addon, it will align all islands horizontally and vertically and then you will move islands where required, then remove doubles… decide if it’s worse then current workflow). It’s possible to shift texture coordinates to make different meshes to get different texture but it works if UV coordinates are already in place.
I would say that in texturing with tileable textures atlases should not be used since you’re effectively restricting final resolution and adding work to do, though I don’t have information about all requirements of that certain project.
Details like that should be included from the beginning into the question. No one can guess.
Indeed it was just have a look on the texture in this post: Special unwrapping problem
I thought it was obvious enough not to mention the whole tileability of the texture. my bad if i was not clear enough
what i like with blender is that you never know everything and honestly i didn’t know about the addon you talk about and about the technique you mention. I definetely will have to try this out !
Thanks a lot for the clue Zak_Gre
It however looks like the way i did the thing. It’s okay for say… 20-50 tiles but for hundreds of them it’s unhuman x))
I made a post here: Magic UV - #15 by pitibonom
detailing the way i did it. lemme copy/paste the text:
i gonna try your idea ASAP and will flag this topic as closed if am okay with it.
Till then the question is still opened and all ideas are welcome !
Unwrapping posted slightly above is not really shorter than what you mentioned with Magic UV (marking seams is more efficient instead of edges splitting) since you still need to move islands together and do this for each mesh, so if you really need to do that on multiple meshes (especially highpoly) script would be required
This was the answer i hope that wouldn’t come
as i’m used with coding in C# in unity but i know nothing in python and in blender data structures
Nevertheless i think you’re just right saying this needs some scripting, even if i’m unable to make it.
Maybe with some luck, ppl making the magic UV addon will say: ahah easy i code this in 5 mins
Anyone has the right for dreams ^^
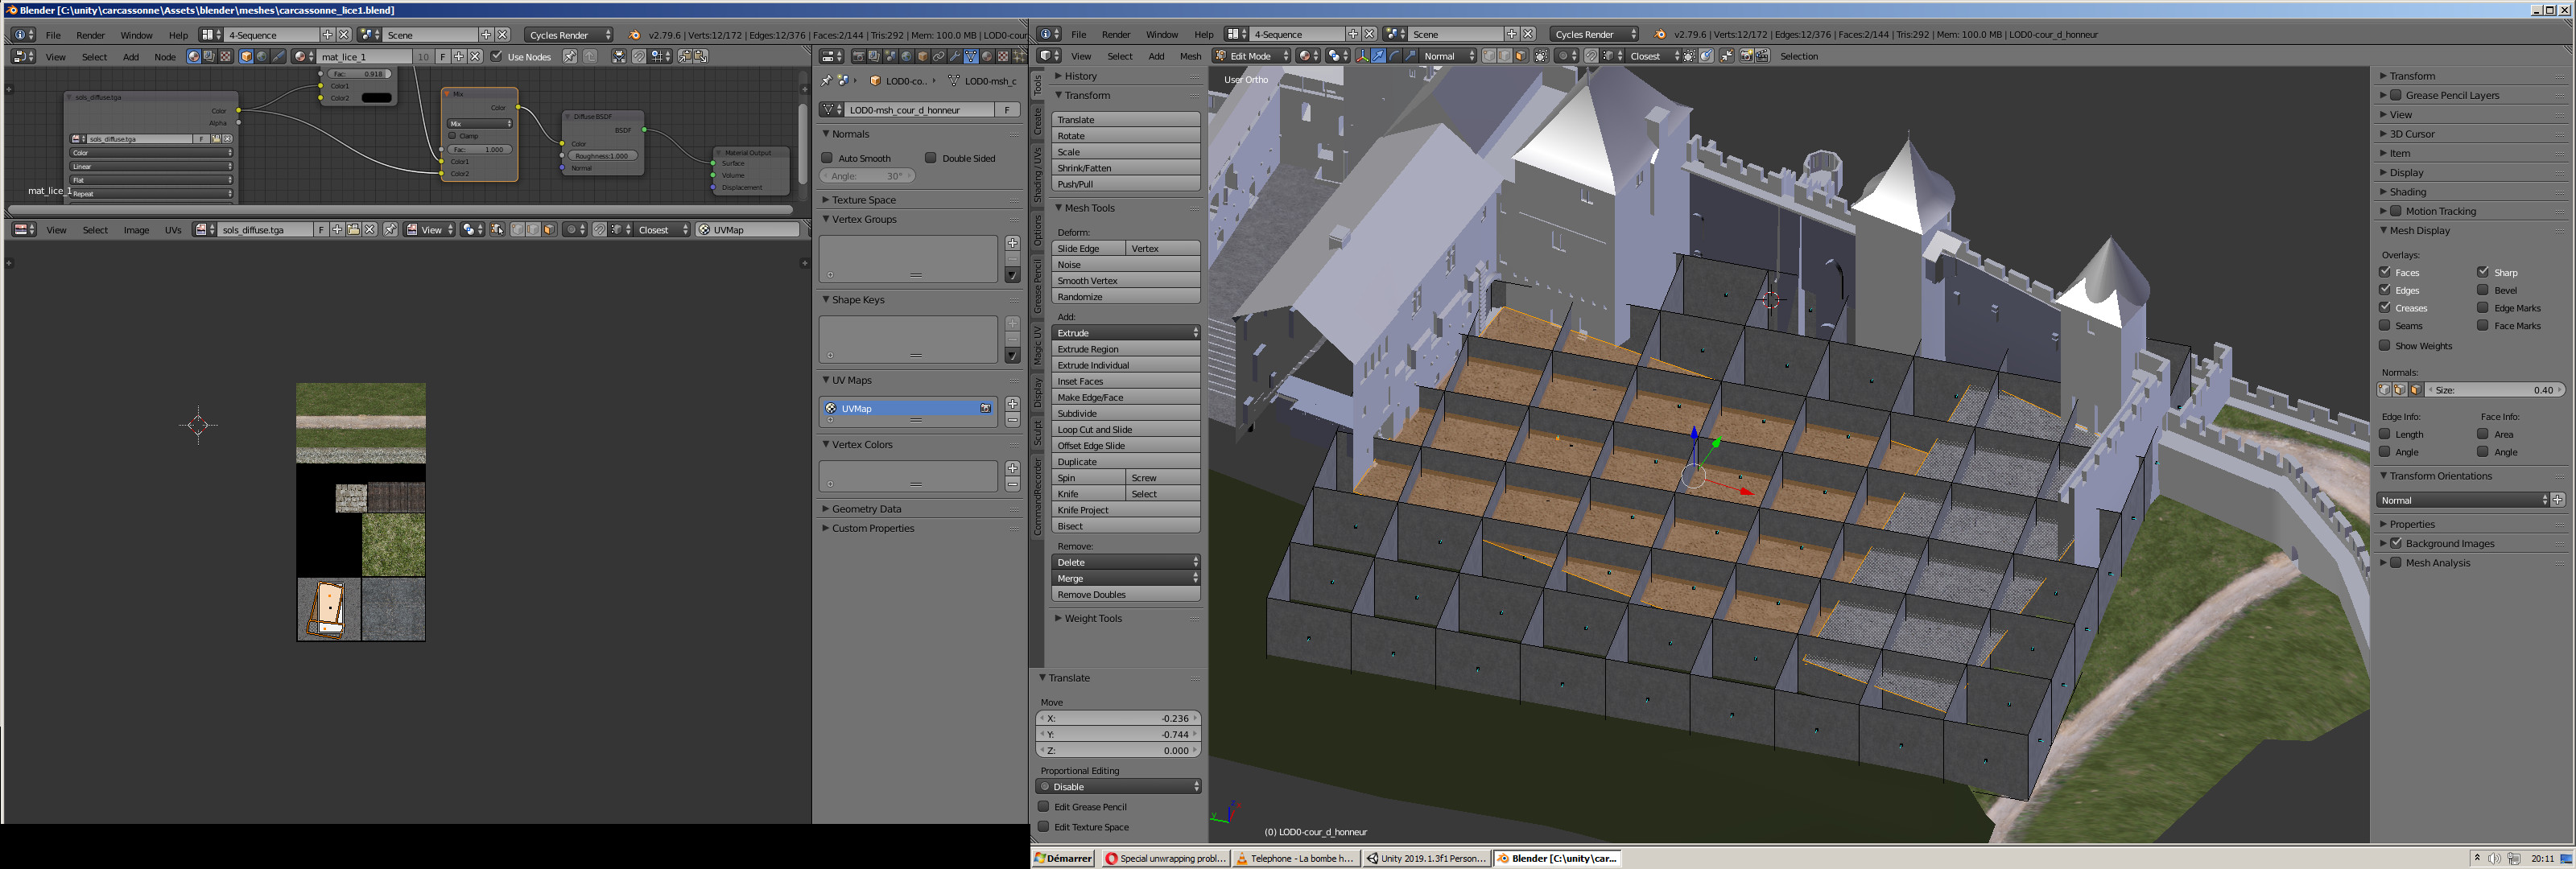
I made a grid object, did an unwrap>reset, then joined my cut mesh and used the knife intersect tool to do the cut, then deleted the cut mesh and outer area. took about 30 seconds, and is scalable, here is a groundplane with 10k faces:
With all of the faces filling the full uv space, you do have to manually align them, but since they are aligned with each other, it’s only one step to move them into position on your atlas.
thanks a lot for your idea
I previously thought about this but didn’t try it just because my mesh to cut is not planar.
I would then have to move each vertex to the right place and create the proper shape all by hand. Moreover i don’t know how to place each square of a grid at the same UV place. This works nice with UV >>> reset but some squares are randomly rotated with angles multiple of 90°
Nevertheless i confess your way is the best one for planar meshes i’ll keep it in mind.
I just have to find a way to have my squares in UV window, rotated all the same value.
thanks a lot for your answer even if it only partially solve my problem
happy blending !
EDIT:
looking carefully at your pics, it appears you didn’t have the UV rotation problem i have…
how did you unwrap all squares properly ? I’ve never been able to do this with UV >>> reset…
owwww
my bad !!! i just discovered that on a plane perfectly cut in squares ( and only this, with no other cuts ) the UV >>> reset places all UVs at the right place !!!
allright ! we’re moving towards the final solution of my problem
my last question is: is there a way to deform a mesh or mesh part with the shape of another mesh ?
This way i could deform my square cut mesh with the original mesh and retrieve the proper shape…
?
thanks
EDIT2:
your second pic looks like a terrain. If i understand what you did, you made a plane cut with squares, unwrapped it with reset, then cut it in the 3D view and finally deform it in 3D view so that it looks like the relief you wanted ?
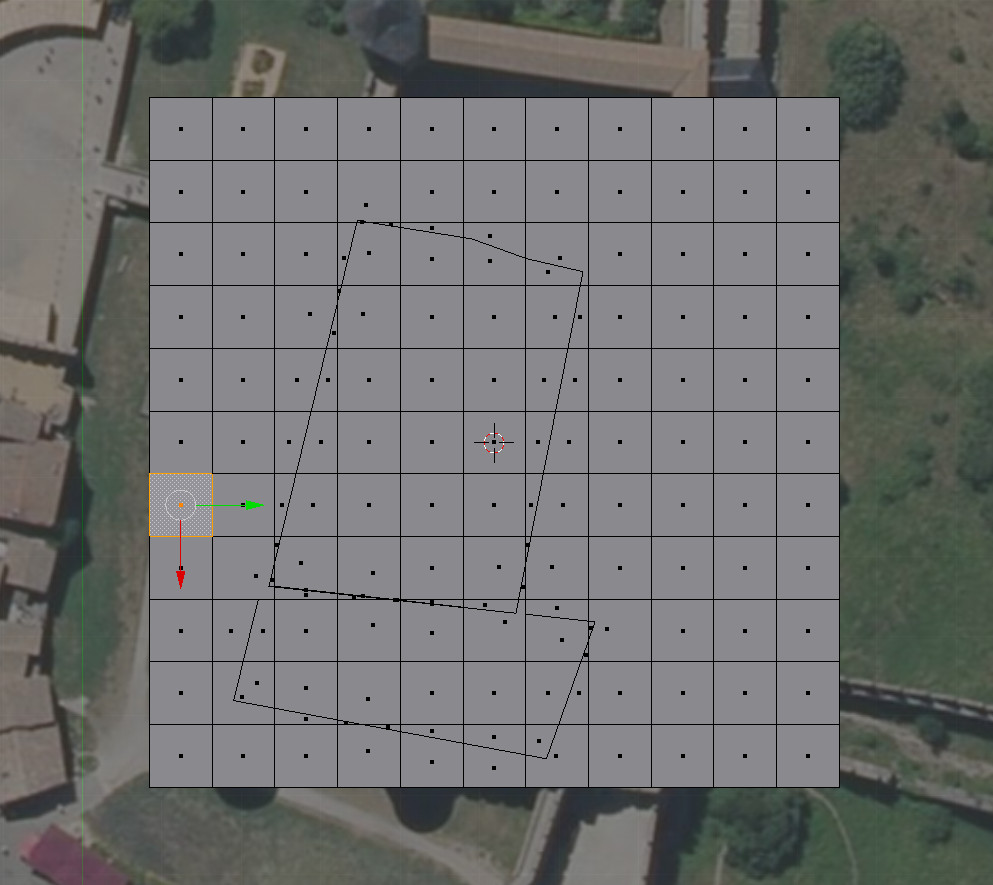
The selected faces are the ones that need to be cut, and you clearly see the ‘grid cutter’…
What i’m unable to achieve is
… owwwww wait…
i think i got it ( and will post this as a reminder )
i MUST start with a grid cutter including the original mesh contour, cutting a perfect square plane previously unwrapped…
take one good tile from it (not sliced, one good perfect square), duplicate and extract into its own object
flatten (if needed) and unwrap the new object as needed
make an array out of it using several Array modifiers so it covers the whole area of the original mesh, i.e. creates a grid similar to one on the above screenshot (but can keep the Arrays, no need to apply them)
on the actual mesh, add a Data Transfer modifier, enable Face Corner Data -> UVs, set mode to Nearest Face Interpolated, source - the newly created grid
apply the modifier
Pros:
more visual
less unwrapping/resetting
can edit/preview the unwrapping live before applying the modifier