That’s the thing, there’s no default pivot in Blender, because you can use the object origin, the 3d cursor, the bounding box, the individual origin (if there’s several objects / islands selected), or the active selection… I’m sure I’m missing something. So based on that how do you define which is THE default?
Someone could argue that all of those options should be present in sculpt mode too, plus masked/unmasked area, mask border, faceset, faceset border… Which is the default and which one is “temporary”?
3 Likes
Thanks for the feedback. I appreciate all the concrete notes!
I just wanted to summarize some points. I think this would be good to build on :
-
There is also a need for each object to store and preserve it’s own pivot point. Specifically to avoid losing the pivot when frequently switching between objects for transforms. (It’s all about having separate or a single uninterrupted sequence of transforms = Per object or 3D cursor pivot)
-
If there would be both kind of pivot point settings available, the purpose and way to use each of them needs to be clear.
-
Having a per-object pivot would allow similar snapping operations with the 3D cursor like in other modes
-
Sculpt mode should have some unique snapping operations, like Snap ‘Pivot to Unmasked’ and ‘Snap Pivot to Mask Border’. Probably it’s own, slightly modified, pie menu layout.
-
The 3D cursor is becoming a lot more loose in sculpt mode. Expand and transform operations are always changing its position. This can be undesirable when using the 3d Cursor for other tools and purposes.
There might need to be a toggle in the tool settings to not have the 3D cursor moved by sculpt mode transforms, expand etc. -
The 3D cursor rotation is missing functionality to be used and edited. A tool, gizmo or other methods are very needed.
Another point I wanted to make is: Using the 3D cursor becomes extremely intuitive when used in combination with shortcuts.
Effortlessly repositioning the 3D Cursor with Shift Right Click to snap to a surface or view orientation, as well as dragging to move it around can be much faster then first having to toggle a tool → toggle a tool option to only move the pivot → drag the gizmo handles. Both are needed of course, but the first one is more in line with how Blender is used to place custom pivot points in other modes.
Maybe this can be done with a per-object pivot point as well. But it might create conflict with the 3D cursor shortcuts 
17 Likes
I really hope this part improves.
1 Like
I got the feeling that we are finally moving in the right direction. Pivot and 3d cursor as two separate entities, yay.
Here’s the thing, the pivot toggle doesn’t necessarily have to be tied to a tool. It should be possible to be accessed directly.
One way to picture how this should work is by looking at how the “edit origin” toggle works in object mode. It’s exactly the same concept, the only difference is that in sculpt mode we are dealing with the pivot, not the origin.
So what happens when you press ctrl + period in object mode? Yes, the “edit origin” gizmo shows up, and that’s exactly what should happen in sculpt mode. No need to go through any tool first. And once we are in that “edit pivot mode”, all kinds of pivot transformations should be possible, like shift right click to snap to a surface/using the transform gizmo etc.
And that’s it. 
10 Likes
I second this. 
4 Likes
Working in Sculpt Mode of 4.3 alpha, and I love the new custom brushes that have been added. No more opening semi-hidden rollouts in search of specific options. 
8 Likes
Do the new brush menus work properly for you? The one at the bottom (asset shelf?) has non-functioning tabs, and the one where the old brush selection was in the toolbar (shift+spacebar) doesn’t refresh until I move the mouse to a new UI element.
Other than that I love it. Brushes get stored as assets, so no more having different brushes in every .blend file because you changed some setting.
2 Likes
The tabs of the Asset Shelf seem to work fine here (Windows PC).
The Shift + Space menu also works, but there’s a slight delay before it updates after you select a different section.
Thanks for the Shift + Space menu tip by the way, I had missed that feature. Can you reassign the hotkey (e.g. to Space) ?
The delay is as long as you keep your mouse over the section, move and it updates.
Don’t know why you couldn’t rebind it to space. It’s called “Call Asset Shelf Popover” in the keybinding list, just make sure you’re rebinding the one for Sculpt Mode 
1 Like
I know right? It feels so good being able to recreate ZBrush shortcuts to get your desired brush in a couple of keystrokes. Been renaming all of my brushes to ZBrush names and put abbreviations at the beginning to get the shortcuts working the same and it feels great. Besides a few bugs with importing brushes with Asset Libraries and being unable to just move brushes to another subcategory it is working incredibly well. We just need to get alphas and VDMs to become proper assets to put on to brushes fast and it will feel fantastic.
The devs really outdid themselves designing the new system. Very happy with how they implemented some of the feedback I had about auto-search when activating the search panel. Great stuff.
10 Likes
I totally agree. Sculpt Mode development is gaining traction again.
7 Likes
did they really decide to expose the bad performance of the projected falloff to the public just like that? last I checked it was rough
or did they improve it?
I really like new Plateau brush. Unlike most of the custom sculpt brushes that are just better variants of default tools this is just something new altogether. Something I would probably not discover on my own. Very cool. Hopefully many more like this are discovered and shared now that it’s actually possible.
If you keep pushing in new direction it creates same effect as on thumbnail, but if you go back and forth it can basically extrude and flatten to create more hard-surface-y forms. Lot of possibilities here
25 Likes
Good question. I haven’t done an endurance test yet. But I’m happy with the accessible custom brushes that provide a shortcut to semi-hidden options.
1 Like
Shortcuts for semi-hidden options?
What’s this like, where can I read more about it?
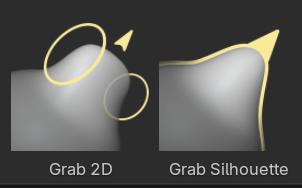
I was referring to new custom Sculpt Mode brushes in Blender 4.3 alpha, like Grab 2D and Grab Silhouette. Usually, you needed to activate grab, then click on a brush settings roll-out, sometimes a sub-rollout, check a box, and uncheck it again if you wanted to return to regular grabbing. Now you’ve got custom brushes with those modes activated. I think it’s convenient.
10 Likes
I agree and think this should be applied to more areas of Blender (it is already happening – think hair curves).
Blender basically is full of basic building block functions that have loads of options/possibilities. Having shipped presets of brushes, node groups (both shader and Geo) etc makes things a lot more user friendly.
The new extension system will become this. The amount of usefully presets possible is exponential.
9 Likes
You might be interested in testing this new add-on: QRemeshify
https://www.reddit.com/r/blender/comments/1frbp4f/remesher_extension_with_goodquality_quad_topology/
11 Likes
Interesting! Thanks for sharing.
1 Like
A sculpting tip: I’ve modeled 80 % of this Spongebob using the Blob Fusion add-on. I can recommend it. It brings the flexibility of non-destructive SDF modeling into Blender.
3 Likes