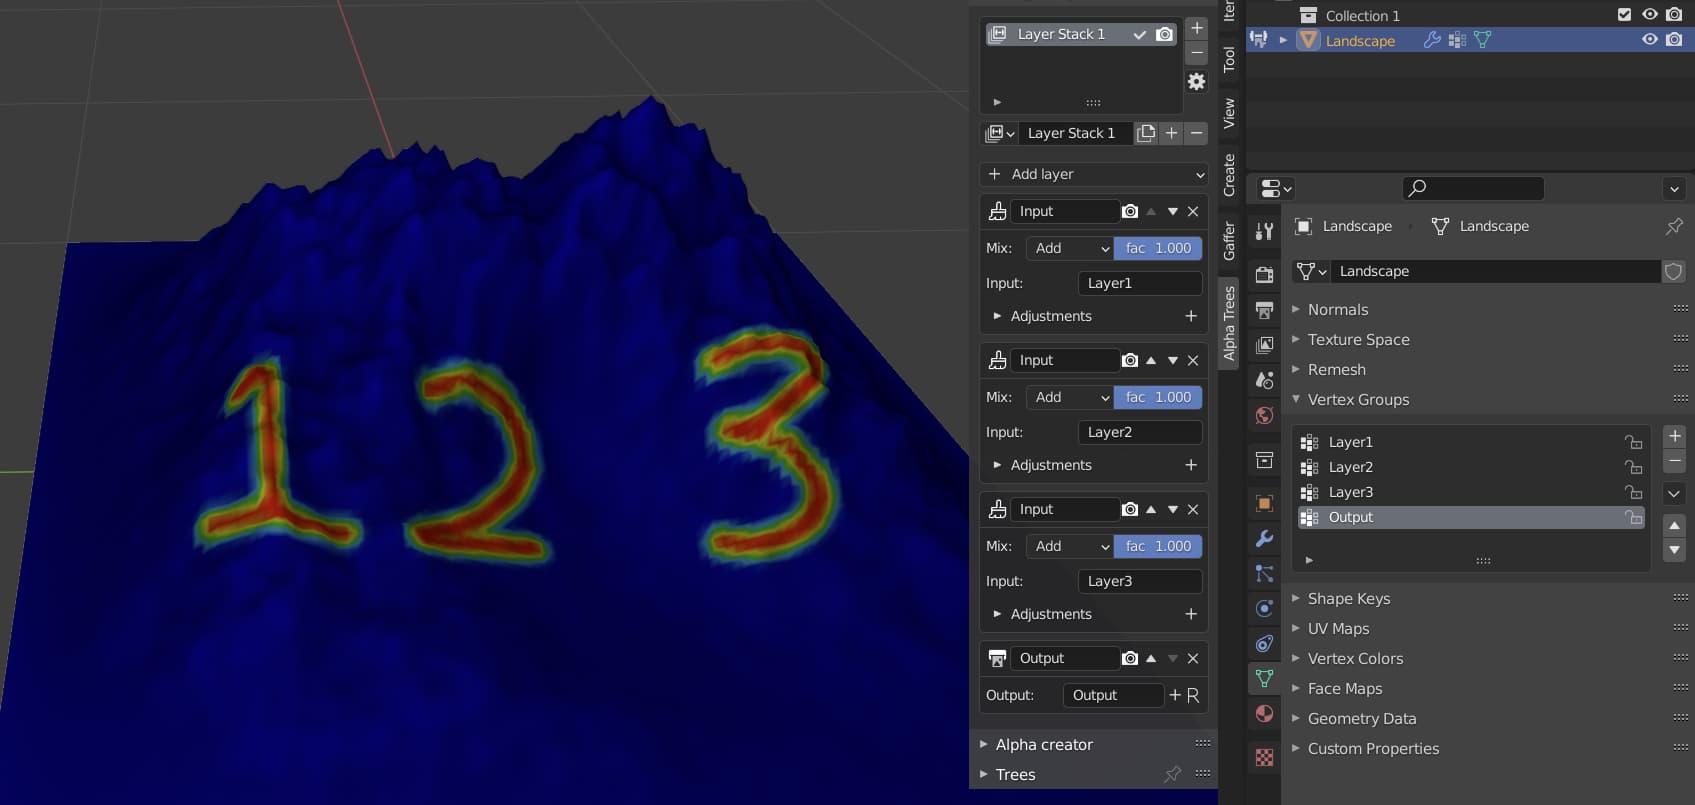
Hi, guys, for the past couple of weeks I’ve been working on a new addon for creating fast, procedural weight maps (vertex groups) that can be edited in the form of layers:
Ability to output result to any attribute (vertex groups, vertex colours, geo nodes attributes)
Ability to use interactive weight painting at any point in the layer stack
Ability to use the same layer stack on multiple objects, and edit them all at once
Works with Blender 2.93 and 3.0
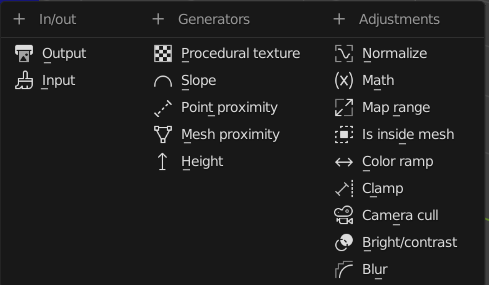
Currently, these are all of the layers included in the addon:
But if you have any ideas for new ones, I’d love to hear them!
On heavy meshes, the addon can start to slow down, especially if there are a lot of other geometry node systems on it, so to stop this, you can also turn on manual refresh mode, and update the output with the click of a button.
You can get the addon here (just type in 0 to the price box to get it for free:)
One last thing is that I’m going to be away for the next couple of weeks, so if you find any bugs, I won’t be able to fix them until I get back.
1- Bug with location panel by start blender. default is data panel but location in N panel. swith only if turn on in preferences.
2 - possible to add vertex color with the same values like in vertex group?
3 - there is no properties in procedural texture layer like in your videos.
4 - some times blender close hen delete layers
5 - will be nice to add collection of objects in mesh proximity
6 - move layers in stack hide layers. can`t understand this.
Nice addon. Thanks
I’ve updated the addon download, so this should be fixed
This is planned for the future, but will take some time to add (I’m sure you could hack something together tho)
That must be an error, do you think you could show the output of the console when you have a procedural texture layer added?
That sounds like a problem I had a while ago, but fixed. I haven’t been able to recreate it on my laptop though. I’ll look through the code when I get back.
That’s a really good idea, I’ll definitly add that soon!
I’m not sure how that would happen… I haven’t been able to recreate it. maybe check the console fore errors when it happens?
Also, I am hoping to make tutorials for it at some point in the future. And sorry that I can’t fix these sooner, I should probably have planned the release date a bit better
I love how much control you get over weights and how more accessible everything is. You can even throw some cloth sim in the mix for some random experimentation
Bug for later: If I add the vertex group output through the addon (or sometimes manually after creating a vertex group)
I get a console error that repeats every time I change aything
ERROR (bke.node_ui_storage): C:\Users\blender\git\blender-v293\blender.git\source\blender\blenkernel\intern\node_ui_storage.cc:109 node_error_message_log: Node Tree: "WLAYER_output_1", Node: "Attribute Math", No attribute with name "WL_temp"
Nice! That’s not something I would have thought to use it for, but that gives some really interesting results!
As for the errors, those are printed automatically by geometry nodes when some of the layers are in the wrong order.
I did try to limit the number of messages it prints, but it’s not something you can detect easily with python…
Realy handy with alpha trees, but I seem to have an issue, adjusting parameters will update Length on my Alpha Trees in realtime, but not the Density, I have to click on the vertex Groupe or do something else that will trigger a refresh to make it update. Am I just missing an option or something?
Hmm, you’re right, I just tried it, and it seems to be a bug in Blender to do with Geometry Nodes and Particle Systems…
I think I made a bit of an oversight when I wrote the original post saying that it integrates with Alpha Trees, what I was thinking was that it will be completely integrated into the next version, that uses geo nodes and wont have the same problems. The new version should fix it (hopefully out withing the next few weeks )
Sorry about that, I’ll remove it from the original post.
No worries I just noticed that you had it updating realtime in the videos so was wondering if I was doing something wrong, but probably just the length getting updated in the videos then. Just beraly touched the weight layers so far, but realy enjoing the workflow already, so responsive. Great jobb
I’ve been looking for an addon, with a non-destructive layer/layer mask system for weight painting, similar to ngSkinTools, which is a plugin (addon) for Maya. Instead of painting weights on one “canvas”, with careful normalizing and gettings weights distributed between different vertex groups with the shared total max infuence of 1.0, and trying not to make mistakes… I mean, it’s fine if two bones are affecting same vertices, but throw third or fourth bone in… you don’t really have a full control how much weights are distributed between different bones when Blender is normalizing automatically, and without auto-normalization, total weights can easily go over 1.0, and post-normalizing is also something you can’t have a full control of…
…but instead, you’d have fantastic layers with layer masks and opacity, where the topmost layer with one blending mode (normal) overrides weights on layers below, while they’re still blending together with opacity, normalized.
But I’m not sure if this addon is what I’m looking for(?). I was getting high hopes of someone creating “ngSkinTools” equivalent for Blender, when I saw “Weight Layers”.
…unless you have studied how Blender’s weight system works and can implement something like that? A layer/layer mask system would be awesome for weight painting complex rigged characters.
Unfortunately, the addon isn’t really design to be used in the way you described (I mainly use it for stuff like distributing particles) but I’m sure you could find a way to make it work in a similar way. You can definitely use it as a way to non destructively paint weights in layers like this:
Paint layers.blend (750.2 KB)
But it’s a little clunky, and it’s definitely not normalized (I am planning to add a “clamp” layer which should fix this). Sorry it’s not ideal, but I hadn’t really considered its use for character sculpting when I designed it.
If you give it a shot though, and come up with some features that it needs to work for you, I’d be happy to consider adding them to the addon
Sure, I can give it a try, your tool has a lot of potential though.
Oh, and no, I meant skinning/weighting an armature with bones to a character mesh, not sculpting, hehe.
Another typically important feature when painting weights for a character is to have the weights mirrored. Like for limbs and such. But then the mirrored weights should basically get to another layer and vertex group, let’s say your painting weights on “upper_arm_left” (bone & vertex group with the same name). Once you’re done on one side, you could copy the weights to another layer, mirror them and assign them to be used with “upper_arm_right” counterpart.
Still, if you were favouring character riggers with your tool too, I believe you would get a lot of attention and popularity. Generally speaking, Blender’s, and even Maya’s native weight painting tools are working in a similar way, where a specially careful weight painting is needed, due to normalization. Mostly people rely on automatic weights in the hope of getting good enough weights that they don’t have to fix them manually, unless it’s really necessary. They’re scared of weight painting (including me) of not messing them up… and that’s not a good workflow getting nicely deforming weights.
Also, it seems like you can only create a new vertex group for a layer on your tool, instead of choosing from existing vertex groups. Usually when parenting an armature to an object, we create at least empty groups which are automatically created by Blender matching the bones’ names.
Hmm, that’s really interesting! I’ll be honest, I’ve never really done any weight painting for characters, so I’m not sure exactly what is needed, but this is really useful advice!
Mirroring is something that I hadn’t considered, but that would definitely be very useful! I could maybe also add some stuff for then writing it to different vertex groups after its generated.
You can select already existing vertex groups just by clicking the text box and selecting the group name from the dropdown.
Also, I’m not entirely sure what normalising weights does in the context of weight painting, is it making sure that all the weights on a vertex add up to one?
Yes, normalizing does exactly that. The total sum of bone/vertex group influences per vertex is max 1.0. Going above that usually brings issues to deformations. With auto-normalization when you paint weights to an area where the adjacent bone have influences, it’ll erase weights from that bone while adding new weights to the active one your painting to.
Let’s say a “shoulder_left” bone has a weight value of 0.8 on one vertex, and you wish to add some weights for the “upper_arm_left” to that same vertex. Ideally you’d have 0.2 to spare onto that vertex, so the total sum would be 1.0 at the end. But if it exceeds to like 0.3 on the “upper_arm_left”, then “shoulder_left” gets auto-normalized to the value of 0.7 with substracting the weight value of 0.1 automatically from it to have space for the “upper_arm_left”.
Oh, good to know that I can select existing vertex groups, nice. Actually, I’ll have to test this addon of yours as soon I have time, with a practical model, like with just a leg of character and see how it behaves. And come back if the base workflow works for rigged meshes.
Btw, does this addon work on 2.92 though? I haven’t updated to 2.93, since it’s just an LTS version, and I’m looking forward to next 3.0 instead.
I’m happy to hear you’re interested to expand the functionality of your tool. (;
Ok, that’s good to know! I think that Implementing normalization with geometry nodes (which the addon is built on) could be quite hard, but possible…
The addon only works with 2.93 at the moment, since it has a lot of features for geometry nodes that aren’t in 2.92 (Just out of interest, given that it has more features, why would it being an LTS version put you off updating?)
Ah, it’s just that updating to a new version, I need to personalize user preferences, UI, startup file, re-installing addons etc. I usually update if there’s an important hotfix which fixes something I use a lot. Like in 2.90, there was a critical bug crashing Blender with undo/redo, which was patched in 2.90.1.
But I can definitely make an exception with your tool, and update to 2.93.3 anyway (last time I checked it was 2.93.1, lol. They’re updating it quite often it seems). I also happen to have bunch of new versions for some other addons I have as well, which need updating, so it’s worth installing the newest Blender version I guess, hehe.
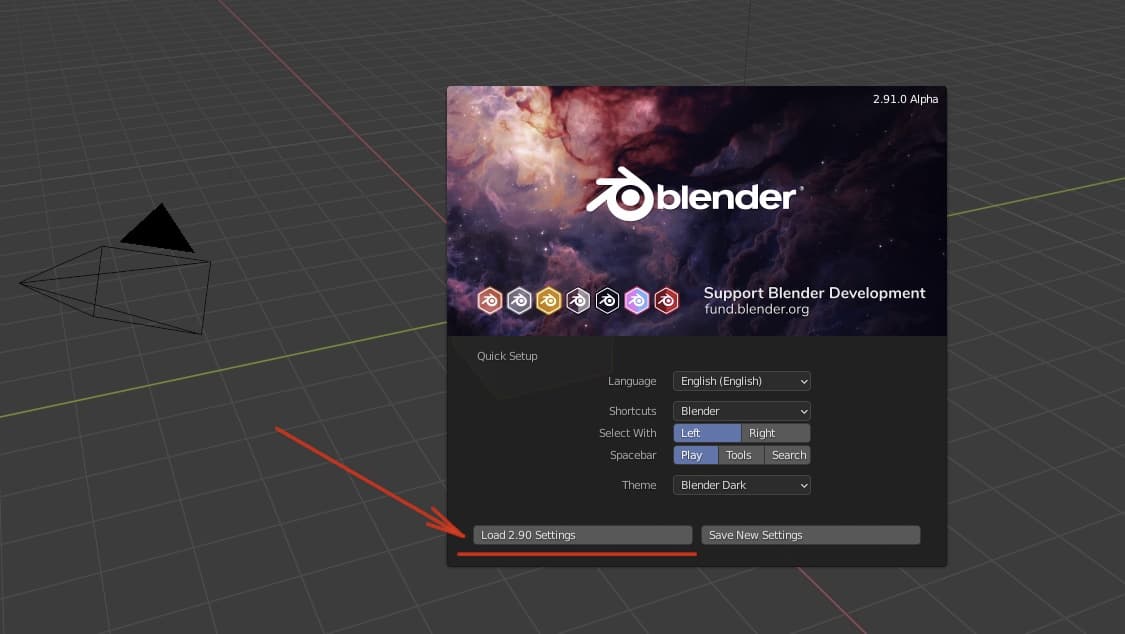
You don’t have to do this every time you update. If I remember correctly, when you open a new version of blender for the first time, there is a button on the splash screen that says “load previous settings”:
Oh, I think I haven’t got that “Load 2.xx Settings” button, since I always delete the previous version completely from my PC before “installing” a new one, because I don’t need the old one anymore, and I always us the portable .zip version, haha.
Getting back to the topic of your tool though. So, I checked from your videos that you have adjustments on each layer, similarly like “adjustment layers” on Photoshop, right? I guess one simple addition for layer adjustment could be smoothing? (:
Anyway, keep at the good work though. Your digging a goldmine here. (;
Yeah, smoothing is something I would love to add, but unfortunately, it’s not possible at the moment with geometry nodes (without using really cheaty, slow hacks)
This is mainly just setting the groundwork for future updates, as 3.0 geo nodes open up a lot more possibilities for new layers. Off the top of my head, these could be a Curve adjustment that uses the RGB curves widget, a statistic layer to get the mean, min max values etc. and the ability to normalize all values.


 )
)

 Generally speaking, Blender’s, and even Maya’s native weight painting tools are working in a similar way, where a specially careful weight painting is needed, due to normalization. Mostly people rely on automatic weights in the hope of getting good enough weights that they don’t have to fix them manually, unless it’s really necessary. They’re scared of weight painting (including me) of not messing them up… and that’s not a good workflow getting nicely deforming weights.