A bit of a broad question, I’m not quite sure how to phrase it even. Like, in the examples below, what sort of compositing steps are people doing do to achieve this look?
I’ve been watching various tutorials on compositing, but I’m not making much progress. I think the problem for me is that most tutorials are not applied - they tell you about the theory, then expect you to build that from first principles (e.g. if you multiply diffuse and indirect, then add the colour pass, you can rebuild the diffuse pass). Sadly, I’ve I just don’t find myself able to build from that for this sort of work. I’m not yet able to look at these images and understand - “oh, that’s a guassian blur on the background layer” etc.
I know some of you will probably think - well, just experiment, but usually by the time I have something rendered, I’ve not really considered rendering it out as multiple layers, because - as I don’t know what “steps” to take, I also don’t know what layers I need to render separately, and then what layers to apply these things to. It’s also very slow, and without a clear end goal, I don’t find randomly trying nodes achieves very much. I have been looking into chromakeying, but again it’s a bit directionless - “oh that’s cool you can do that, but now what?” sort of thing. It’s like going into Gimp and just applying artistic filters to a jpeg; most of the time it looks worse.
It seems like a lot of digital artworks have similar tools applied (there’s a definite look, collectively), so is there any like, top 3 tools or top tips that might help me get a foot in the door? Is there some industry book that everyone reads that I don’t know about?
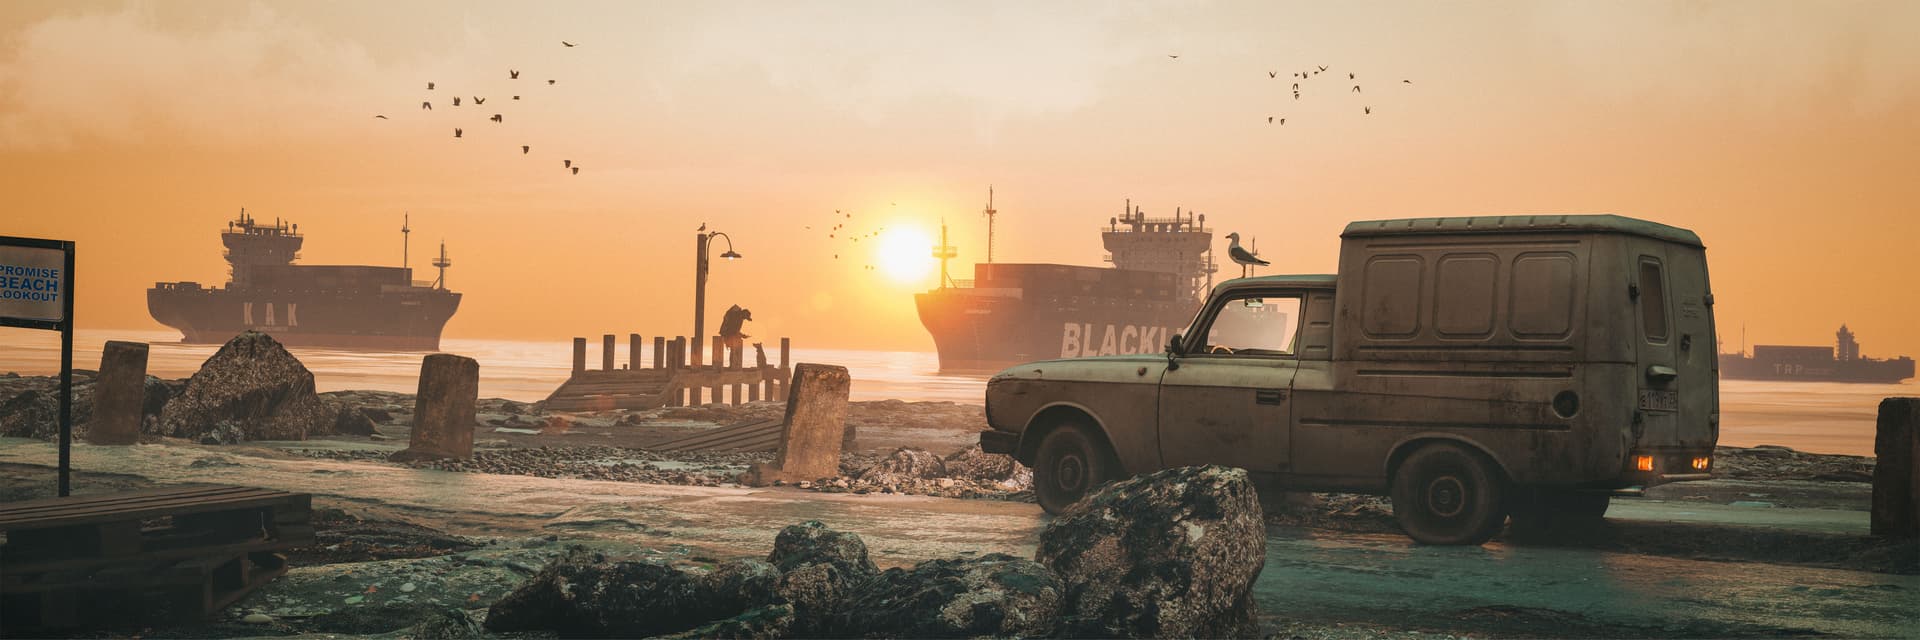
With Cargo Desert Voyage and Promise Beach Lookout.
if we are talking the compositor editor, I forget it exists. I rendered out the image, took them to Photoshop, and used Camera RAW Filter to do color work, and adding in the effects. just a lot quicker than playing around with nodes in the editor, dealing with multiple passes and so on… Blender is great at being a tool that comes with everything, just when it comes to color work and digital composition it can’t beat a tool designed specifically for doing that
Also, film grain, I add about 20-25% film grain on all my renders to emulate the feel of a photograph
You say: “It’s like going into Gimp and just applying artistic filters to a jpeg; most of the time it looks worse.”
my answer to that is don’t limit yourself with Jpegs. the only time you should use Jpeg’s is at the very end, the format you save your final image to, never work with color on a Jpeg, you’re limiting yourself to 8bit color
as an example, with the Promise Beach here’s the colors straight out the render, then after all the post work
Before Post:
Hey there! I saw this post because you linked my artwork (“A New Dawn”).
I’ll try to explain a bit my process and from what I grasp, it’s a practice lots of people do. You render your image, with minimal compositing on Blender so that you have lots of space to play with, in Photoshop. Then, when in Photoshop, you try to create the atmosphere and highlight areas you want to show off. For instance, volumetrics are expensive in blender, but you can fake them out with brushes in Photoshop (like I did).
Note that in my artwork, the clouds are native volumetrics, so they have a different look than what brushes may give you. But they are expensive and tool a lot to render
Now last but not least, I don’t think there’s any book to answer all the questions and everybody reads. But I know for sure that there are many useful concept art tutorials both in artstation and in individuals’ gumroads. For instance, Jan has some killing tuts on the subject. (https://janurschel.gumroad.com/)
It’s all about patience, research and practice. Keep creating!
ok, this is what I thought in the first place, but I didn’t see that I could do that when I read what I could do being a regular.
But thks for the answer @Debuk
and sorry @grant.r.brown for the messages unrelated to the topic
For “Canyon City” my compositing ‘workflow’ was roughly like this:
(note: I use the Blender Compositor for roughly 95% of stuff and for the rest I use GIMP)
Since I had to split the render up into five render layers to make my PC not explode and to make it render it at all, I had to go through the compositor anyway. I rendered out all available passes for each layer (I usually do all passes, just to have them).
I used a denoise node on each render layer before layering them on top of each other to get the whole render back (alpha over nodes).
I then stitched each mist pass of each layer together and layered that on top of it (math nodes/color ramp node).
On top of that I layered the haze in front of the bottom of the cliffs and around their top part to make it feel more ‘massive’. I used a modified gradient texture input for that (texture input node/color mix node).
Then I added some glare (glare node) and some color correction (color balance node).
On top of that I added a vignette effect (ellipse mask node/blur node).
Then I added some lens distortion and dispersion (lens distortion node).
Finally, I added some noise/film grain (custom grain noder/color mix node).
GIMP:
I added a very subtle sharpening effect to it.
Then I usually make several copies inside GIMP and play around with the colors and see what I like and which version I feel best about (sometimes I have to sleep a night before I come back, have a look again on each version and chose one).
That’s my process but I’m no expert at all. I just do stuff and it’s a hobby of mine I started 1.5 years ago. So take everything with a grain of salt. I take it as a creative process which I don’t the know the exact result of and take it as it comes.
@Tom_Pleysier Thanks for responding - I never thought about film grain, interesting. Also thanks for explaining the process (I’ll see if I can figure this out for gimp, sadly PS is a bit out of my budget atm). I really also need to practice editing colour curves too.
@ExpresstheChaos Again very helpful and interesting. Further down the line I’m hoping I can look into paid tutorials etc. (currently unemployed, so off limits for now).
@WK042 Again, many thanks for this. Splitting into layers also sounds a bit of a nightmare. I tried that a few times, it seems so much easier in older versions of Blender compared with 2.8-on (I had a lot of problems with collections turning off and on in renders when my settings would indicate the opposite!).
It’s very helpful to have the logic/process and nodes outlined, I’m going back to the original image now and looking for their effects, how they complement each other. At the very least I have an idea of what sort of things people are using - I’ve never really though to use lens distortions, etc. Th problem of too much choice, and not knowing enough (why are there so many types of blur!). The use of alpha over for fog/haze is also something I’ll need to look into too. I’ve never had much luck with the mist pass, perhaps this is why.
Lots to think about.
[Bit of an aside, but I’ve found that using render farms work out cheaper often for these sorts of things, compared to my electricity costs rendering for longer at home. I’ve rendered a few poster sized images for about $1, that would have taken anywhere between 8 and 45hrs to render on my machine. Or not at all. My last work, “void worms” wouldn’t render on my machine at all. Plus I got $5 just to make an account, so it’s been pretty handy. A lot of my smaller images (1K or 2K) were only a few cents each. I have a gtx970 though, so it’s probably less value for money the better your rig is. ]
Hi there! maker of the Express shipping post.
DISCLAIMER: I have only been doing realistic renders for about a year. And just now getting the hang of it. And 3D for only 2 years.
As some others already noted. I don’t use a lot of layers.
It’s mostly making a render with a nice balance of light and then adding photoshop filters/colors on it.
For animation I mostly use premade LUTS found in premiere pro and in photoshop I just do some random color grading in Camera RAW and then balance the amount of light on that.
I do however always separate volumetrics. Since you either need an insane amount of samples or a perfect denoiser if you don’t want some weird dots in it. I create a linked new layer and set all my collections to holdout with transparent background. So I render 1 layer with no volumetrics. And then I add the volumetrics layers in compositing with the alpha over node.
Sometimes I also use the mist pass as a seperate image to use it as an mask for smoke/steam assets inside photoshop or After Effects.
Some settings I always use in camera raw or grading:
Film grain, Clarity, dehaze, and vignette/custom grain vignette.
And a bit of chromatic abberation.
And ALWAYS render it in high bit images before doing colors.
I feel honored that you linked my post, appreciate that a lot! Hope I was somewhat usefull here.
Again, many thanks - some real gems of info there. Separating the volumetrics - will try that next time!
I’m also glad that I was not completely off the mark in assuming there were a few tools that were used again and again - seems like a lot of film grain, etc. make it into these images.
Probably you’re struggling with art direction and composition, like me. With compositing you will manage effects, remove some undesired subjects but won’t guarantee a final good art. By learning more about photography and color theory you will slowlly creating a style and achieve all those looks. Those are knowledges you would learn in a art school, most of internet tutorials, guides, information are about how to do it, technically, and not how to artisticly create it. Concept artists are very good with creation, you can follow some of them in Artstation. Also, there’s a free learning tutorials that can help, look for art direction, composition and specially photography. Everything will add up to your artworks.
The famous [film …] photographer Ansel Adams once observed that “an image is captured in the camera, but it is made in the darkroom.” The same principles apply here.
Consider a scene that is being played out from a single camera angle on a single set. And, just for kicks, let’s say that there’s a pretty water fountain in the middle of a courtyard.
Well, you need to render only oneframe of that set. Then, you need to render one or more complete animation-cycles of the [water in the …] fountain … and nothing but the fountain. Finally, you need to render the actor(s), along with the shadows that they’re casting on “shadow catcher” planes which correspond exactly to the set.
“MultiLayer” files capture each layer of information separately, and perfectly. For example, the “shadow pass,” which tells us where the shadows are, and how dense they are, on a scale of 0.0 to 1.0.
With these three assets in place, you can now composite the final scene together, but you only had to render “precisely as little as you had to.” Render nodes become your “all-powerful digital darkroom.” They let you manipulate the numeric data (!) any way you wish to.
You should always do all of your rendering work using the MultiLayer OpenEXR file format, using OpenEXR (non-multilayer) for your “final print.” You then produce each of your deliverables – JPG, PNG, MOV, AIFF, whatever – [individually] from that “pristine” source. The point of this strategy is that you have preserved “the floating-point numbers” all the way through the process including the final master. Only then did you voluntarily start using compression, gamma, and other “physical concerns” when making each deliverable. And you were free to make individual choices appropriate to each deliverable in turn.