Great resource, thanks!
Thanks for your answers, Chris
I am looking forward to solutions with wrinkle maps and a possible product with textures in the future.
Good luck, you are amazing 
@ChrisJones Catch
Shape Keys+
Been looking for this shit for my character, since FACS seem like a pain when you combine it with a character creator scheme of ShapeKeys, AND Corrective ShapeKeys
Hope it helps you too, wasn’t easy to find because of the name.
1 Like
Just out of interest - Does gumtree tell you when someone owns both the body annd the head rig? I’ve owned the body for a couple of months and I bought the head when it came out Haven’t really had time to play with it yet though cause work’s been crazy - And I’ve not had anything come through about a code?
I’d rather not have to learn how to blend the two. It’s a couple steps outside of my mental reach atm.
1 Like
@ComplexAce Thanks for mentioning it, I think I might have seen that, and would probably be making use of it except that I have to be careful about relying on add-ons while trying to keep the human compatible with vanilla Blender. Something similar for drivers would be a time saver too, as I’m constantly rummaging through a growing list of ~165 of them that can’t be searched or sorted (not even alphabetically).
@Resulka I’m notified whenever someone buys the face or the body, and then I have to manually search the customer list to find a match and then generate a code and email it. Sometimes Gumroad shows me a name for one and an email address for the other though (or a different address if it was changed in-between purchases), and those ones can slip through the cracks.
There are still a few unredeemed codes as well for some reason, so send me an email or PM me your email address so I can verify and send out a code (sorry about the delay!).
1 Like
dude thanks for the link i didnt know that thing exist, so usefull addon!
1 Like
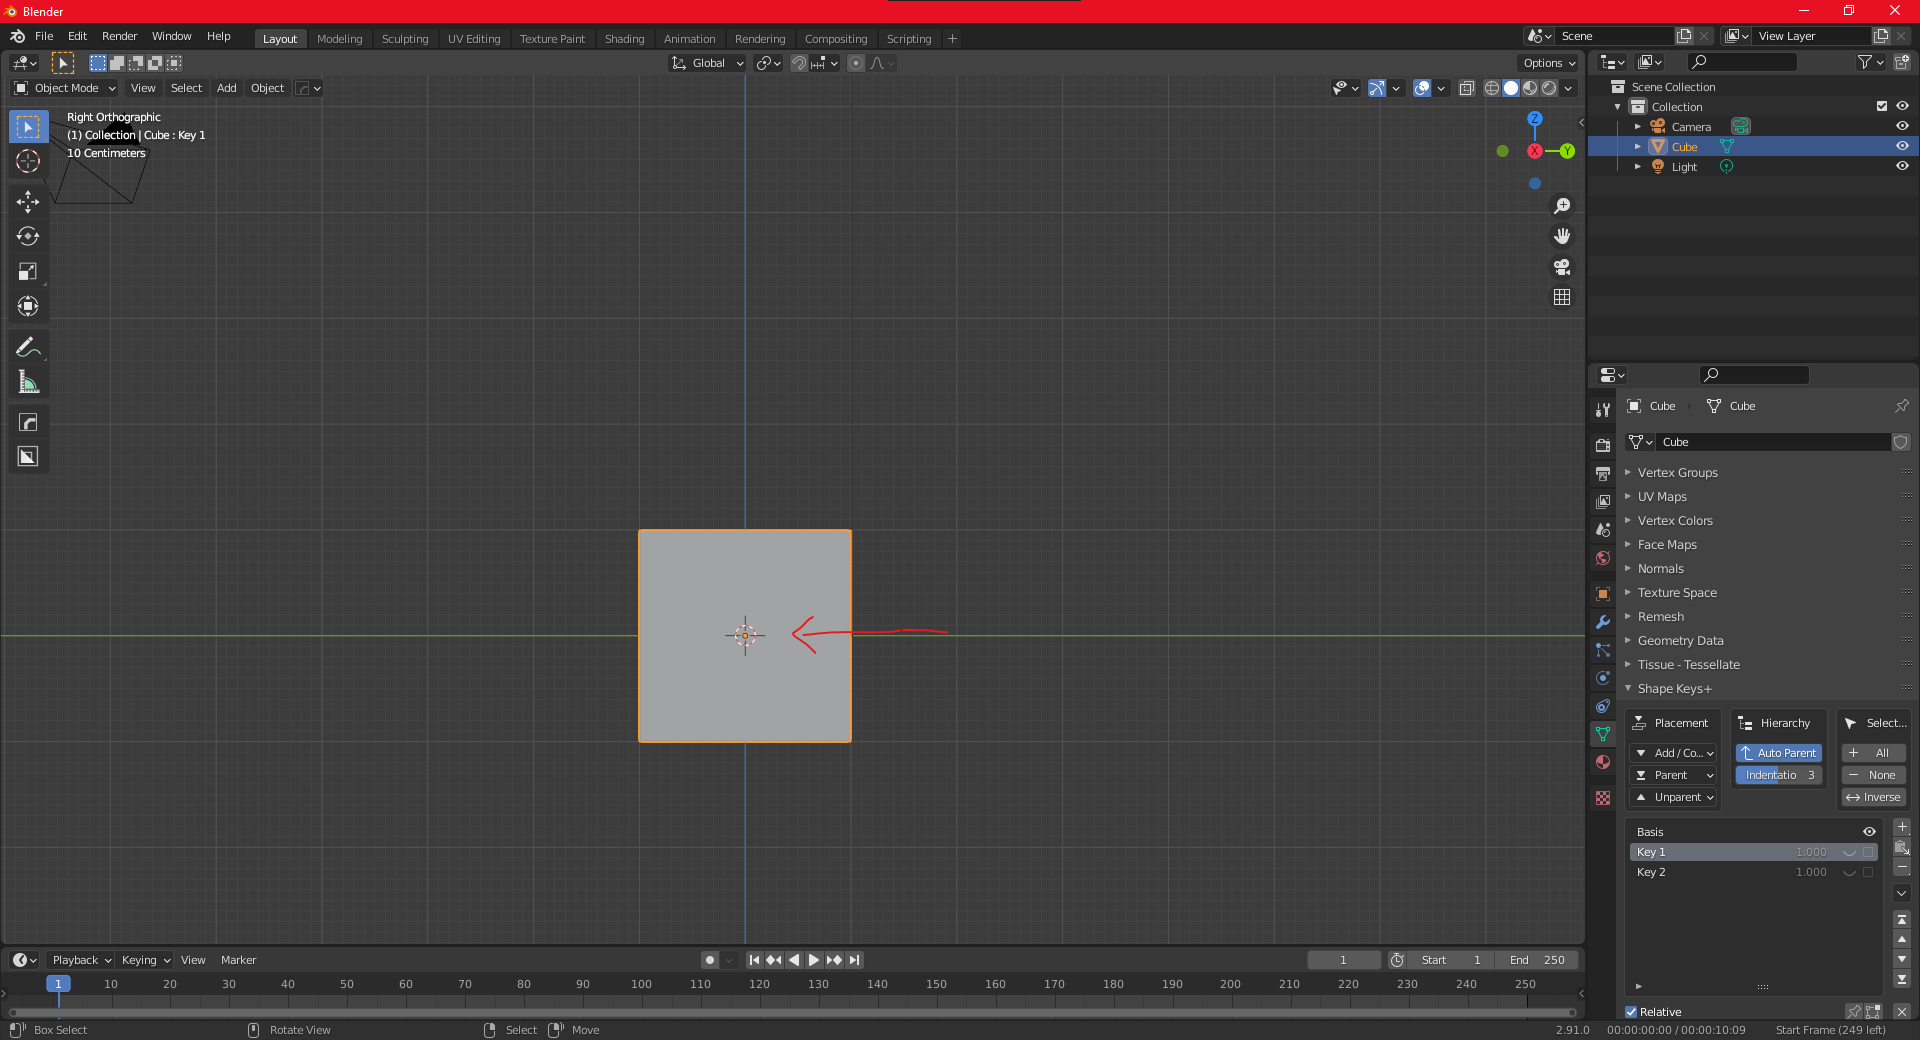
hey Chris, do you know how to make a driver get triggered at a specific value, and then stop the activation to another value? for example imagine that you made a shape key and you want to add a second one, but with different location/rotation,etc, so imagine a cube that you want to move it to the z axis to 1.000 m up, and then you use a driver to automate that with a bone, but then you want to make this cube move 1.000 again to z or other axis but after the previous one (or replacing it as well or either of those) but you get with a normal driver in both, so when activated the two shape key they blend together they move 1.000 m more in total 3.0000 m, like in this example 1.000 m the first shape key, 2.000 m the second one:
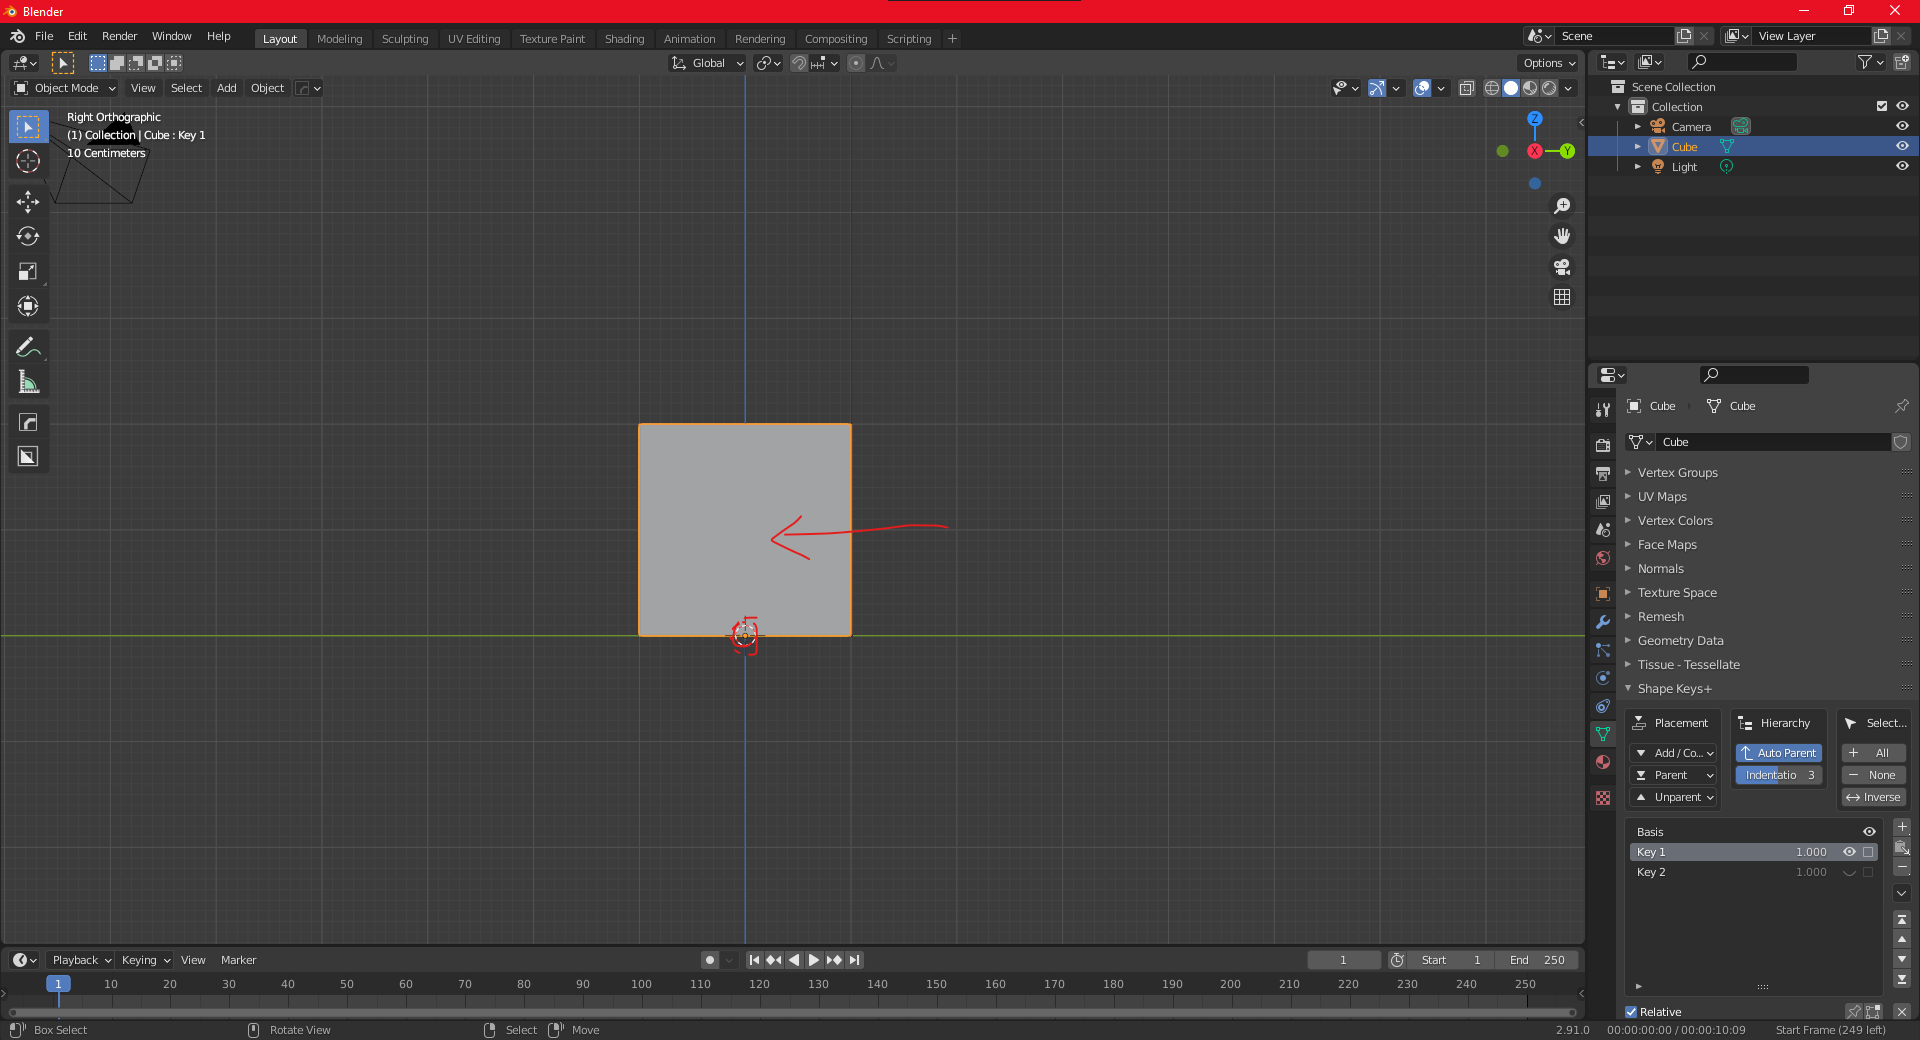
so here i dont want the first shape key to be activated, when the second one is activated at the same time…so i found that using the mute checkbox button works, but can this be done in the slider to get it back to 0.000 when it reaches a little bit before 1.000 (1.100 for example when the bone controller moves to that location in the driver)?
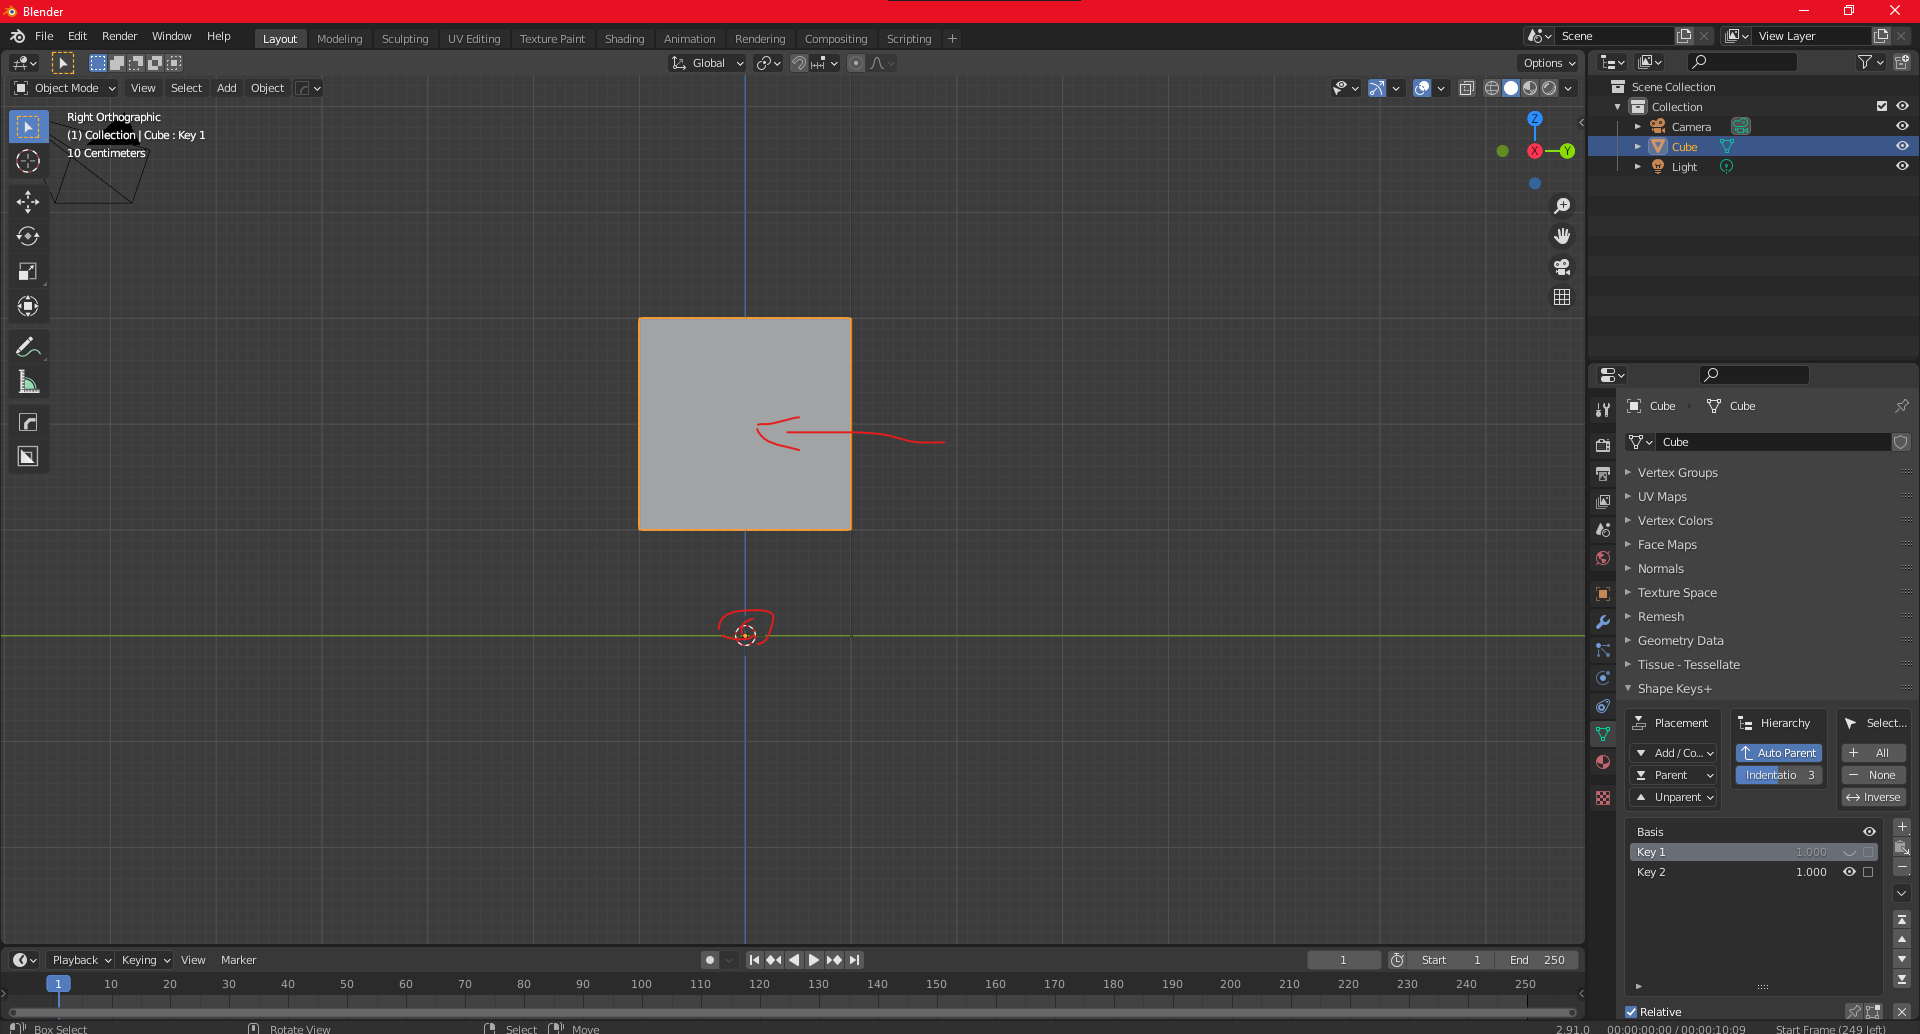
but actually i want to make this in a facial shape key am working on, which is setup like this in this example:
shape key - slider value - starting and end value of the bone controller location to trigger and deactivate
lips-smile1 = 0.000-1.000 = 0.01 m = (deactivate with the checkbox button which has a similar driver)
lips-smile2 = " " = 0.02 m
lips-smile3 = " " = 0.03 m
lips-smile4 = " " = 0.04 m
lips-smile5 = " " = 0.05 m
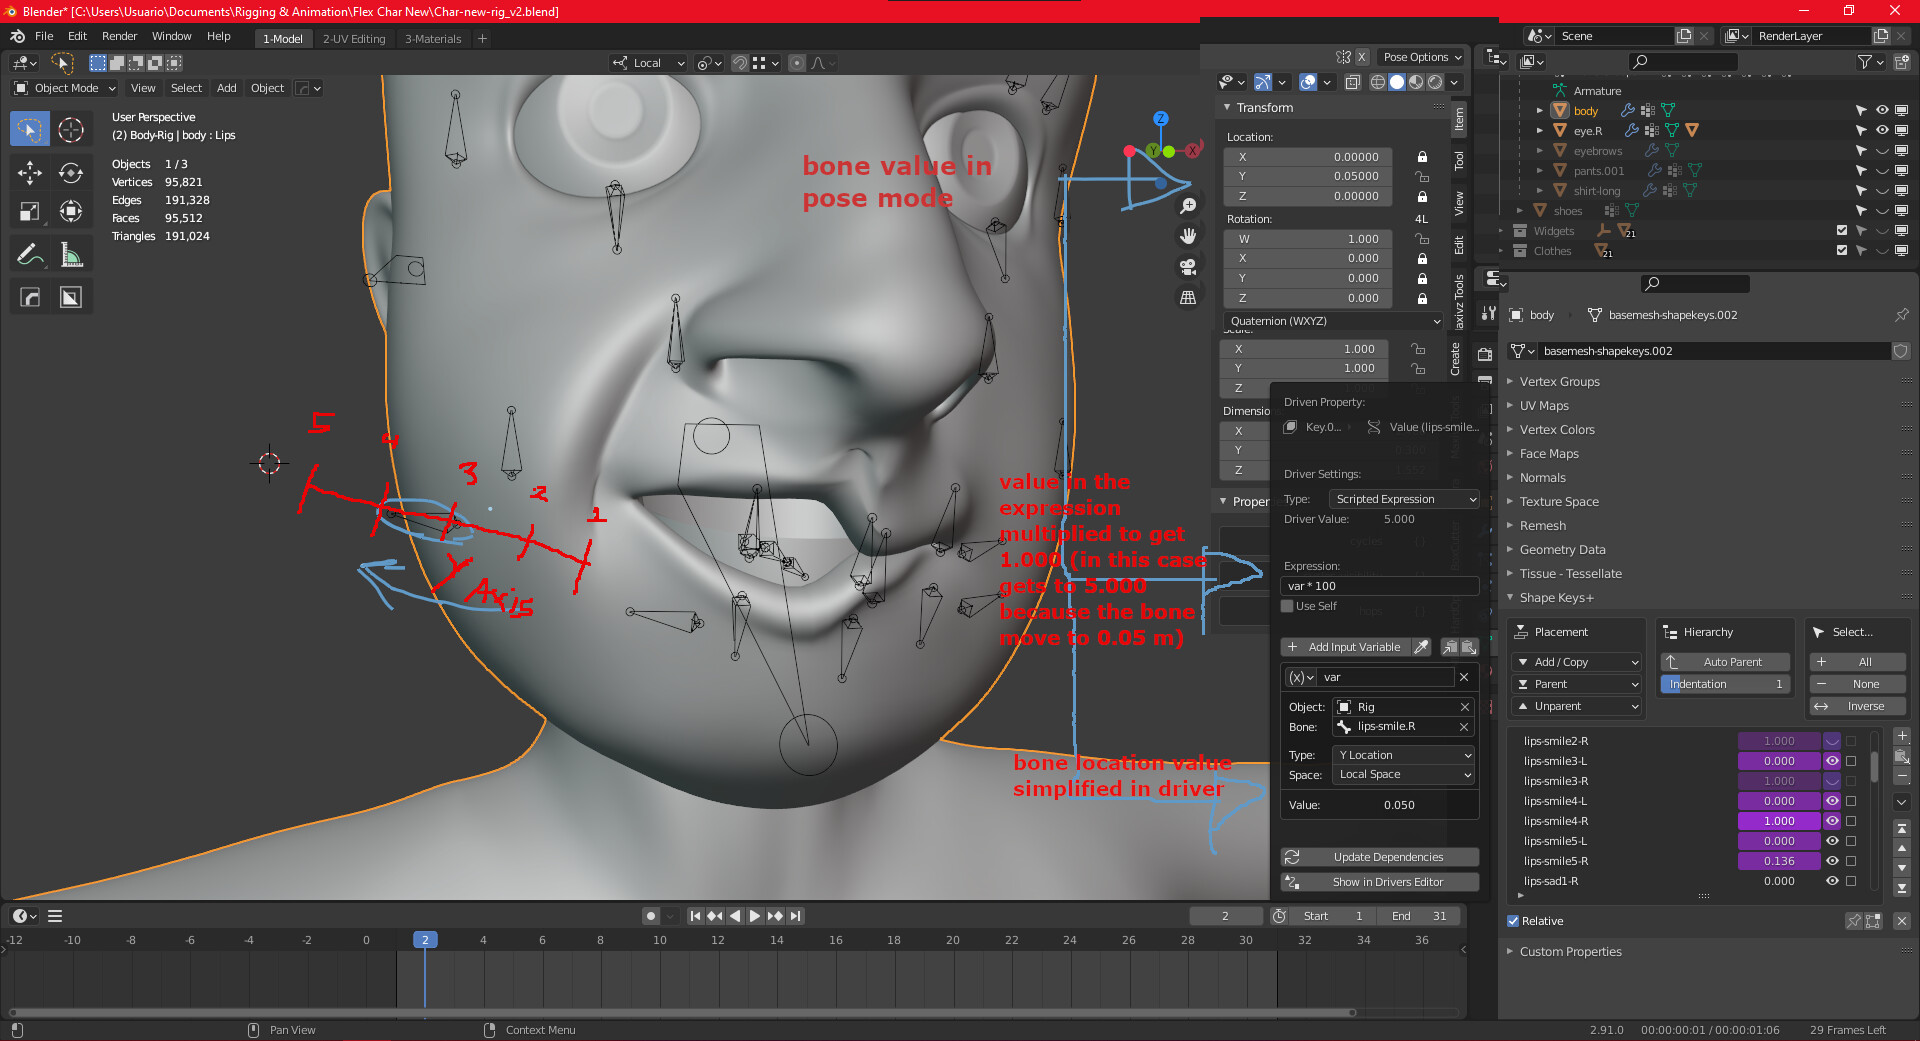
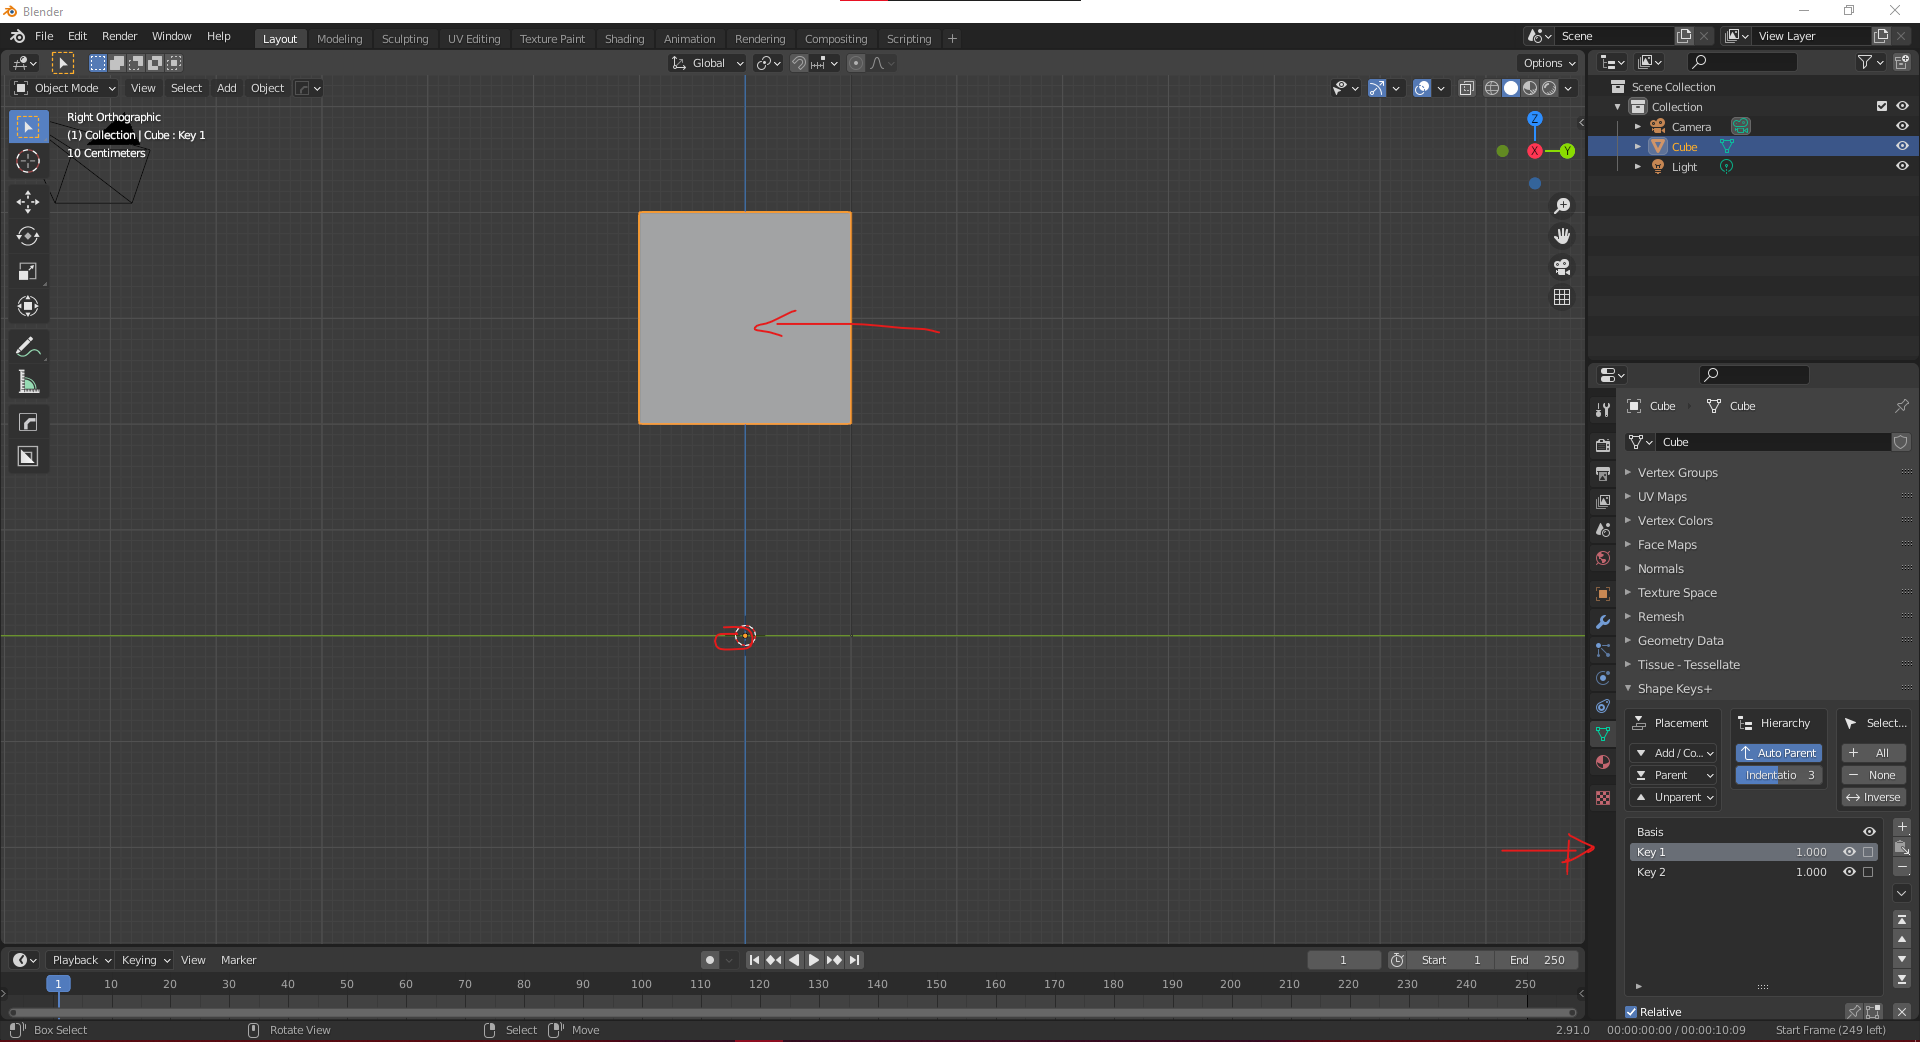
another thing is that the shape keys doesn’t seem to blend, but this seems normal since each one is a variation from the another previous one to them, so i made 5 variations in how much the mouth opens when smiling…
sorry for the rough explanation i hope you get it…
Hmm… I struggle with these things myself at the best of times (usually when I’m in full concentration mode and fluking things a lot), so pardon me if I’m slightly flummoxed. ![]()
Is my eyelid rig similar to what you’re trying to achieve (where the shape keys switch from one to the other with a single control)? If so, you can do that with F-Curves.
The actions and extra bones in that post have since been made redundant by the way (I think I mentioned that somewhere later but I couldn’t find the post).
2 Likes
i damn need to know how you made that eye rig in a video tutorial dude please 
so you mean using the graph editor to make them blend? but how? but can be done with just drivers (perhaps no?)? then how should i re setup my drivers and stuff to get the shape keys switch and blend properly from one to the other with a single control?
also another question: you see that the lips are way too stretched in that way because the shape key are limited to a vertex group in the R or L side so that’s why appears like that, but how should i properly made the shape key and then blend properly (yeah you can actually blend asymmetrical shape keys but it depends) with an asymmetrical one which would be ideal to use (in this case this is a single shape key that i duplicated to generate the left side one limited with the opposite vertex group side), since the lips can move either to one side or the another and without moving either left or right side of the lip like this.
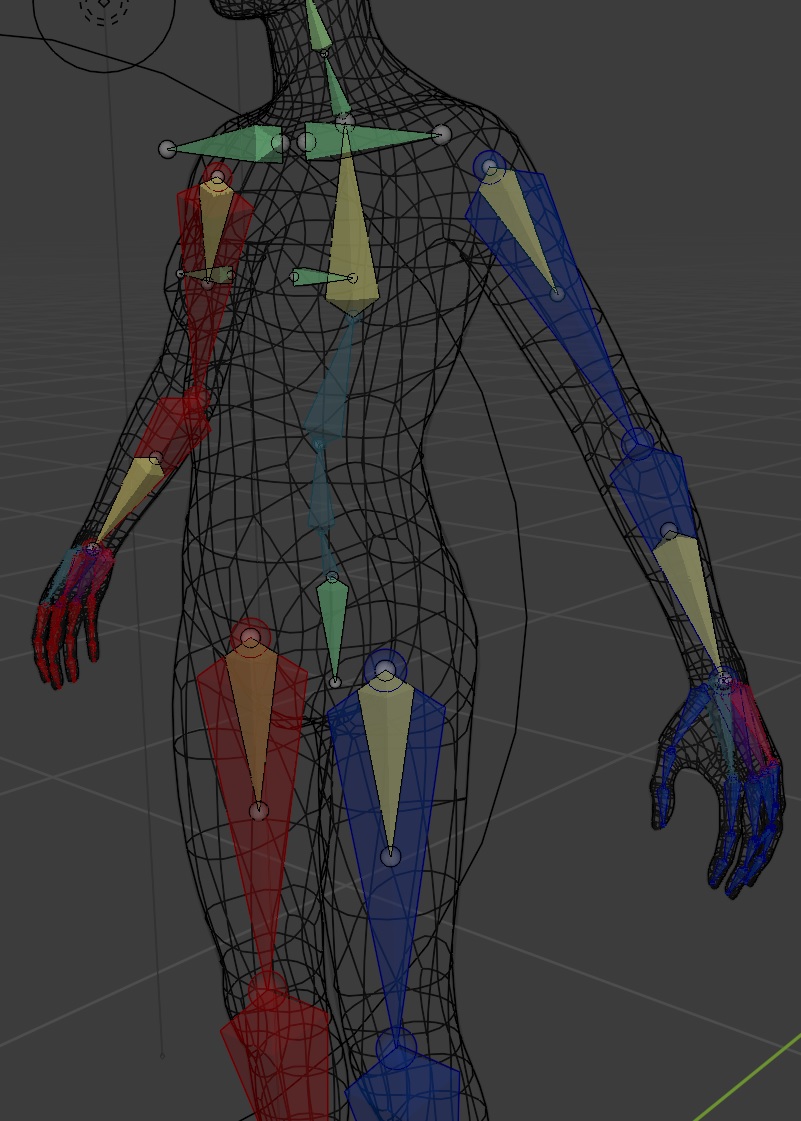
PD: also another question that you might know to answer, is necessary to have 2 subdivisions (2 bones) in a upper arm bone and thigh bone? i have subdivided always the forearms (minimum from 2 to 8 bones IMO should suffice depending the polycount, for low poly models is more suitable 2 bones for example)since they always twist, but what about the thigh or upper arm? they bone pivot point (real life ones i mean) lets them to rotate all the directions as possible, which is something that cannot normally do the shin, forearm, most of the fingers,etc parts of the body
1 Like
Found the more recent post, it includes a file that you can download and dissect:
I’m not sure if there’s a “proper” method for making left/right coordinated shape keys, but mine was to do one side, duplicate and mirror it, combine them to see how it looks, make adjustments, mirror, combine etc. until they start to cooperate.
As with the forearm, two bones in the upper arm and thigh helps with creating a falloff for twisting. If you twist your arm you’ll notice your shoulder doesn’t rotate as much as your elbow; same goes for your upper thigh compared to your knee.
2 Likes
so yeah you just play around and see if they blend  , ok i guess i will have to do that as well
and how can you explain that anatomically and then properly apply that in a rig?
because i have rarely seen a rigger in tutorials subdivide those parts (even the forearm as well some noob people i would say, dont subdivide it either, which i strongly think that it should be subdivided always), and actually did you do that as well for your rig?
if so how you properly setup the bone constraints and stuff to make it work like in real life?
because you know the forearms twist copies the wrist rotation (but hand bone in this case), and when rotates to this the rotation of the forearm (lets suppose its the x axis here) it still copies the rotation the forearm bones, but in a different axis, but the this would happen:
so you add a copy constraint one after the other (or targeted to the same hand bone) and with a lower influence in each one, so then does the same apply for the upper arm and thigh?
also if just enough two bones or it can have more?
and also another little question how you did the spine rig on your rig? because it seems you used bendy bones, and they look tricky to control to me and with ik controls even more (also its really good idea to make the spine have a ik chain setup rather that just fks bones setup? give me your thoughts about it)
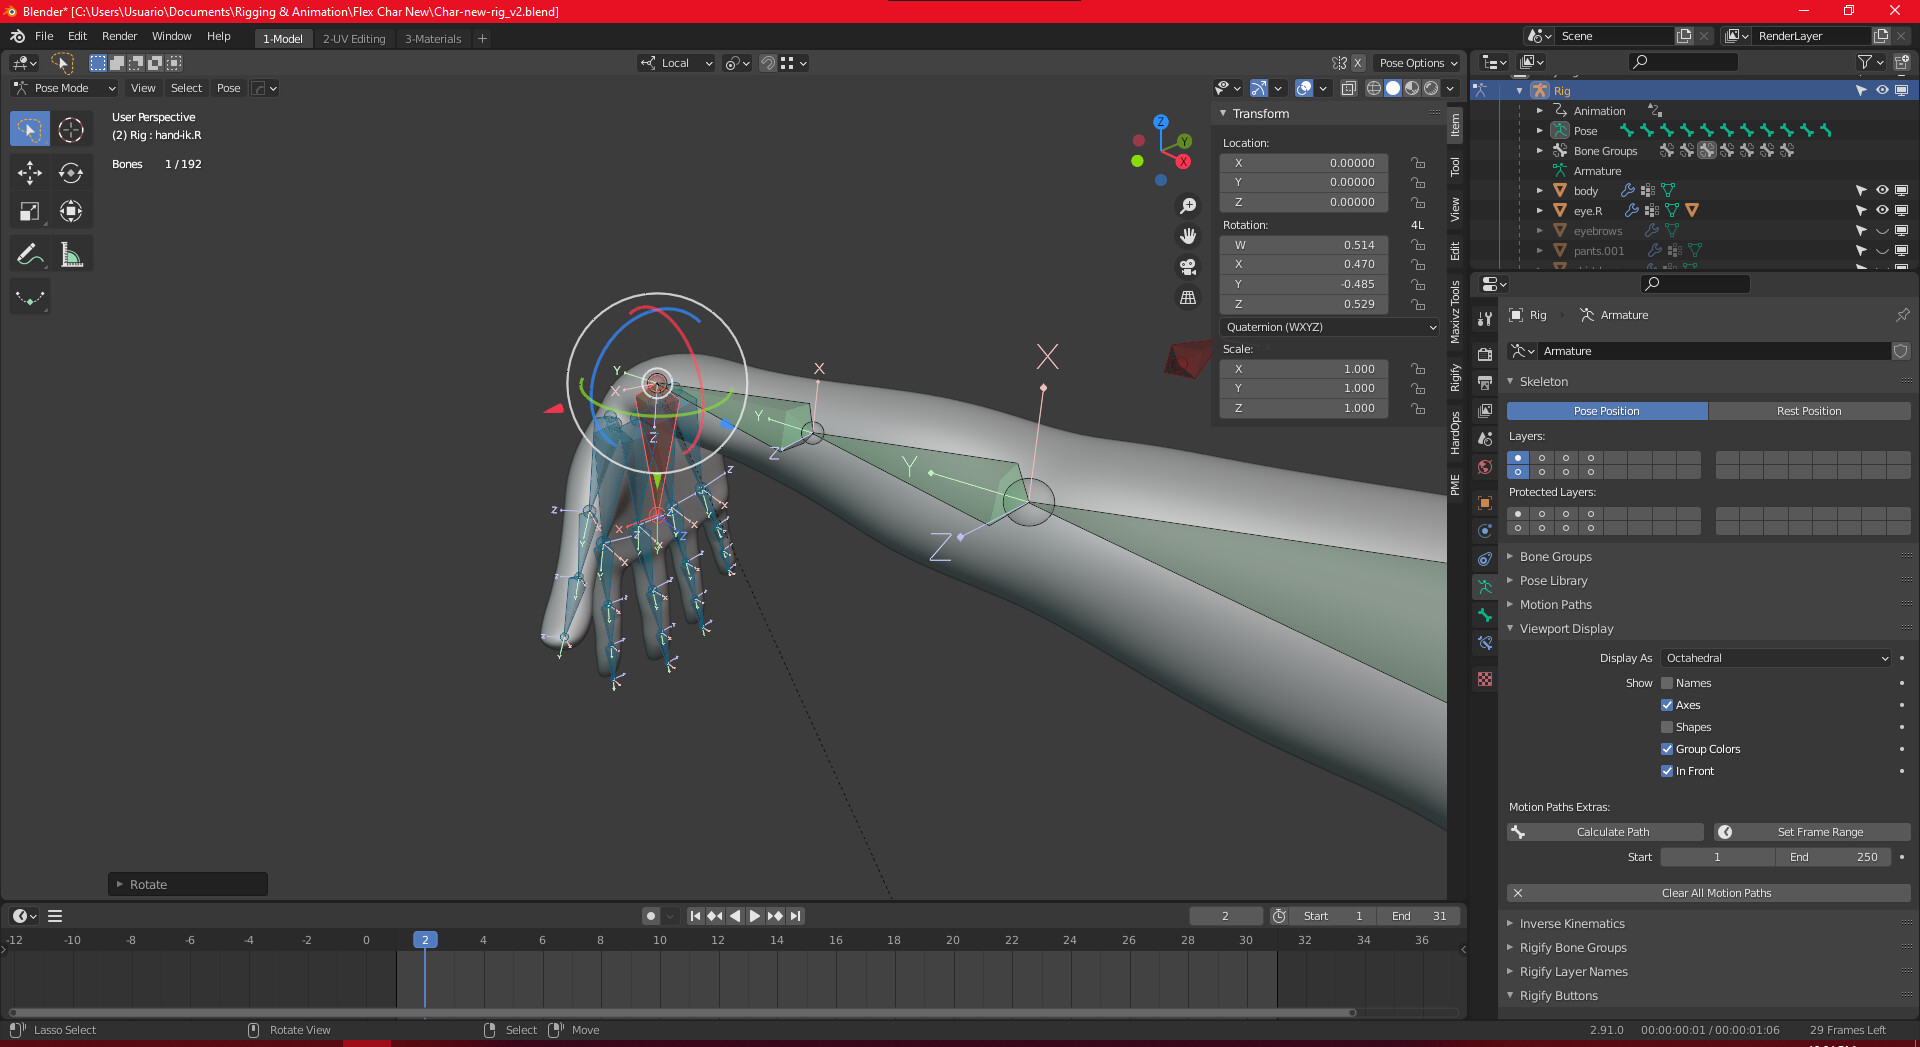
also i dont know if you have experienced this problem, but i watched in your video that you did you ik fingers setup differently that i was trying myself, i used a simple 3 ik bone chain for the fingers (and two for the thumb) so i setup the ik limits and locked the axis where the finger doesn’t rotate (usually the y and z axis, or the y and x axis depending the bone roll) but except the last finger bone that goes to the carpal bone which rotates everywhere but with some limitation set with a rotation constraint of course, and then i try adding the pole target, but the ik limits are gone (they dont work anymore), but this seems a ik pole limitation from blender unfortunately  …
…
So how in the hell did you actually make the fingers have one ?
btw nice touch you did with the floor constraints you added to the ik controls (i guess) of the fingers as well, (even that i haven’t bought your rig and i know part of what you did there but i still need to learn more from it and every setup  )
)
hey btw this channel featured your video here https://www.youtube.com/watch?v=W_rphISMMzs
Pretty much!
I have a full-length bone for both the thigh and upper arm, but weights for the upper half of each are assigned to separate bones. Those bones have IK and target pole bones to retain their Y orientation.
Bendy bones were causing too much deformation in the chest, so I switched them to normal bones.
IK spine makes it easier to e.g. adjust the lower body position without disturbing the upper torso. I have an imperfect setup for that, but it’s better than no IK.
I’m probably misunderstanding, but the pole still works with IK limits set on mine, so I’m not sure what’s going on there.
Just a simple Limit Location constraint on the fingertips.
Will have to see if I can do better than 4th place in the next incarnation. ![]()
2 Likes
“Will have to see if I can do better than 4th place in the next incarnation.”
Lowskiller. 
Your head hand puppet vid is one of my all time faves.
Higher than the 4th place?
This should be interesting. [Same goal here, fella]
yeah that also works, but the other constraint i think is slightly better…
how? can you describe with images please?
ah also rewriting this:
because you know the forearms twist copies the wrist rotation (but hand bone in this case), and when rotates to this the rotation of the forearm (lets suppose its the x axis here) it still copies the rotation the forearm bones, but in a different axis, but the this would happen:
i rotated the hand the bone in the x axis:

then i rotate the same bone in the z axis, and the first bone in green (the forearmtwist) rotates along the y axis in that moment (but the contraint is supposed in targeted to copy the rotation of the y axis of the hand bone, so i dont know how this hack is posible, maybe something to do with gimbal locks?)
Oh ok, I only checked that the IK limits could be enabled, but now I see they’re actually ignored. I’m not using limits on the fingers anyway - it seems to work ok without them.
Which constraint would that be?
This stuff throws my head into a spin… I don’t recall exactly how I got the wrist working (and it would take some time to deconstruct), but part of it involves the bone that deforms the lower half of the forearm targeting a pole that’s off to the side, and that pole being parented to a wrist bone that copies the rotation of the hand control.
Incidentally, regarding your earlier spine question, I remembered that I posted this way back in the thread:
1 Like
Hello, so that deform bone is parented to the upper arm? (and the upper arm is weighted too, or is not a deform bone?) then like this it follows the rot/loc of the IK/FK of the arms chain (but the upper arm in this case) but as i can see for the wrist i guess you did the same but using one bone only? but is it enough one bone for a proper twisting (and then the weights gradient done in that bone for getting that effect)?
yeah show a little breakdown of that wrist rig please…
the floor contraint
and then how you make it work, like it has a ik pole in those fingers ik chain? can you show me the finger/palm rig breakdown?
hey also check this out, probably you can improve a little more your rig with this trick i did this in my rig and works nicely https://www.youtube.com/watch?v=suP14lYWpN8 i applied this trick in the arms as well… here is a example blend file i made myself for you leg-advanced-ik-rig1.blend (123.6 KB)
hey btw i see you didnt add pelvis to the armature, but it does make a difference in the deformation of the legs pivot, maybe because with that helps to blend the weights as it deforms…
also in your rig how you fixed the armpit bulge known problem?
also i tweaked a bit your spine rig, few unnecessary bones removed, and improved a few the controls, btw nice trick to use a bone half disconnected of the chain to rotate its own chain xD… Human 17j Spine.blend (674.4 KB)
2 Likes
It’s parented to a bone that’s parented to the root, which has a Copy Location constraint targeting a bone that’s parented to the clavicle. ![]()
Weighted to the lower half of the upper arm.
It’s essentially a two-bone IK arm, with extra bones that are not part of that IK chain, which exist solely for the purpose of twisting the mesh (along with extra mechanisms to keep those bones aligned to the main bones, and twisting in accordance with the arm/hand rotations).
What I mean is that having forgotten how it works, it’s not something I’m keen to spend the time trying to decipher and articulate (since my brain’s not fast at doing those things)…
Well that’s weird… the Floor constraint seems to have escaped my notice until now (even though I didn’t spot it when I looked for it the other day, and I’ve been through the constraints part of the manual before). It seems to be specifically designed for the job I was using Limit Location for, so I think I’ll use that instead (thanks for mentioning it!).
Yeah each finger is a 3 bone IK chain with a pole. There was a screengrab further back in the thread, dunno if that helps…?
Thanks, I’ll give that some consideration if I decide to go back for another round of rigging (which I’m giving a rest while I attend to more superficial features).
Corrective shape keys:
Well that’s really thrown me - I don’t even know what I’m looking at when reviewing my own spine file now. ![]() I’ll try to fathom what you’ve done if I can find the time.
I’ll try to fathom what you’ve done if I can find the time.
I should reiterate at this point that I’m really not a rigger, despite all appearances to the contrary. I can get stuff done if I hammer away at it for long enough, but once a problem is solved, the process gets jettisoned from my brain to make way for the next thing (I usually try to get some of the main points down here first before that happens though!).
![]()
![]() me either i am not a pro in this, rigging is so complex, a year ago i didnt know a sh*t about it as much as today, everything began when until i started to digging in depth, now i do freelance work of that as well, but i have to learn more to really get professional, though there is still so much to learn… am mainly hard surface modeller, and kinda still studying and managing enough in an artistic point of view character sculpting and modelling, also attempt to get in depth in animation of that, like everything you have done with this ed project, which is the similar and probably more greater results i want to achieve with characters…btw i hate the irony of this post http://www.cgchannel.com/2017/05/blender-gets-google-funding-for-next-gen-skinning-system/ that nothing of this has been done yet since 2017, and we really need this feature in skinning asap…
me either i am not a pro in this, rigging is so complex, a year ago i didnt know a sh*t about it as much as today, everything began when until i started to digging in depth, now i do freelance work of that as well, but i have to learn more to really get professional, though there is still so much to learn… am mainly hard surface modeller, and kinda still studying and managing enough in an artistic point of view character sculpting and modelling, also attempt to get in depth in animation of that, like everything you have done with this ed project, which is the similar and probably more greater results i want to achieve with characters…btw i hate the irony of this post http://www.cgchannel.com/2017/05/blender-gets-google-funding-for-next-gen-skinning-system/ that nothing of this has been done yet since 2017, and we really need this feature in skinning asap…
actually the spine rig is just more simplified, less useless bones (to me), and removed the bendy bones setting as well, and still working nicely i think so…
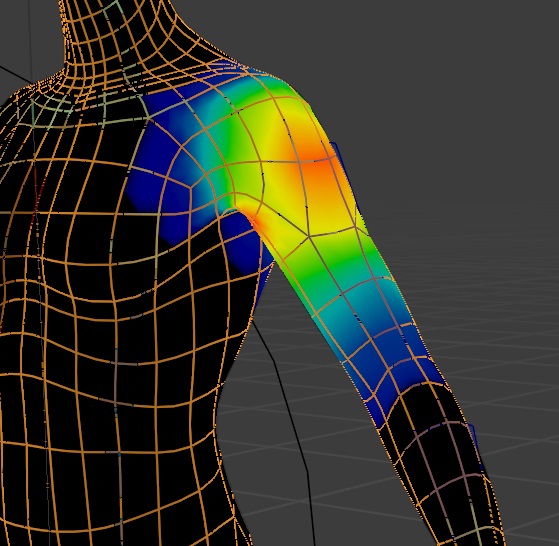
yep i guessed you did it with shape keys, but there is a popular method, that i learnt lately about that https://www.youtube.com/watch?v=gz7hsjcW1Xc i think this method is enough mixing linear blending and quaternion…i have seen lately that when editing a model with weighted groups and then when add shape key for correction sometimes it gets broken or harder to edit, like if it was a dependency loop, like this for example:
when i move the bone i notice some jagged edges because is not working properly when using a assigned vertex group in those same vertices…
but though the smooth corrective modifier (aka delta mush) is a little god sent feature for fixing this LOL…
and another good thing about it is that also preserves the shape of the original model vertices position, so it only tries to fix the bad propagation of the vertices, and then perfectly smooth the mesh without actually smoothing it like what happens with the normal smooth modifier
still i dont get your setup, the big bone in between is for what for copying the rotation to of the fk bones or has something to do with the ik? then how did you setup the pole, as normally we do for the arms? but then the fingers will rotate in the y axis because of the pole (and we dont want that) but what then if we want to tweak or lock the ik limits? (for the an ik chain the limits or locking should be added in to the ik limits properties, instead of the transform properties and/or limit rotation constraint) how we can avoid the limitation blender has, what hack can be done? i guess your bones have to be locked in the obvious axis they dont rotate (e.g y and z or y and x axis depending the bone roll)
https://twitter.com/cjones3D/status/1174957846812741632?s=20
oh this looks so thicc, i want to have those shoulders deformations in my rigs!
3 Likes