Looking forward to seeing the releases of the textures. Wonderful work!!!
3 Likes
I am really amazed at all this work and community. I love how everyone is giving tips and advice to make @ChrisJones project amazing. @ChrisJones I wish you luck and success on this project; it is looking fantastic so far and keep up the great work! I don’t know if I could help you in any way to achieve your goal but I am happy to be able to see your progress on this project!
6 Likes
I just re-discovered this while someone asked something about eyes… I can’t believe that i didn’t followed this thread the last… (what was it?) few month since i saw this first (still to high level for me) … i’m an idiot and have to like several of this yet… so @ChrisJones : don’t wonder about a tsunami of  's…
's…
Edit: I give up and just followed you 
3 Likes
My Jaw is on the floor. Excellent job!
I had a question about something you tackled a long time ago. You mentioned you used bones to drive multiple shape keys, gave those bones an animation, and then used another bone to drive the animation of the shape key bones. Now I’m not sure how to word my question, or if I even understand the technique properly, but doesn’t that like… still play the animation? How do you “animate the animation” without the original animation playing?
For example, when you animate the “shape key bones” of an eye blinking, its now keyframed in the timeline, doesn’t it play that animation before you can animate it manually? I don’t really understand how that works.
Looking forward to seeing more of your work! Keep it up.
1 Like
Thanks @robouden, @BB23Dart @Okidoki & @Oliver_Flatt (and anyone I missed).
I think you’re referring to this (which I later replaced with something simpler). It uses an Action, which is essentially a separate timeline, and you can animate that timeline. Think of recording a video of someone blinking once, and then recording a video of that video while you scrub the playhead back and forth to make them blink how you want.
I’m still using Actions for the quick posing controls on the fingers.
4 Likes
Bro, this is gold. I’ve learned more about blender reading through this entire project of yours than I’ve learned in a decade. Thank you for sharing your techniques!
1 Like
I’m replying to an older comment, but, does the rig automatically drive the shapekeys and tension maps based upon their position, or do they have to be keyed in tandem?
1 Like
The rig drives them.
4 Likes
Hey chris, do you think you can at least put on sale the textures you used for the video ? people would love to use them for projects as they are ready now, even if the whole thing doesn’t work perfectly, i think a lot of people are just waiting for the textures for now ?
4 Likes
That’s all I’ve been trying to do. The main holdup is the product pages and documentation are in a state of flux, because I (still) haven’t settled on the best way to separate/bundle the textures, shaders, wrinkle maps, wrinkle nodes and such, and pricing for each. Once that’s locked in the ramifications will be ongoing, and there’s no backpedalling if I get it wrong.
It’s a complicated beast. 
5 Likes
Hey Chris! I really admire the work you’re doing, and I think that it will leave a lasting mark on the CG community. Really hyped for the release of the textures, etc.! Also, I seem to remember somewhere (found it) you mentioned that hair was next on the priorities. Sounds Exciting! I do however have a suggestion:
I am a single artist who uses blender as a hobby. I would be happy to invest in your models, rigs, and textures to bring some life to my personal projects, but I’m not sure I’m comfortable spending hundreds of dollars on any digital assets, regardless of the quality. Now, I know that you have poured countless hours into this project, so I think it would be absurd to ask you to lower the price: You’ve definitely earned it. What I suggest you do is make a few tutorial videos on how best to use your assets. Some examples of things you might want to share:
- How to make the model look like a real person (i.e. from a photograph or perhaps a 3D scan)
- How to animate the model using motion capture.
- How to animate the model with speech.
- A few small projects using the the model, just so we can get an idea of ease of use and possible use cases, without having to buy the model first.
The most important thing that I think is weighing down my confidence is animation; A convincing character is only as convincing as it’s motions and expressions. Don’t get me wrong, I’m not criticizing your character rig; the rig you made is ridiculously intuitive, and utterly genius, I’ve never seen anything quite that effective. But in your showcase videos you make it seem so easy to bring the character to life, and we never see how you actually do that. It may be just as easy as it looks, but the showcases make such a big deal about it that without knowing the process behind it, the first assumption is that it’s much harder than it looks. If you were to share some tutorials on creating a convincing character animation, I think that many people will be much more confident in their ability to use your model, and I think you could get much more sales and general awareness of the project because of that.
Keep in mind that while I believe I am speaking for what others will want, this is ultimately just my opinion. And if you don’t agree with it, I can’t really make you do anything. But just know that the day you decide to make a few tutorials on how you animate your rig, that is the day I take out my checkbook. But until then, I will watch the project with a close eye.
Thanks for your time!
P.S. I just watched your String Theory music video for the 5th time, and I can confirm that it is literally the best video on the entire internet. Also I would pay folding money for a 3D VR version of it. Just sayin’
EDIT: Oh, I almost forgot, I wanted to ask you if the model includes muscle/skeletal system deformation, and if not, what tools would you recommend I use to incorporate that? In my mind that is a very important part of a realistic human character. Thanks again!
3 Likes
Thanks for the complements. ![]() Now, where to start…
Now, where to start…
Tutorial requests come up quite a lot. The problem with making tutorials though is that they take even longer to make than it takes to make the thing you’re making the tutorial about - and making a human takes longer than just about anything I can think of (and that’s before factoring in my camera/microphone phobia, which means I have to make tutorials the s-l-o-w way).
That being said, I do at some point intend to make some form of workflow tutorial(s), but I’m waiting for the right moment, which generally revolves around the timing of a PC upgrade (because I don’t think I could demonstrate it effectively on the system I’m using now).
So that’s tutorials!
Now to address some other specific points:
I might have to revise that… I forgot I haven’t textured the tongue yet, and I need to rework the teeth and polish the eyeballs - then I might get to the hair.
You can sort of get the gist of that process from this post:
I’m yet to do either of those things myself ![]()
If by that you mean demo .blend files, I don’t know how I could do that without giving away the model itself. If there were some way to time limit the file that would probably be ideal.
I might have some bad news there…
I originally wanted it to be stereoscopic, but sadly that plan fell through when I realised it was going to add another whole year of rendering…
Not as yet, but I did do some preliminary tests:
Anyway, hope I covered everything!
5 Likes
Nice, Thanks so much! I see now there was a little miscommunication on my part around the bullet suggestions, My intention was that each bullet would represent a different demo video(s) or tutorial(s). I understand that you can’t make a demo blend file (would be nice tho)
Thanks for the helpful links and comprehensive answers! I look forward to seeing more from this project in the future!
Also, slight side note: I’m a game developer with a focus in 3D graphics and digital rendering, and I plan to get much more involved in the blender community going forward, possibly even steer my career in that direction. If you’re open to expand the project down the road, I would be honored to help you design a nice comprehensive and intuitive addon, (paid of course) to make your amazing hard work even faster to use, as well as accessible to less experienced users. Also, blender has uncovered a personal passion for parametric and procedural rendering, (as with geometry and shader nodes) and your showcase videos have filled me with more inspiration and admiration than I have had in a long while. So, in the far future, I am considering a project to develop procedural/parametric versions of your models, and in that case I would want you to be a part of it.
With that in mind, I hope that our relationship continues to grow! (and my wallet bc i really want those models lol)
Thanks again!
Oh, and I almost forgot, for most of my side projects I use an alias, so you might start seeing me comment as “Dr. Rubisco”
Here’s a link to my page:
2 Likes
Oh, and i forgot, there was other stuff I wanted to say/ask
- Do you plan to texture and/or wrinkle map the body at some point?
- Will you release the tiny skin hairs you used in Colour? (or at least a method to generate them)
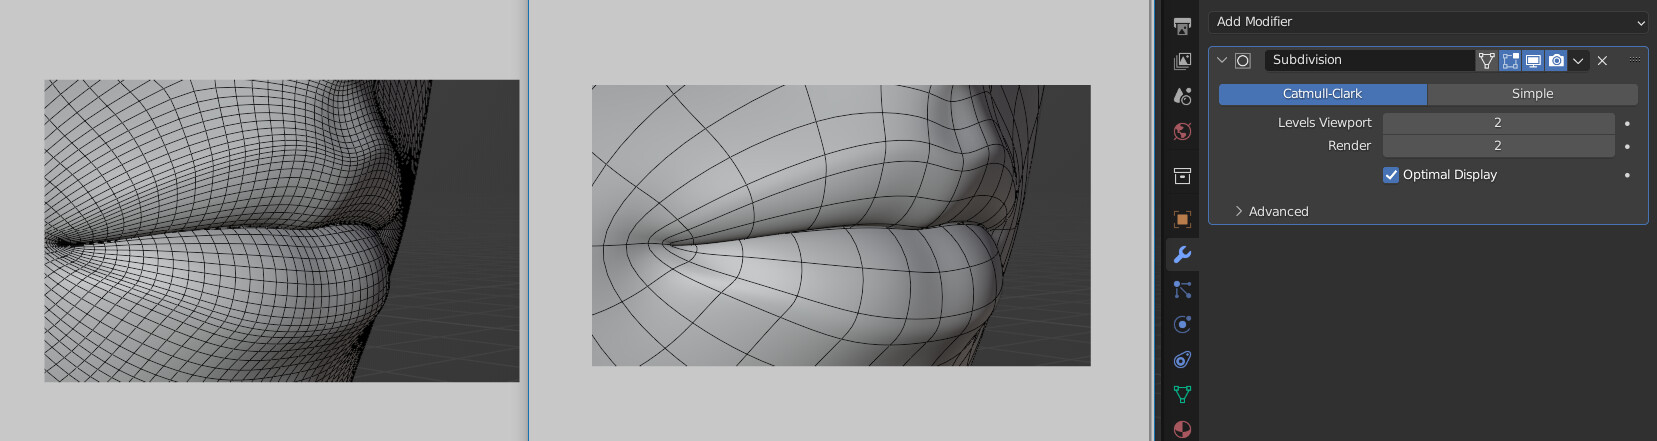
- Side note: i just realized that the mesh grid that you overlay on all of your renders is the actual geometry before subdivision! That’s some pretty efficient mesh design! I assume you used Beziér patches or something similar. Or maybe you just subdivided and somehow made the wireframe curvy. Idk how blender does that stuff. Still pretty wicked tho.
- Will the skin color be picked from pre-textured color values / shader materials or is it just a color input, or something else? Also can it be edited fancy in nodes (I assume you used nodes to do the fancy orange skin at the end of the showcase)
Also, I really like the color showcase from an artistic standpoint, but the strength of the idle animation kinda tapered off just as the full face came into frame, which kinda took away from the liveliness at the end. (which is good because the focus at that point was on the color) Also, the way the color varied in patches kinda made it hard to lock onto the face as a whole. Maybe, If you do another render with the tounge and teeth, better eyes, etc., you can choose a single skin color (maybe a caramelly color so everybody’s happy) so that way it is easier to focus on the features of the face. Also, I would really like to see a dynamic expression showcase like Flexpressions, but with everything together, and a bit more personality like the idle animation. (minus the hair ofc) Maybe you could even add some basic ambient vocal or breathing sfx, although I know those are often hard to get right.
Now, I know that these renders take ages for you, so If you post one last video like i described, then I will render it on my machine. AND before you say anything reactive, I have secured some funds to buy your assets if you deem it necessary, and I am also willing to sign an NDA or pretty much whatever you want me to. I can likely render a short animation within a week, based on what i’ve read of your previous render times and hardware, but of course that is just a rough estimate. I can provide full hardware specifications if you want them. Alternatively, I could donate the funds for you to render the animation in a render farm, I know a very good render farm that is cheap enough that you might even get two animations out of it, and much faster than you would on my machine.
To be honest, I know how forward this sounds, but your videos have really inspired me to contribute in any way possible. Please don’t take it the wrong way. I just want to be a part of this incredible project, especially knowing that you have done all of this by your self on minimal hardware. I just want to help out.
Let me know what you think!
P.S. Sorry for the giant brain dump on your public feed, I am just now realizing how this looks in that context. Part of this is just because my head is a little disorganized since I didn’t get any sleep last night (side effects of extreme inspiration and a liter of sweet tea) Hope you can understand 
2 Likes
Subdividing makes the wireframe smooth automatically:

(This is with my own model, if that’s not obvious)
2 Likes
(Continuing from alias account)
Hmm. It does this without having to apply the subsurf modifier?
In hindsight, this actually makes the most sense, considering how the object outline also smoothes when using a subsurf Thanks for clearing that up!
Slight side note: Would you mind if I stole the idea and the name of your string theory music video, but made original music and graphics? The combination of theoretical particle physics, audio analysis & visualization, and procedural 3D Rendering has so much overlap with my interests that I would never forgive myself for passing up such a great opportunity to express myself. I would of course credit you for inspiration. Please?
Also, I wanted to point out that I love the analogs to actual theoretical physics, from the nice string visualizations at the title scene to the particle collider epicness to the black hole/wormhole/fuzzball thing at the end. Absolutely magnificent.
P.S. Was that other majestic thing a volcano? Volcano was my first impression, and I didn’t really see how it fit, but it was cool nonetheless, and I couldn’t really visualize it as anything else.
Yes and no, but mostly yes. The actual model is still blocky unless you apply the modifier, the modifier is just making it appear smoother/subdivided. The wireframe is overlayed over the surface of the mesh, so it displays where the edges where they are now with the modifier enabled, instead of maintaining their blocky form which would require them to display out side the meshes surface.
Most of the modifiers change the geometry of the model surfaces in some way way when enabled (in a “temporary” reversible way), so if the wireframe is enabled, you typically see the wires for the geometry as it would be with the modifier applied.
If you’re thinking “but subdivision increases the polycount - shouldn’t the geometry be denser?” You’re right. That used to be the default setting if I remember correctly, but there’s a box called “Optimal Display”, and if checked (the current default setting) it only displays the edges that exist on the current geometry but in their location with subdivision enabled. The other edges remain invisible.
2 Likes
Neat! I never new that the subsurf had an optimal display setting. Thanks for the tip! 
@ChrisJones Something that I nearly completely forgot i wanted to ask:
Colour and Flexpressions use your “Perfect Face” model from this video, right? not really important but i always wondered what that model would look like rendered out. It didn’t occur to me at first that your most recent vids might be exactly that.