Quad Remesher — an auto-retopologizer from the developer of ZBrush ZRemesher — is available for Blender, following 3ds Max, Maya and Modo.
Quad Remesher is available for each OS that runs Blender: Windows, macOS and Linux (since December 2020).
![]() This thread was initiated several months before Quad Remesher was released for Blender, so only later posts were written after the release, starting with this post.
This thread was initiated several months before Quad Remesher was released for Blender, so only later posts were written after the release, starting with this post.
———————
![]() About the author of Quad Remesher (@Max33)
About the author of Quad Remesher (@Max33)
Maxime Rouca is the developer of Quad Remesher. He has worked for Pixologic, developing ZRemesher, UV Master and Decimation Master for ZBrush. He has posted a few times in this thread, but as Quad Remesher is available for multiple 3D editors (3ds Max, Maya, Modo, Blender, Houdini and Cinema 4D), Maxime needs to divide his time between multiple communities, and spend the rest of his time on further development.
———————
![]() About the author of this thread (@Metin_Seven)
About the author of this thread (@Metin_Seven)
I’ve been a fan of the impressive ZRemesher auto-retopologizer ever since I bought ZBrush 4R7 in early 2015, and it’s always been one of the few remaining tools that forced me to go back and forth between Blender and ZBrush. So when the news arrived that ZRemesher was available as a stand-alone tool called Quad Remesher I was very excited, and contacted Maxime to ask for a Blender version. He was interested, and once he had started development I became a beta-tester of the Blender version.
That’s why I know relatively much about it, and love to help as many Blender users as possible to discover this very useful, workflow-easing tool. No strings attached, no hidden agenda, just good old-fashioned enthusiasm. ![]()
● ● ● ● ● ● ● ● ● ● ● ● ● ● ● ● ● ● ● ● ● ● ●
![]() Quad Remesher FAQ (unofficial, by @Metin_Seven)
Quad Remesher FAQ (unofficial, by @Metin_Seven)
Q: What’s the added value of Quad Remesher compared to the Voxel remesher and Quadriflow remesher in Blender 2.81 and up?
A: Quad Remesher is not an ordinary remesher that projects faces onto a surface, but a cutting-edge auto-retopologizer with smart placement of edge loops and singularities, resulting in a mesh that is suitable for smooth subdivision without artifacts, proper UV mapping, easy rigging, and forms an optimal quad-poly base mesh for Multiresolution sculpting.
Just download the trial version and compare the results to other remeshers.
———————
Q: Will Quad Remesher also do a good job on a mesh that has a messy triangular topology?
A: Quad Remesher works on every kind of mesh topology. It looks at surface characteristics like concavity, convexity and branching, then strategically places edge loops and (as few as possible) singularities. In fact, I’ve found that a triangular source mesh topology often gives slightly better results.
———————
Q: I’ve bought Quad Remesher and encountered a problem after installing (e.g. something regarding license activation). What should I do?
A: For technical support it’s best to contact the Quad Remesher developer directly.
———————
Q: I’m getting a Blender error when I try to use Quad Remesher. How can I solve this?
A: Check the error message. If “FBX” is present in the error message, you might have deactivated Blender’s FBX Import / Export add-on, which is used by Quad Remesher for mesh data transfer to and from its auto-retopology engine.
If that isn’t the error cause, it’s best to contact the Quad Remesher developer and describe the issue.
———————
Q: The site’s link to the Blender Quad Remesher add-on downloads a small zip file with just a Python script, instead of a full Quad Remesher installer.
A: Once installed in Blender, the python script will automatically download and install the Quad Remesher module when you first try to retopologize something.
———————
Q: Why is my UV mapping not preserved?
A: This is a limitation of the current version, but UV preservation will be added in a future update.
In the meantime, if you keep the Quad Remesher Quad Count as low as possible, the resulting mesh should be easily UV mappable. You can also try Blender’s Data Transfer modifier to project the UVs from the source mesh to the Quad-Remeshed mesh.
———————
Q: Can I use Quad Remesher on scanned meshes?
A: Quad Remesher can work fine on scans, but I’d advise to first use Blender’s native Voxel Remesh tool to make the mesh manifold if necessary. Then, depending on the amount of polygon detail, I’d recommend applying a Decimate modifier to reduce the amount of triangles before running Quad Remesher.
Also, any vertex colors that might be present in the scan will be lost, but you could try using Blender’s Data Transfer modifier to transfer the vertex colors from the original scanned mesh to a subdivided Quad Remesher result.
———————
Q: There’s a Face Maps 2 Materials operator that converts facemaps to material slots, but there’s no way to just use the Face Maps directly. How come?
A: The reason for this is: Quad Remesher uses the FBX format to transfer mesh data, and FBX doesn’t yet support Face Maps. Solving this would require a rewrite of Quad Remesher, or Face Maps support in an update of the FBX format. Hence the converter is added as a bonus option for those who have already assigned Face Maps to a mesh.
———————
Q: The polygon count of the remeshed result doesn’t equal the entered Quad Count value.
A: Uncheck the Adaptive Quad Count option. That should result in a quad polygon amount that better matches your input value (although it can still differ a bit, because the algorithm needs a little flexibility for a proper solution).
● ● ● ● ● ● ● ● ● ● ● ● ● ● ● ● ● ● ● ● ● ● ●
![]() Quad Remesher tips ‘n’ tricks
Quad Remesher tips ‘n’ tricks
People who are not familiar with ZBrush ZRemesher tend to increase the polygon count a lot, figuring there should be enough polygons to capture all the details, but I advise the common ZBrush ZRemesher workflow for QuadRemesher in Blender:
- Apply Quad Remesher using a relatively low poly count (the average value of 5000 is often OK). The source mesh will be automatically copied and hidden.
- Add a Multiresolution modifier.
- Add a Shrinkwrap modifier and assign the auto-hidden source mesh to it.
- Set the Shrinkwrap modifier’s Wrap Method to Target Normal Project or Project with both Negative and Positive checked.
- Press the Multires Subdivide button as many times as you need.
- Apply the Shrinkwrap modifier if you want to edit the subdivided, detailed mesh.
- In the Multiresolution modifier, press Shape ➔ Apply Base to project the detailed mesh shape to the base mesh.
- If you want to work on the mesh, lower the Sculpt subdivision levels if you want to perform more global adjustments to the mesh, like smoothing large areas.
This workflow is actually even better than ZBrush Project All, because it’s non-destructive. If you make a change to the source mesh, it will automatically be reprojected to the QuadRemeshed + subdivided mesh.
———————
There’s no tool yet in the current version to indicate a custom edge flow, like the ZRemesher Guide brush in ZBrush, but there are several ways to guide Quad Remesher in determining the new topology:
Activate the ‘Detect Hard Edges by angle’ option to make Quad Remesher automatically recognize hard edges, and place edge loops across those edges. This is very useful when you’ve used Boolean operations to combine primitives with hard edges.
You can assign materials to a mesh to guide Quad Remesher’s edge loop placement. This is comparable to the Keep (poly)Groups option in ZBrush ZRemesher. It tells the Quad Remesher algorithm to place edge loops across the boundaries of the materials, and the rest of the topology will converge to those edge loops.
Your source mesh doesn’t always have proper topology to assign materials. In that case you can use Edit Mode’s Knife tool (K) in Cut Through mode (Z after K) to slice clean cuts through a mesh where you want edge loops, then assign materials.
Alternatively or additionally, you can assign normals to groups of faces to retain existing edge loops.
Last but not least, you can use vertex paint to assign more polygon detail to specific areas, such as a mouth, and less polygon detail in other areas, such as the back of a head.
———————
Try Triangulate + Beautify Faces to change the polygon structure into only triangles (no ngons) with a balanced structure. This makes the Quad Remesher algorithm more effective.
———————
The Detect Hard Edges By Angle option auto-assigns Sharp edges as a guide for the algorithm. Sometimes it’s better to deactivate the option, especially if you already make use of other options, like the Use Materials option.
———————
To use sharp edges, turn on Blender’s Object Data Properties ➔ Normals ➔ Auto Smooth, and set the angle to 180 so that non-sharp edges don’t get split. Instead of the hard edges option, use the Normals Splitting option in Quad Remesher. QR will then use the normal breaks that happen at sharp edges.
———————
The scale of your mesh can sometimes make a difference. You can try running Quad Remesher on a few different sizes of your mesh and see which one yields the best result. Don’t forget to apply the scale using Control + A in Object Mode.
———————
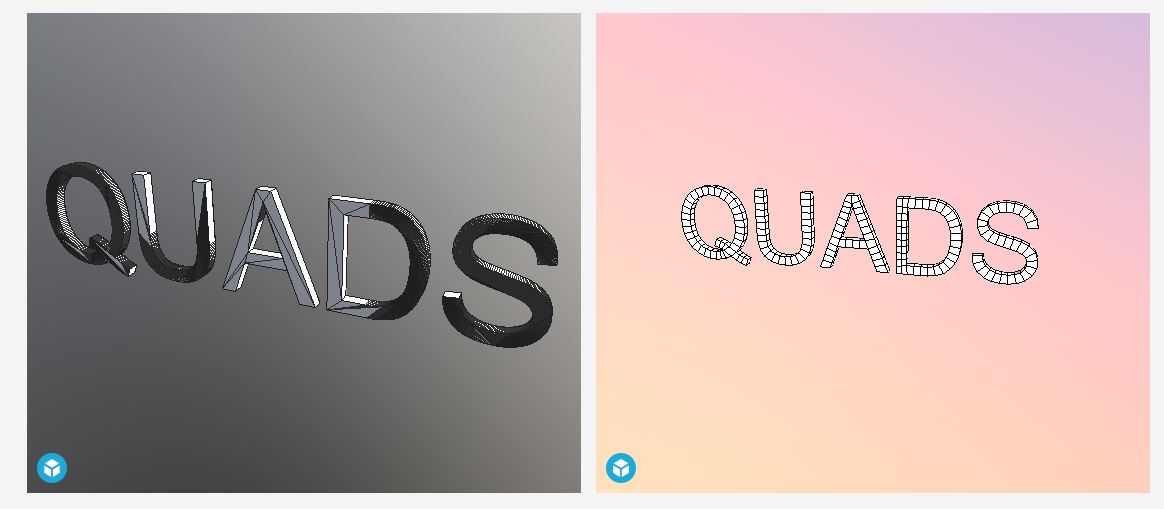
When using Quad Remesher on flat, 2D meshes, add a slight bevel to sharp corners to guide Quad Remesher in forming better edge loops.
A quick ‘n’ dirty example shape, Quad-Remeshed with a Quad Count of 1000:

———————
To avoid the edge loop spiraling that sometimes occurs, divide a mesh into a few key sections. You can use Edit Mode’s Knife tool (K key) in Cut Through mode (Z key when Knife mode is active). Then assign materials to each part and activate the Quad Remesher materials option, similar to ‘Keep (poly)Groups’ when using ZBrush ZRemesher.
The spiraling shouldn’t cause artifacts / issues when subdividing though.